Documentation Index
Fetch the complete documentation index at: https://anaconda.com/docs/llms.txt
Use this file to discover all available pages before exploring further.
What are CVEs?
CVEs are weaknesses in software that can be exploited to access sensitive information, such as credit card numbers or social security numbers. Because modern software is complex with its many layers, interdependencies, data inputs, and libraries, vulnerabilities tend to emerge over time. Knowing when and how the code you use is vulnerable to attacks is a powerful tool in allowing you to mitigate the potential for harm, and Anaconda provides you with everything you need to keep your pipeline secure.Why trust Anaconda?
Anaconda regularly pulls its CVE databases from the National Vulnerability Database (NVD) and the US National Institute of Standards and Technology (NIST) to minimize the risk of vulnerable software in our applications and web pages. Anaconda has an extensive and well-established process for curating CVEs, assessing whether or not Anaconda built are affected by any CVEs, determining which versions in our are affected, and mitigating the vulnerability.Understanding CVEs
Here’s what you need to know to make the right decisions regarding CVEs for your organization:Common Vulnerability Scoring System (CVSS)
Standards for determining the severity of a CVE have evolved over time. The Common Vulnerability Scoring System (CVSS) is a mathematical method dating back to 1999 that grades the characteristics of a vulnerability. CVSS 2 was developed and launched in 2007. It was later updated to CVSS 3 in 2015 to offer a more comprehensive scoring method that accurately reflects the severity of vulnerability in the real world.CVE scores
Software developers refer to CVE databases and scores to minimize the risk of using vulnerable components (packages and binaries) in their applications or web pages. CVE scores and ratings fall into one of 5 categories: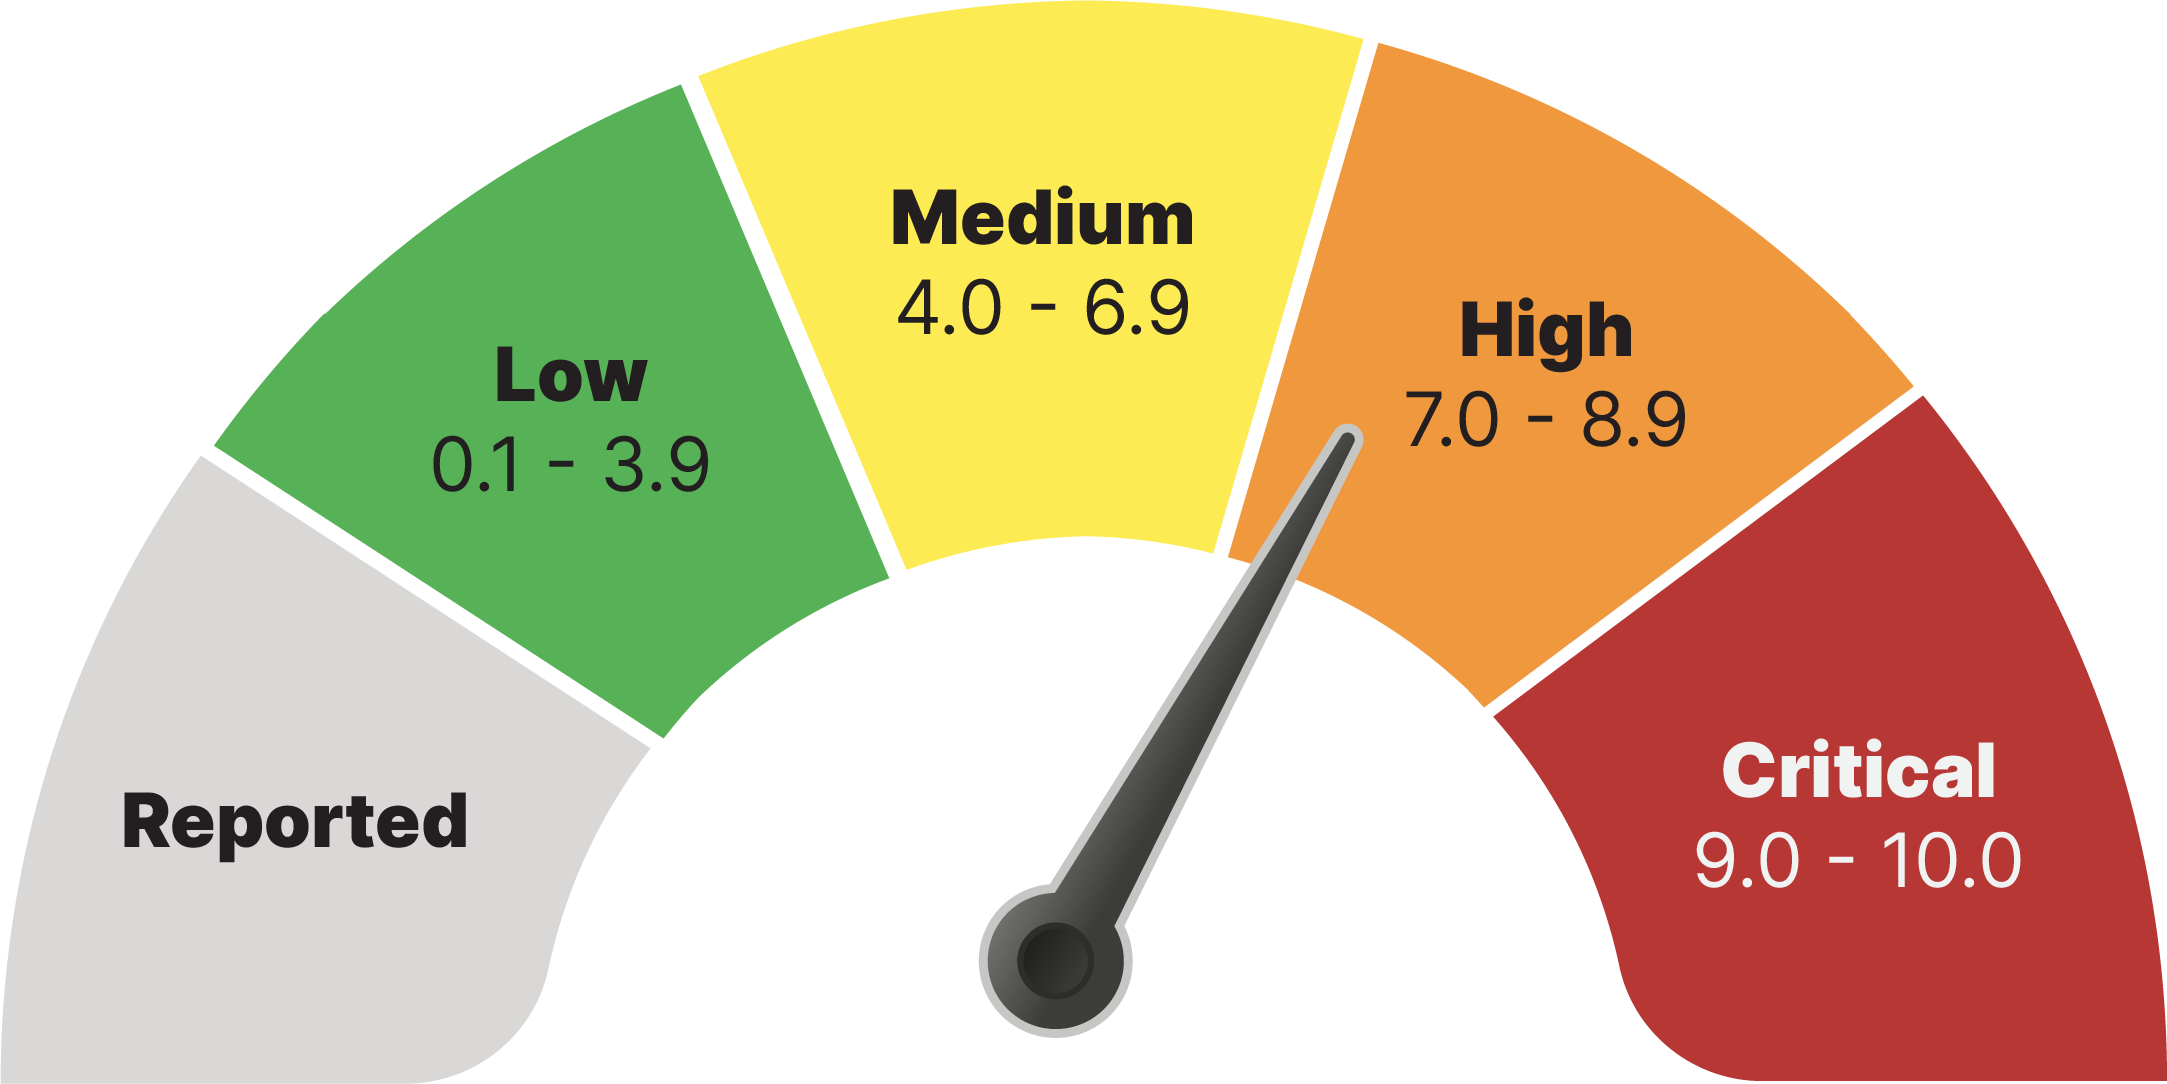
CVE statuses
CVEs are assigned a status category as a result of the Anaconda curation process. CVE status categories include:- Reported: The vulnerabilities identified in this package have been reported by NIST but not reviewed by the Anaconda team.
- Active: The vulnerabilities identified in this package are active and potentially exploitable.
- Cleared: The vulnerabilities identified in this package have been analyzed and determined not to be applicable.
- Mitigated: The vulnerabilities identified in this package have been proactively mitigated in this build through a code patch.
- Disputed: The vulnerabilities’ legitimacy is disputed by upstream package maintainers or other community members.
Viewing CVEs
- Not all CVEs present in a package apply to every file within that package.
- Files can be associated with multiple CVEs.
- Channel CVEs
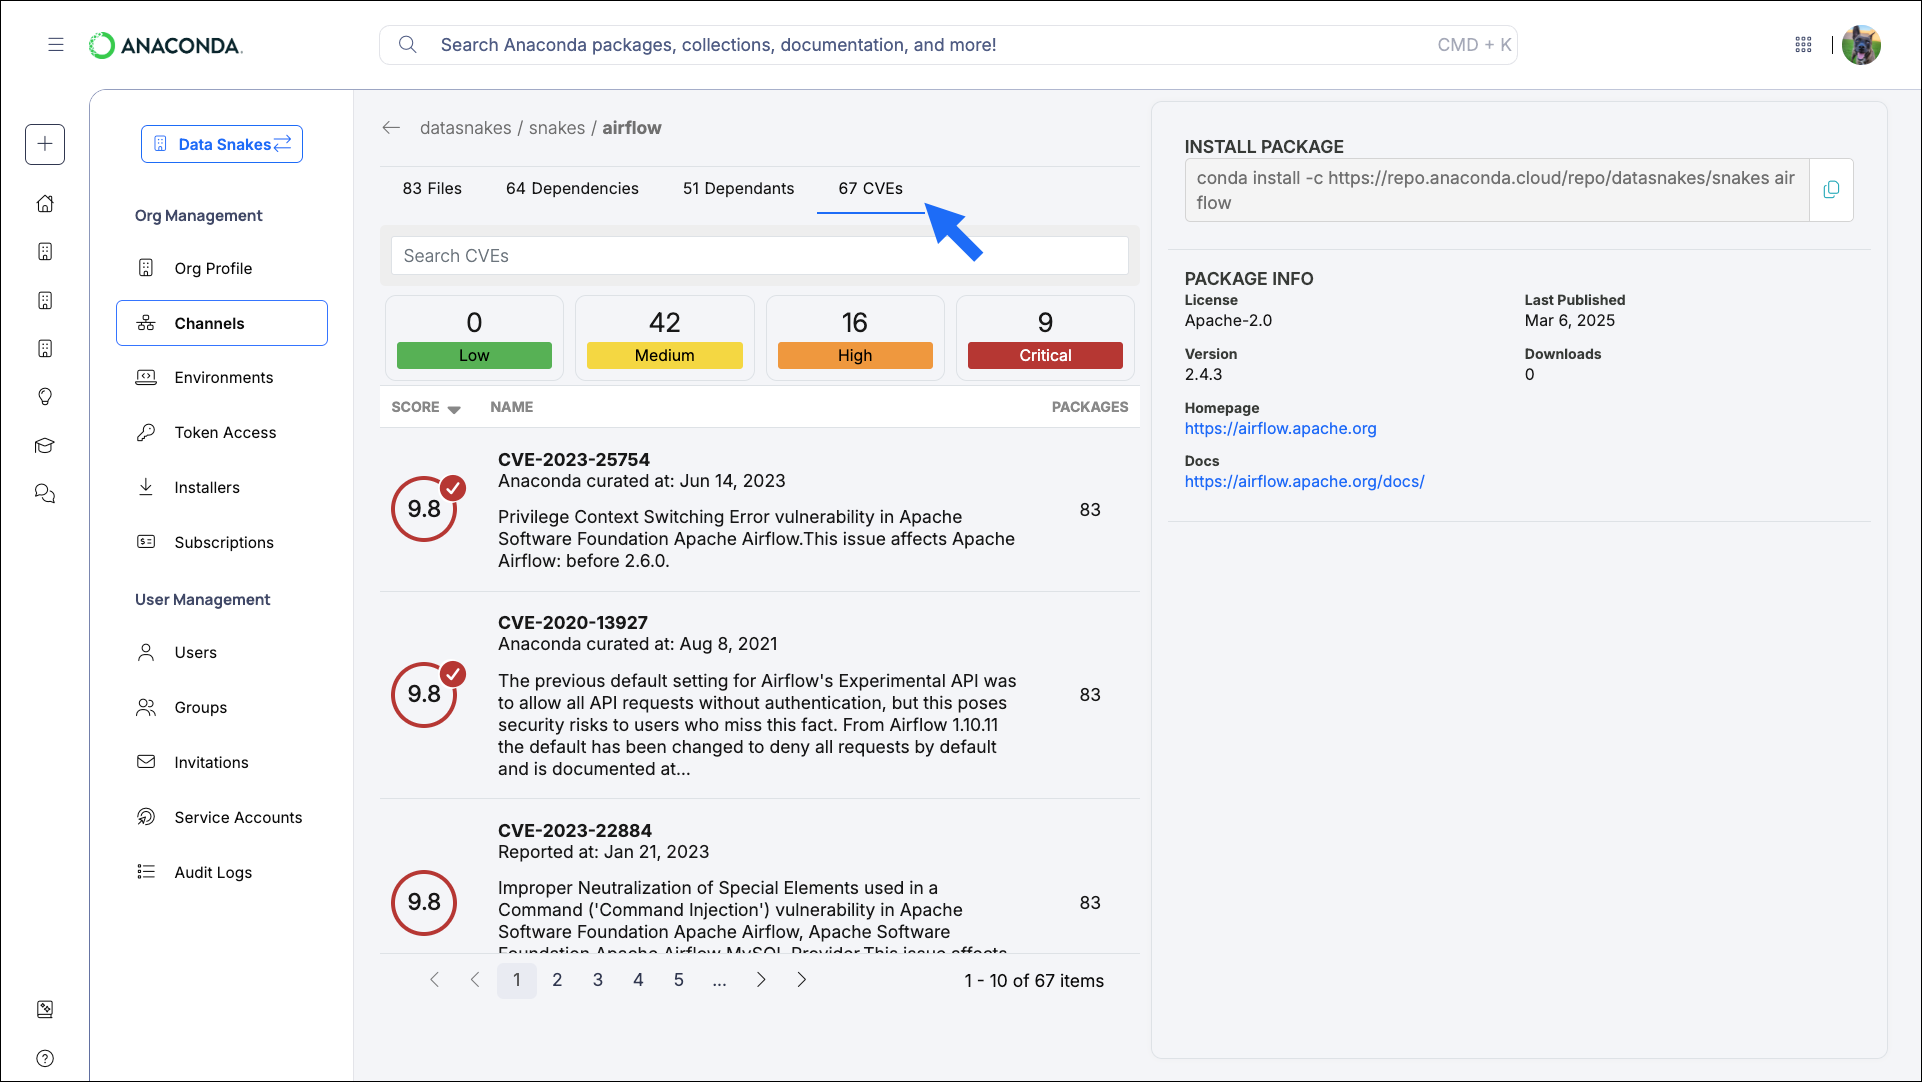
- Package CVEs
- File CVEs
- From the Channels page, select a channel to view its packages.
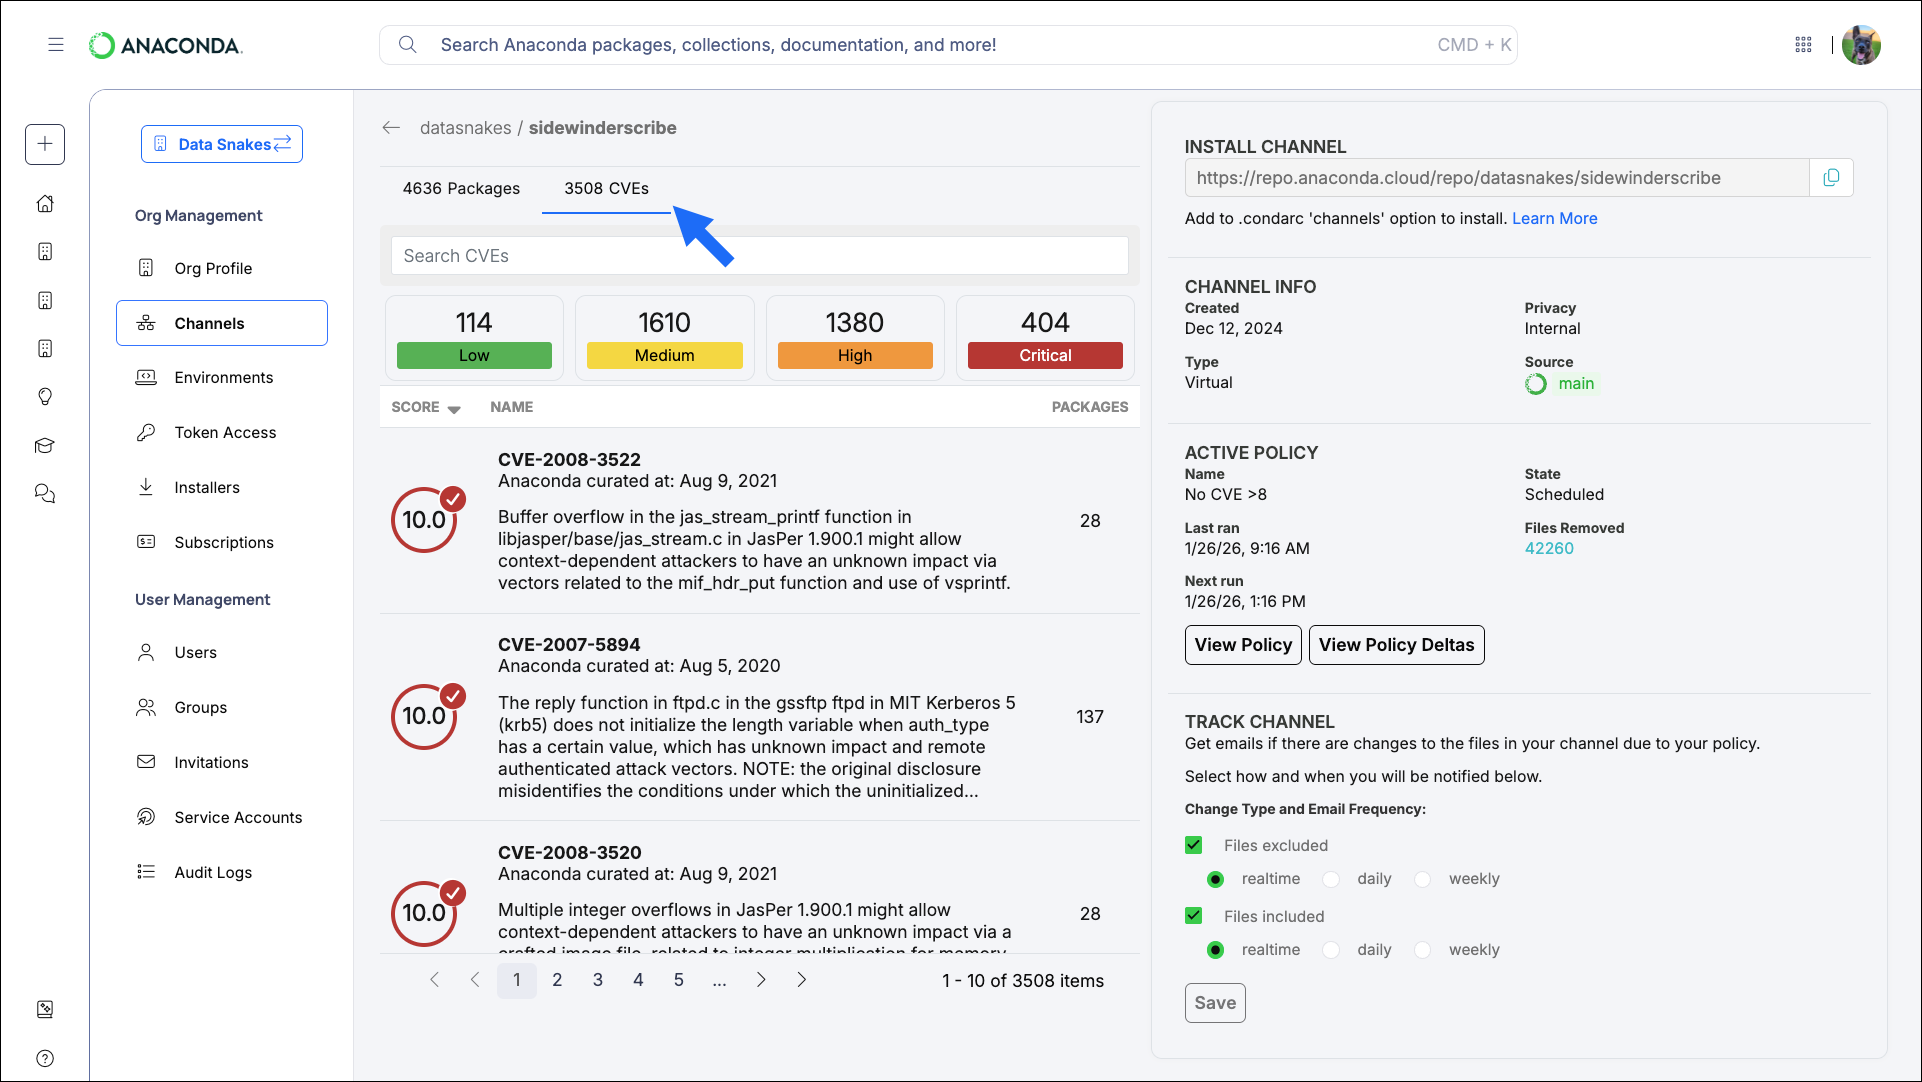
-
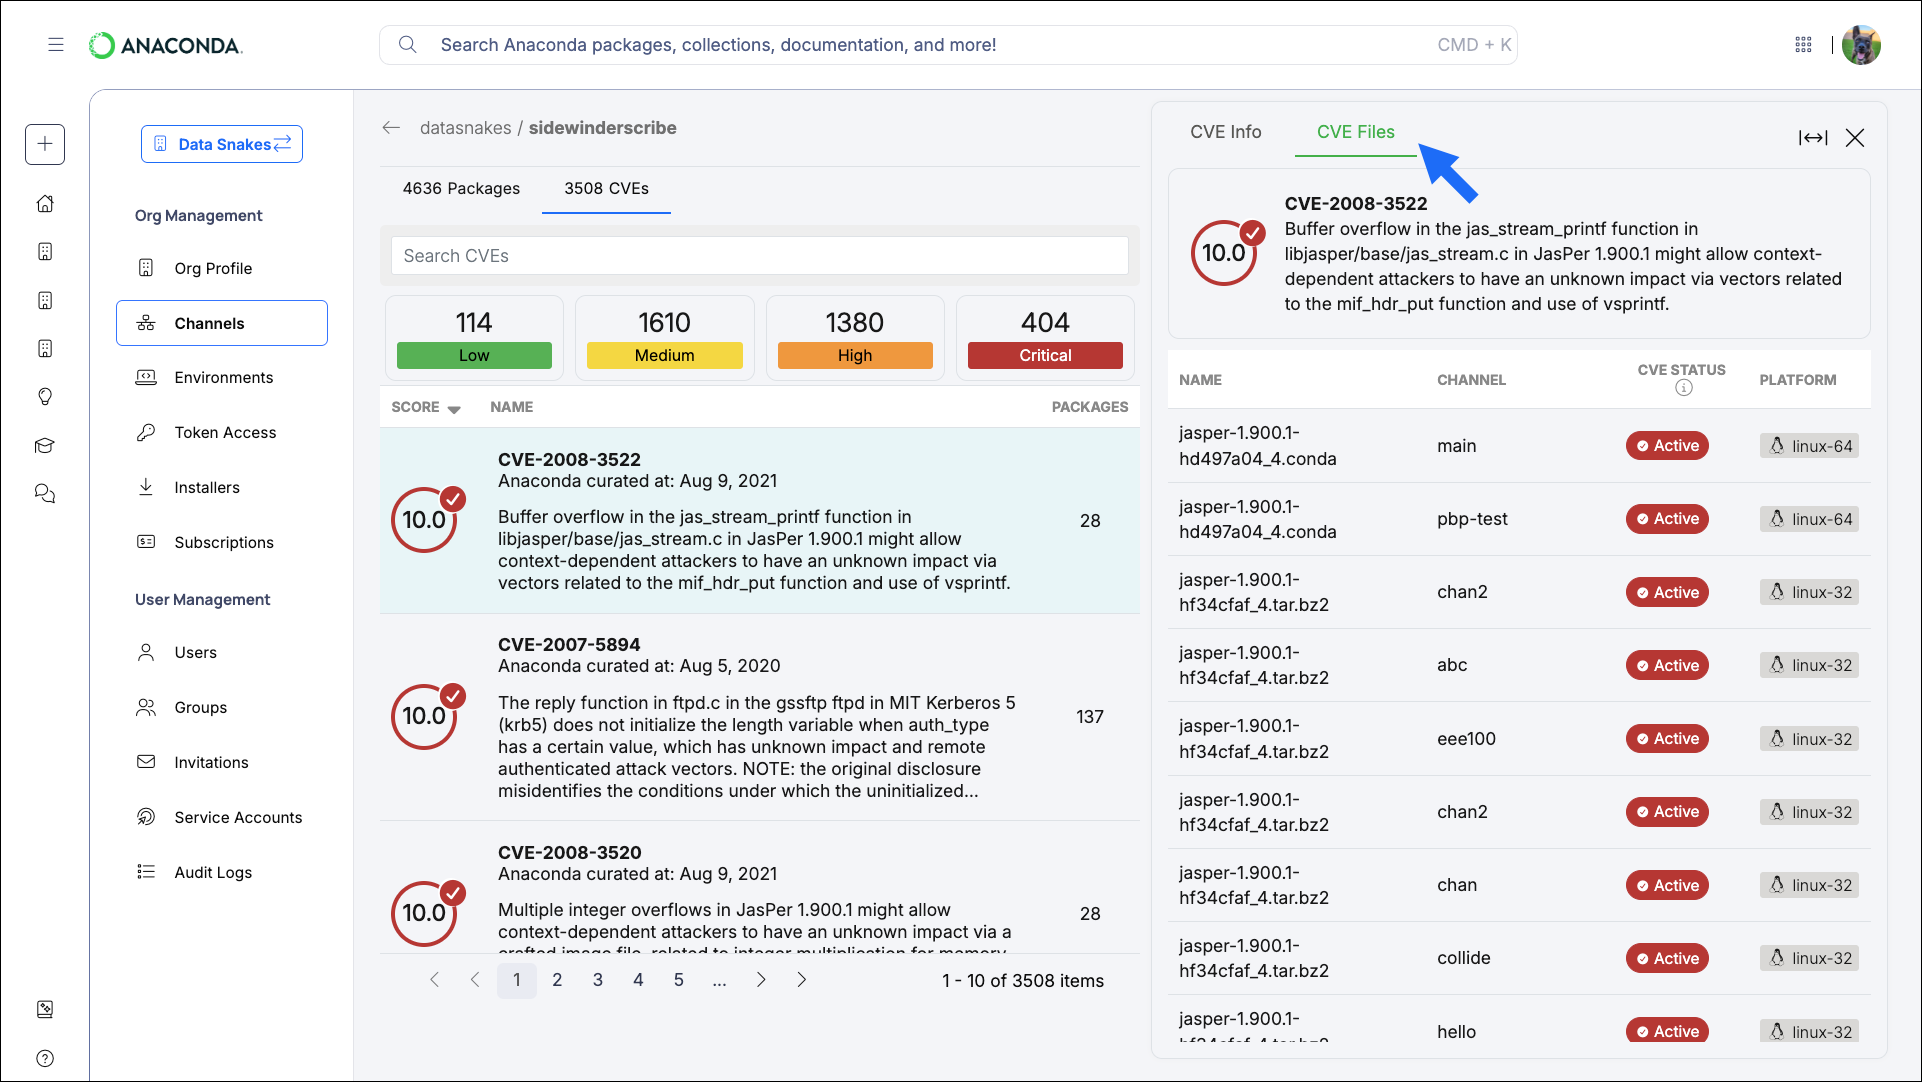
Select the CVEs tab to view a full list of CVEs present in the channel. A summary of how many CVEs are associated with packages in the channel and the CVEs’ severity levels are displayed at the top.

Viewing CVE information
Select a CVE from the Channel or Package CVEs lists to open the CVE Information panel. Here you can view a brief overview of the vulnerability with notes that were created during the Anaconda curation process, as well as its CVSS 2/CVSS 3 score metrics.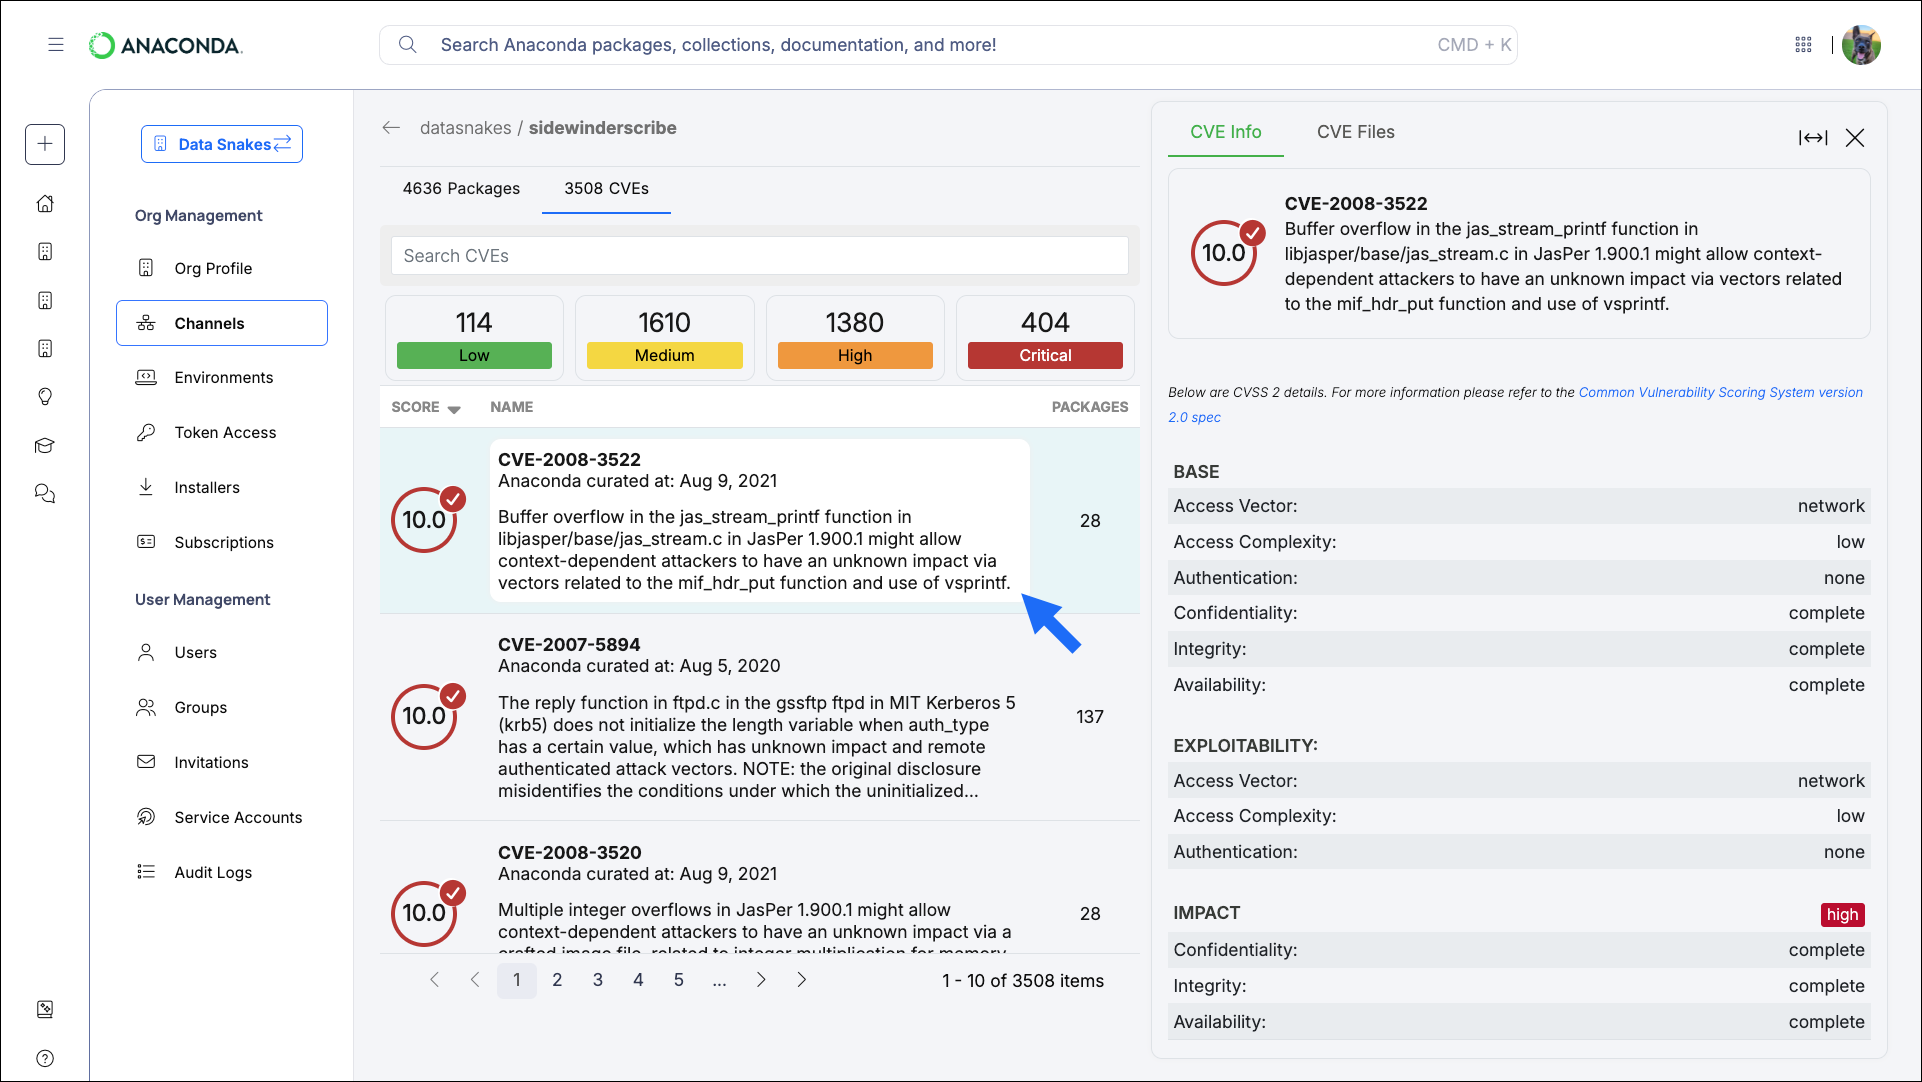
Dealing with CVEs
CVEs can pose security risks to your and your organization. Understanding how to identify and mitigate these vulnerabilities is essential for maintaining secure systems. Packages can be associated with more than one CVE, and CVEs can be associated with multiple different packages, meaning that over time, maintaining an environment can sometimes turn into navigating a maze of dependencies, vulnerabilities, and package conflicts.How can I tell if an environment is affected by a CVE?
How can I tell if an environment is affected by a CVE?
You can scan your local environments for CVEs using
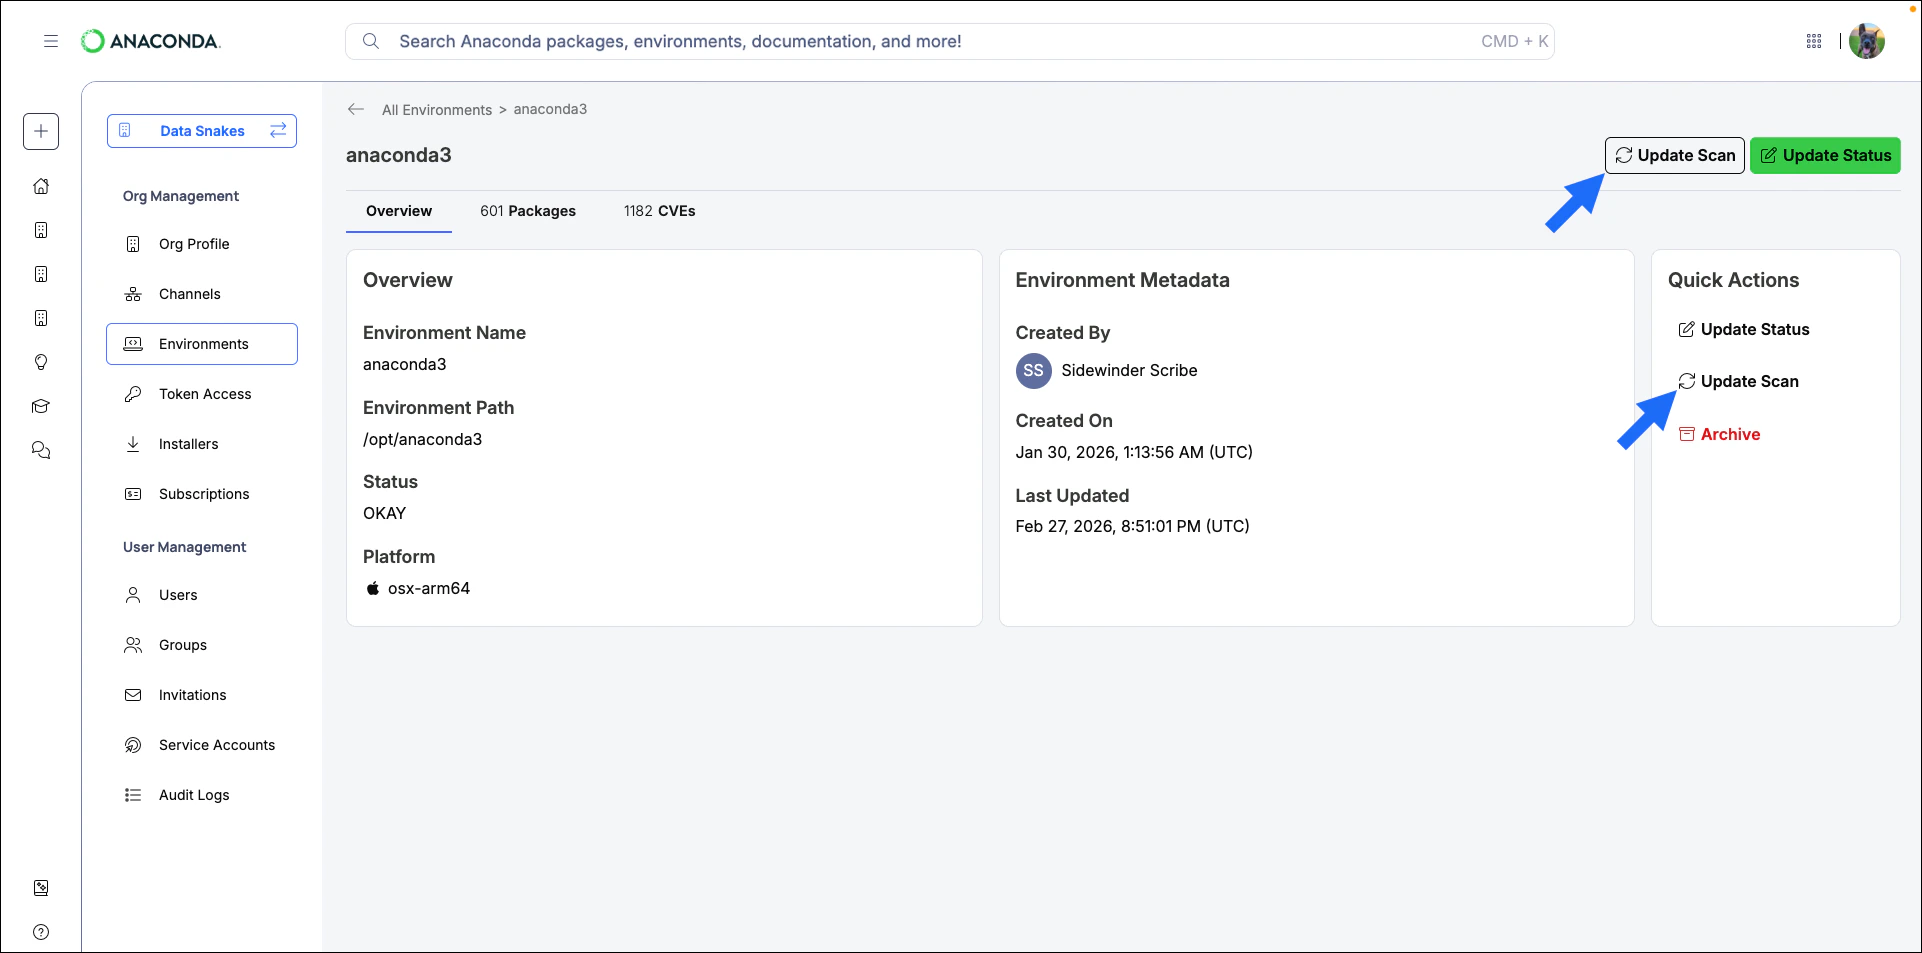
anaconda-audit. For more information on obtaining anaconda-audit, see Enabling environments.If you are an administrator, you can instruct your members to register their environments with your organization. Once registered, all newly created environments will be logged, scanned for CVEs, and displayed in Anaconda Platform. For more information on registering environments with your organization, see Enabling environments.- Scanning locally
- Scanning from your organization
Use To scan an environment for a specific CVE:The audit scan returns a list of environment packages, and displays the following information for each package: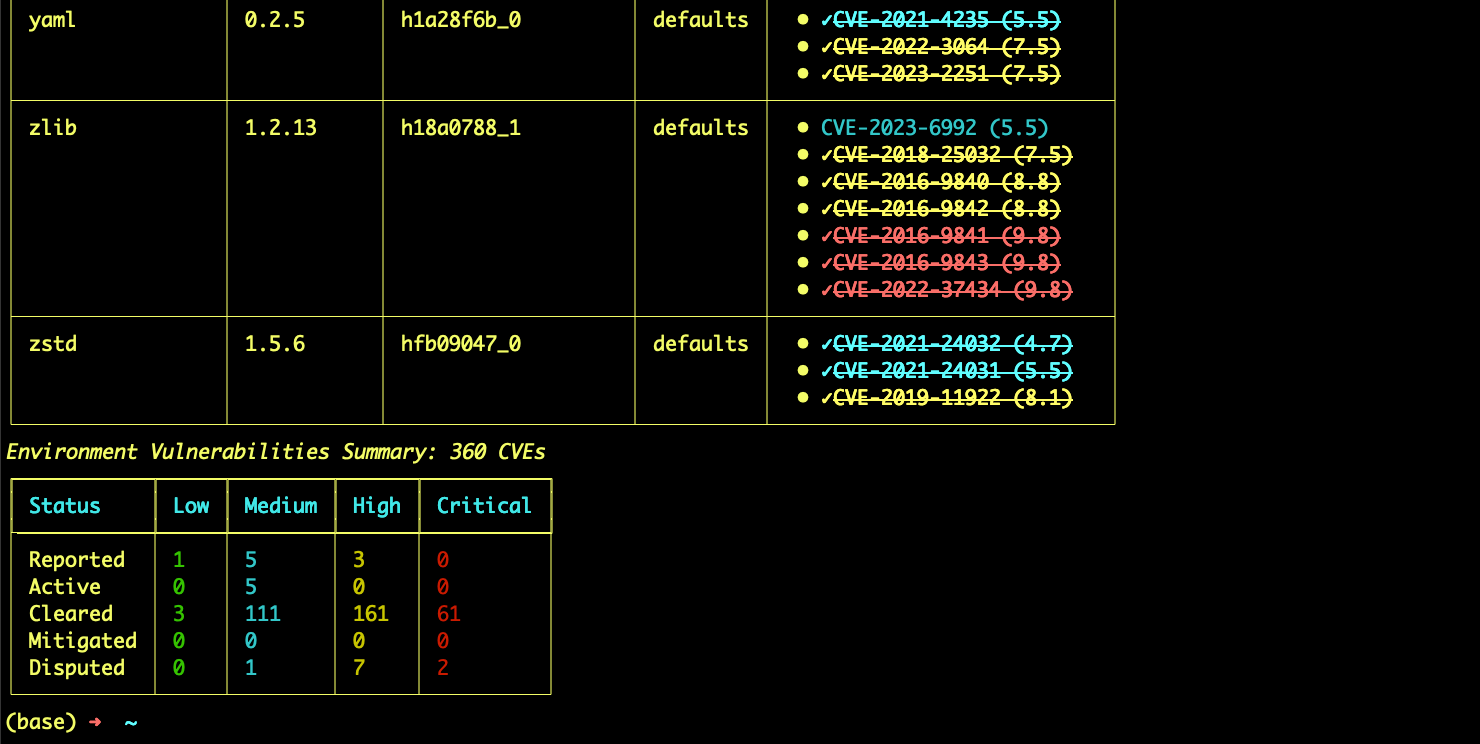
anaconda-audit to scan a local environment.To scan an environment, open Anaconda Prompt (Terminal on macOS/Linux) and run the following command:This command uses the default conda environment path prefix. If you have environments in non-default locations, you can use the
--prefix flag to specify the path to the environment. For example:- Windows
- macOS/Linux
Open Anaconda Prompt and run the following command:
- Version number
- Build number
- Source channel
- CVE curation status
- CVSS score
- CVE status
What actions can I take if I find a vulnerable package?
What actions can I take if I find a vulnerable package?
If you discover a package in your environment is associated with a CVE, you can:
- Upgrade the package: Update to a newer version that has fixed the vulnerability.
- Downgrade the package: If a previous version exists without the vulnerability, you can choose to downgrade. This may come with a loss of functionality, however. Exercise caution when downgrading packages.
- Remove the package: If the package is not critical to your workflow, you can remove it.
- Contact your administrator: If you’re unsure about the best course of action, consult your organization’s administrator.
Upgrading my package created a dependency conflict!
Upgrading my package created a dependency conflict!
Package dependency conflicts can occur when upgrading or downgrading a package to mitigate a vulnerability. For help managing dependency conflicts, see Managing solver errors.