403 error
Problem
A 403 error is a generic Forbidden error issued by a web server in the event the client is forbidden from accessing a resource. The 403 error you are receiving may look like the following:- The user has misconfigured their channels in their configuration (for example, the secure location where the is stored was accidentally deleted (most common))
- A firewall or other security device or system is preventing user access (second most common)
- We are blocking their access because of a potential terms of service violation (third most common)
Solution
-
First, run the following to undo your current configurations:
-
Next, install or upgrade the
conda-tokentool: -
Lastly, re-apply the token and configuration settings:
Conda: Channel is unavailable/missing or package itself is missing
Problem
Configuring your.condarc might cause you to be unable to install . You might receive an error message that the channel or package is unavailable or missing.
Solution
-
First, run the following to undo your current configurations:
-
Next, install or upgrade the
conda-tokentool: -
Lastly, re-apply the token and configuration settings:
SSL issues
If you experience any trouble regarding SSL errors, confirm that you are adhering to the guidance in this section.Moving CA certs to the docker-host
Anaconda recommends mounting thecacert.pem file to the docker-host and concatenating the required root CAs
to that file on the docker-host, rather than copying the file to the containers.
-
First, place a
cacert.pemfile in${BASE_INSTALL_DIR}/config/cacert.pem. You can obtain this file from any conda environment withcertifipackage installed ($<CONDA_PREFIX>/ssl/cacert.pem) or from one of the Package Security Manager docker containers: -
Concatenate the necessary root certs in pem format:
-
You now have two options for updating the Package Security Manager application to use the docker-host
cacert.pem:-
Edit the
docker-compose.ymlfile and add volume mounts tonginx_proxy,repo_api,repo_workerandrepo_dispatcher, or -
Use a separate .yml file (shown below) and let docker-compose merge it with the stock one when starting up:
-
Edit the
Storing user credentials
If the proxy connection requires credentials, Anaconda recommends storing the credentials in the .env file (located in the same folder as thedocker-compose.yml file) and referencing it in docker_compose.yml
so that docker-compose.yml is readable for a broader set of users.
When Package Security Manager is installed, an .env file is created alongside the docker-compose.yml file by default. You can
edit this file and add variables to be referenced in the docker-compose.yml file as follows:
docker-compose.yml file.
Notice the environment variable from .env being referenced in the environment variables:
Local mirrors
Another option is locally. You can do this by getting packages into an admin-managed channel—say,anaconda/main—and then mirroring filtered packages from that channel to other channels.
This will make Package Security Manager the source for the mirror. As such, Package Security Manager needs to be able to validate its own certificate, which in most cases won’t work (in very much the same way PROXY with terminating SSL will not work).
For this to work, then, you will most likely need to update the cacert.pem file of all Package Security Manager containers. For this reason, Anaconda recommends hosting the cacert.pem file on the docker-host instead of the containers.
SSL verification error
Cause You may receive an SSL verification error if you have SSL enabled with a self-signed certificate. Solution Run the following command to disable SSL certificate check:OAuth2 with self-signed certificates
Cause Even if you havessl_verify set to false while using self-signed certificates and SAML, you may still run into SSL verification errors.
You may receive an error similar to the following:
REQUESTS_CA_BUNDLE.
For Windows, run the following:
HTTP 000 CONNECTION FAILED
If you receive this error message, run the following command:Using Redis
Cause By default, Redis does not require a password. Not enabling a password requirement leaves your instance of Package Security Manager vulnerable. Solution Follow these steps to password protect your instance:-
In the installation directory, update
config/nginx/conf.d/repo.confto include theadd_headerdirective somewhere in theserverblock: -
Create a directory called
redisin the configs directory: -
Create a file called
redis.confinsideconfig/rediswith the following contents: -
Update the
docker-compose.ymlfile of Package Security Manager installation to mount this custom redis config: -
Update
REDIS_ADDRvariable in.envfile to include password: -
Restart docker-compose services so changes are picked up. You can do this using:
Error message on initial login to Package Security Manager
If you receive an error on your initial login to Package Security Manager and are unable to set your license, it is likely that you have forgotten to include a default user during your installation command, and your current user lacks the administrative permissions necessary to register your license. To correct this issue:- Log in to the Keycloak administrative console.
- Navigate to the dev realm.
- Select Users from the left-hand navigation.
- Create a user or select an existing user from the list to view their profile page.
- Select the Role Mapping tab.
- Click Assign role.
- Select the admin role, then click Assign.
- Return to Package Security Manager and log in as this admin user.
- Set your license.
Backup fails with exit status 1
If you attempt to run the backup command and receive an error in dumping the repo database withexit status 1 returned by the command, complete the following procedure:
- Connect to your instance of Package Security Manager. If necessary, get help from your IT department with this step.
-
Open your installation directory by running the following command:
-
Open your
docker-compose.ymlfile using your preferred file editor. -
Find the
postgres:section of the file. -
Replace the following portion of the
postgres:configurations:With this:Here is an example of what your file should look like when you are finished: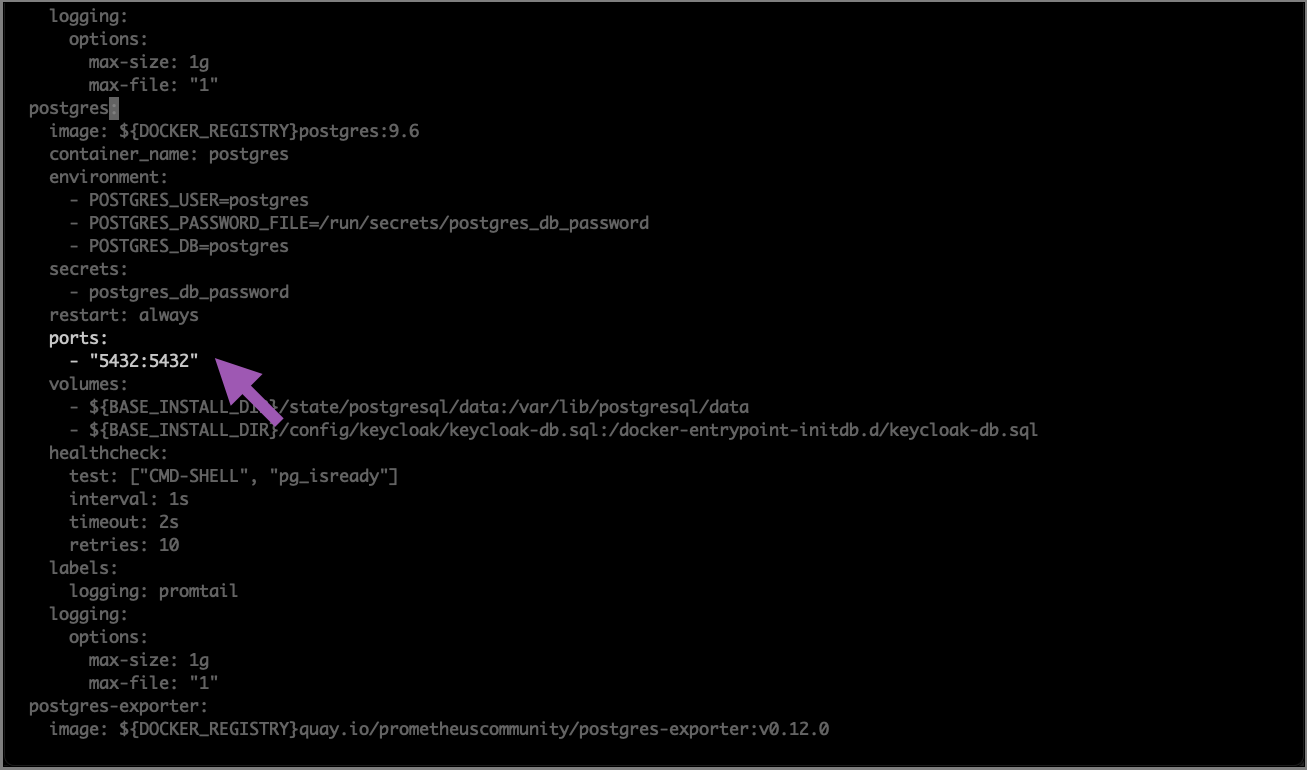
- Retry the backup command.