> ## Documentation Index
> Fetch the complete documentation index at: https://anaconda.com/docs/llms.txt
> Use this file to discover all available pages before exploring further.
# Windows graphical installer
export const DefinitionDescription = ({children}) =>
;
export const BeginnerGlasses = () => {
return ;
};
* You might need to purchase a license to stay compliant with our [Terms of Service](https://www.anaconda.com/legal).
* If your company security policies do not allow admin privileges for end users, you will be unable to install Miniconda manually. Consider requesting that your IT admin add Miniconda to a software delivery or fleet management system (such as Kandji or Jamf).
This page provides instructions for installing Miniconda on Windows with a graphical installer.
## Installation steps
1. Navigate to [anaconda.com/download](https://www.anaconda.com/download), register with Anaconda, and then select **Windows 64-bit Graphical Installer** under Miniconda.
2. Go to your Downloads folder and double-click the installer to launch.
To prevent permission errors, do not launch the installer from the [Favorites folder](#windows-permission-errors-when-installing-from-favorites-folder).
If you encounter issues during installation, temporarily disable your anti-virus software during install, then re-enable it after the installation concludes. If you installed for **All Users**, [uninstall](/docs/getting-started/miniconda/uninstall) Miniconda and re-install it for **Just Me** only.
3. Read through [Miniconda's End User License Agreement (EULA)](https://www.anaconda.com/legal/terms/miniconda) and select **I Agree** to agree to the terms. You can view Anaconda's Terms of Service (TOS) at [https://www.anaconda.com/legal](https://www.anaconda.com/legal).
4. Select an installation option:
It is recommended to install Miniconda for the local user, which does not require administrator permissions and is the most robust type of installation. However, if you need to, you can install Miniconda system wide, which does require administrator permissions.
Just Me (Recommended)
Install Miniconda for the current user account.
All Users
Install Miniconda for all user accounts on the computer (requires Windows Administrator privileges).
5. Select **Next**.
6. Select a destination folder to install Miniconda, then select **Next**.
Anaconda recommends installing Miniconda in a directory with no spaces or special characters to avoid potential compatibility issues with open-source tools. For more information, see the [FAQ](/docs/getting-started/working-with-conda/reference/faq#in-what-folder-should-i-install-anaconda-on-windows).
***
Do not install as Administrator unless admin privileges are required.
7. Customize your installation options:
Create shortcuts
Creates Start Menu shortcuts for the Anaconda Prompt packages. Deselecting this option skips creating these shortcuts.
Add Miniconda3 to my PATH environment variable
Adds the path that contains the conda binaries to your PATH environment variable.
Anaconda **does not** recommend selecting this option. The conda binaries path contains other package binaries, which are permanently added to your PATH environment variable, even if no conda environment is currently active. This makes it possible for other software to use these package files, which might lead to errors.
Register Miniconda3 as my default Python 3.13
Selected by default. Registers the Python package in this install as the default Python for programs like VSCode, PyCharm, and so on.
Clear the package cache upon completion
Runs `conda clean --all --force-pkgs-dirs` after the install finishes. For more information on these commands, see the [conda command documentation](https://docs.conda.io/projects/conda/en/stable/commands/clean.html).
8. Select **Install**. The installation might take a few minutes to complete. Select **Show details** to view the packages being installed.
9. Select **Next** twice, then select **Finish** to close the installer.
## Verify your install
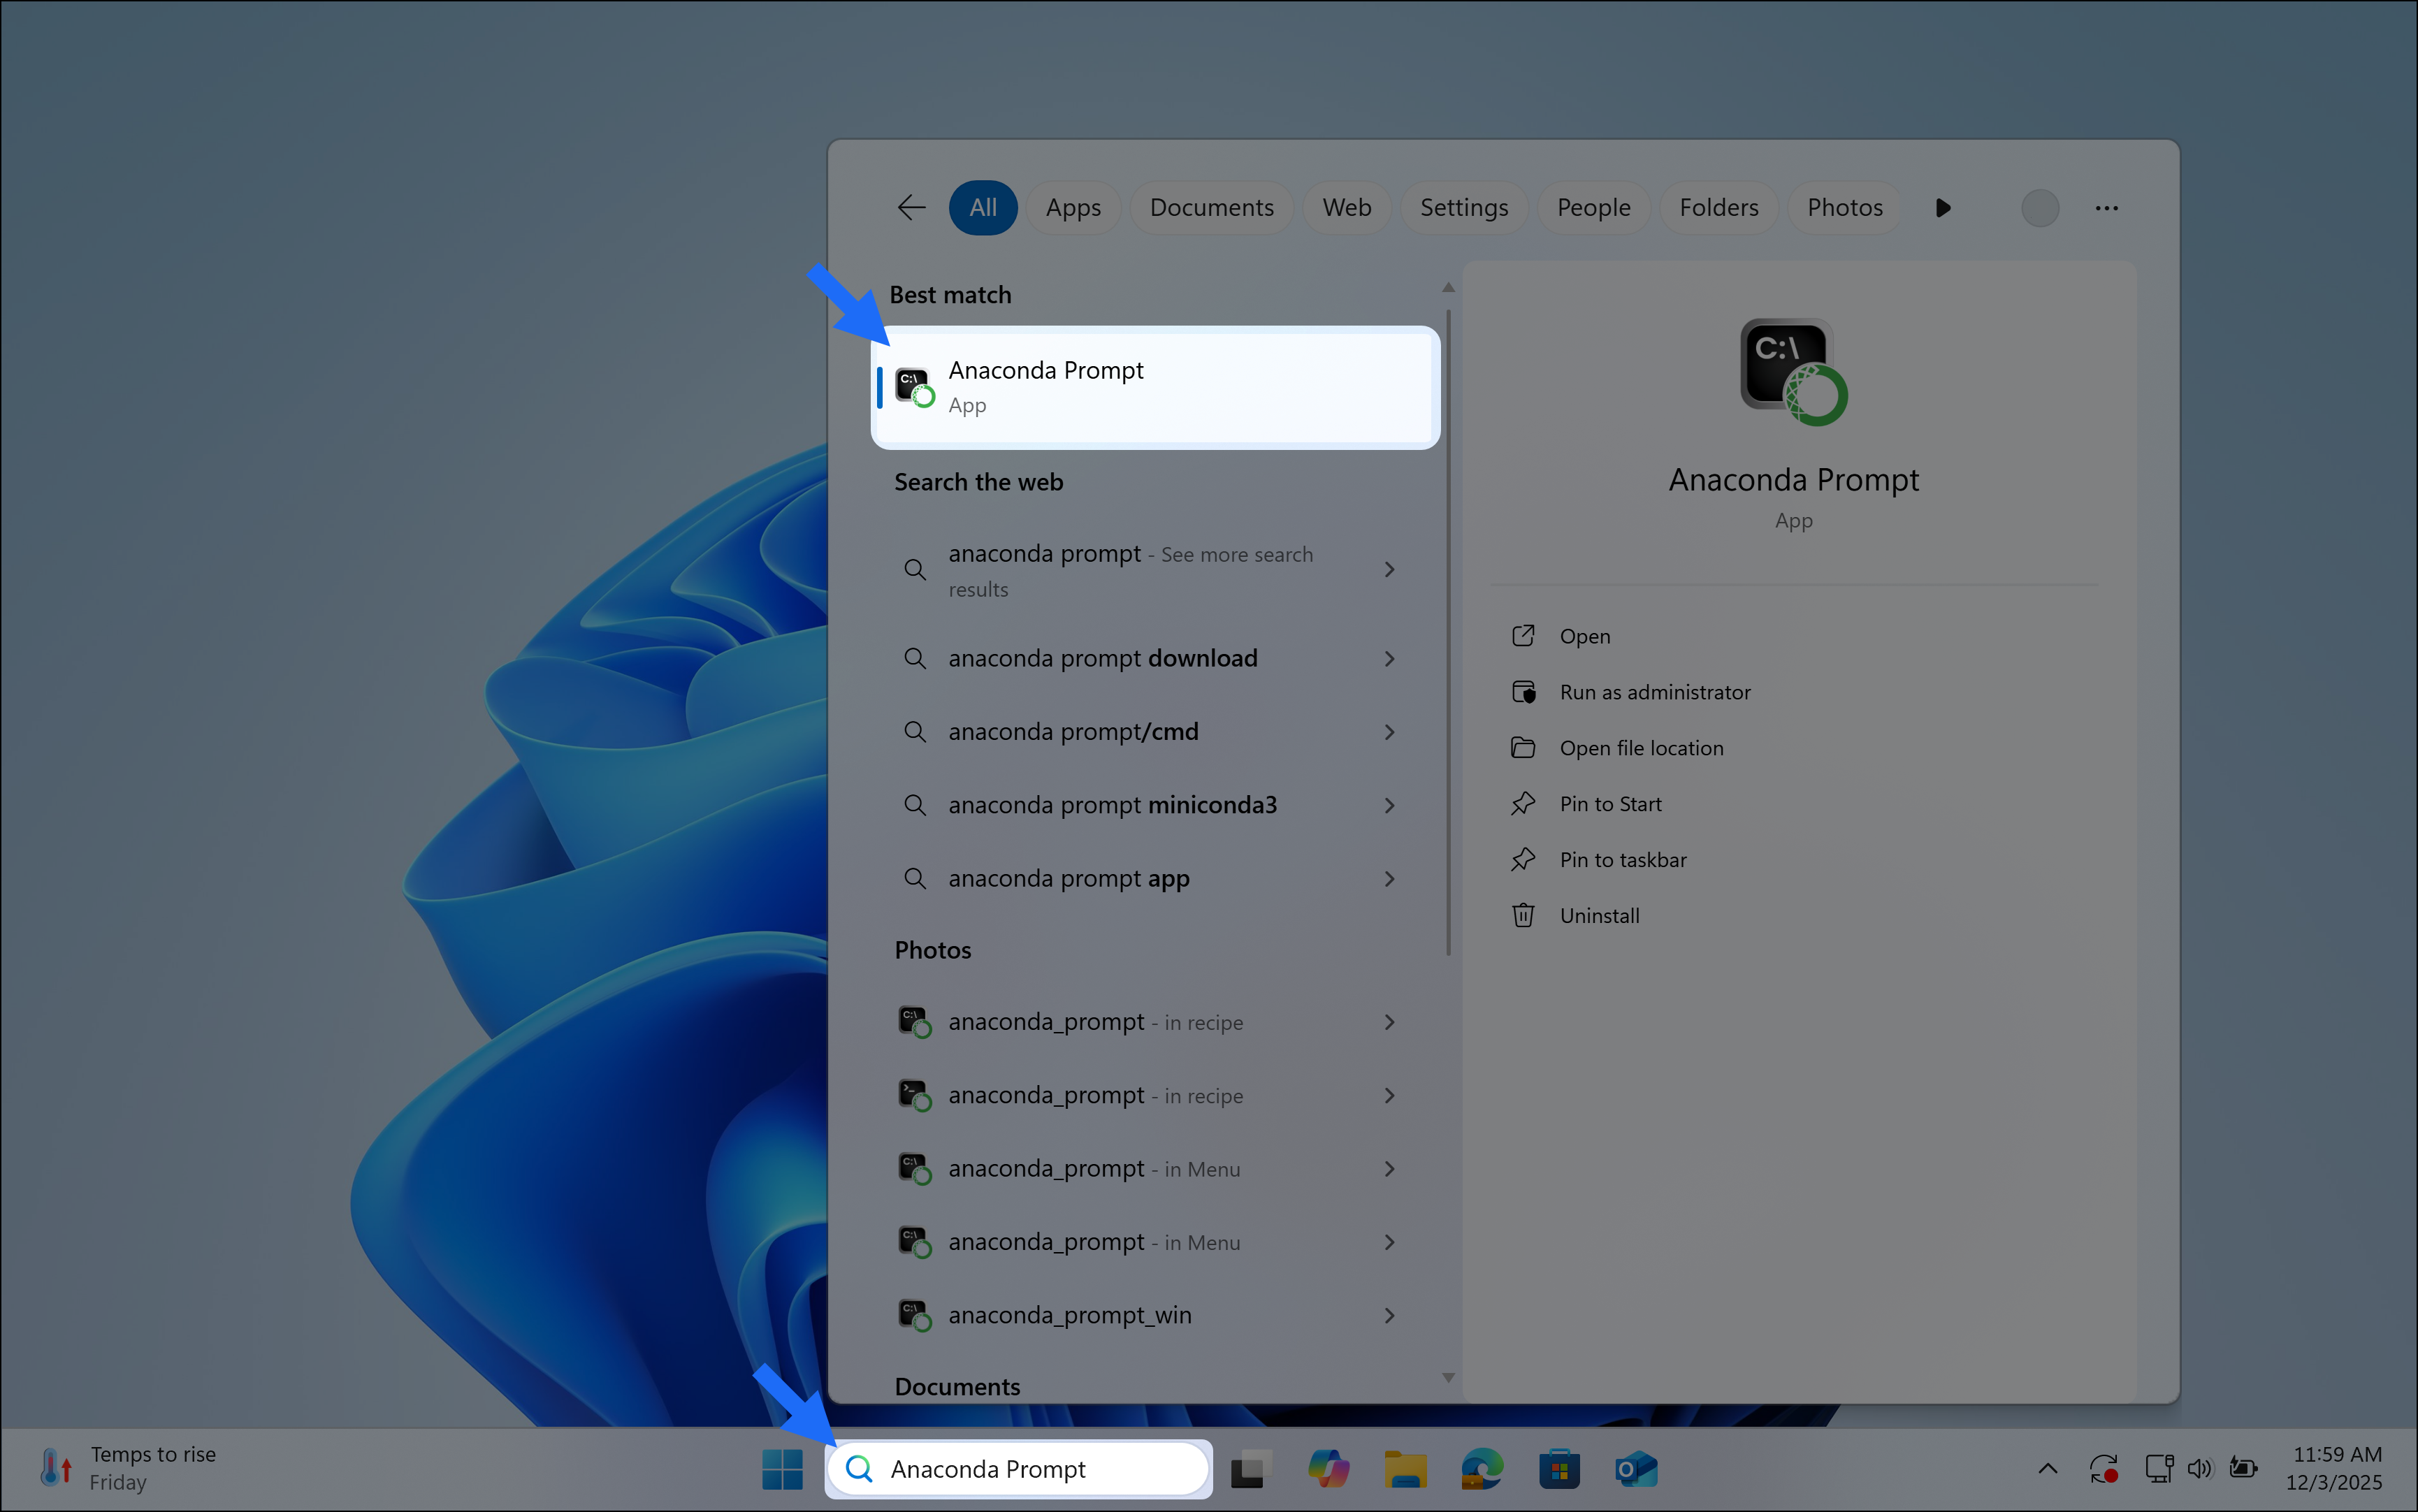
Verify your installation was successful by opening [Anaconda Prompt](/docs/reference/glossary#anaconda-prompt), a command-line shell application that is included with conda installations for Windows.
To open Anaconda Prompt, type "Anaconda Prompt" in the Windows search bar, then select the application.
Your Anaconda Prompt window will display something like the following, with your base environment activated by default:
```sh theme={null}
(base) C:\Users\myusername>
```
## Choose how you want to work with conda
Anaconda Navigator provides a graphical user interface (GUI) to interface with conda, without using the command line.
If you prefer working at the command line, you can interface with conda directly through [Anaconda Prompt](/docs/reference/glossary#anaconda-prompt) (Windows) or your system's terminal (macOS and Linux) after you complete your installation.
Anaconda Navigator is not included with Miniconda. Follow the instructions on [Installing Navigator](/docs/legacy/anaconda-navigator/install) to manually install Navigator onto your computer.
Manage packages and environments with a desktop application
Use command-line tools for package and environment management
## Advanced install options
For more advanced installation options, such as installing with silent mode, installing on older operating systems, or installing for multiple users, see [Advanced installation](/docs/getting-started/advanced-install/main).
## Troubleshooting
### Windows permission errors when installing from Favorites folder
The Windows Favorites folder has unusual permissions and may cause permission errors with installers of any software. If you try launching the installer from the Favorites folder, you may see errors such as "Setup was unable to create the directory", "Access is denied", or "Error opening file for writing".
Move the installer to a different folder and run the installer from the new folder.
### Cannot see Anaconda menu shortcuts after installation on Windows
After installing on Windows, the Anaconda Prompt and Anaconda Navigator shortcuts do not appear in the Windows Start menu.
This may be caused by the way Windows updates the Start menu, or by having multiple versions of Python installed that are interfering with one another. Existing Python installations, installations of Python modules in global locations, or libraries that have the same names as Anaconda libraries can all prevent Anaconda from working properly.
If Start menu shortcuts are missing, Microsoft recommends rebooting your computer or [restarting Windows Explorer](https://answers.microsoft.com/en-us/windows/forum/windows8_1-performance/force-refresh-of-start-menu-start-screen-in/ee4e36d2-91d0-4f34-9eb8-b17ab096e83c?auth=1).
If that doesn't work, clear your `$PYTHONPATH` environment variable, if applicable, and re-install Anaconda.
Other potential solutions are covered in the "Conflicts with system state" section of the following [blog post](https://www.anaconda.com/blog/who-you-gonna-call-halloween-tips-treats-to-protect-you-from-ghosts-gremlins-and-software-vulnerabilities).
### Windows error: Failed to create Anaconda menus or Failed to add Anaconda to the system PATH
During installation on a Windows system, a dialog appears that says "Failed to create Anaconda menus, Abort Retry Ignore" or "Failed to add Anaconda to the system PATH". There are many possible Windows causes for this.
Try these solutions, in order:
* Do not install on a PATH longer than 1024 characters.
* Turn off anti-virus programs before installing, then turn the anti-virus programs back on.
* Uninstall all previous Python installations.
* Clear all PATHs related to Python in sysdm.cpl file.
* Delete any previously set up Java PATHs.
* If JDK is installed, uninstall it.
To find your path variable:
1. Search for "environment variables" in the search in your taskbar.
2. Click **Edit the System Environment Variables** in the sidebar.
3. Click **Environment Variables** in the System Properties dialog.
4. Highlight the **path** variable for your user.
5. Click **Edit**.
### Anaconda interfering with other software on Windows
If a user chooses to add Anaconda to the Windows PATH, this can cause programs to use the new Anaconda versions of software (like Python) and not the versions that were already in place. In some cases, this can cause incompatibility and errors.
Anaconda does NOT recommend adding Anaconda to the Windows PATH manually. Instead, use Anaconda software by opening Anaconda Navigator or Anaconda Prompt from the Start Menu.
### Trouble with activation on PowerShell on Windows
Some users might run into the following backtrace on Windows:
```sh theme={null}
File "C:\Users\damia\Miniconda3\lib\site-packages\conda\activate.py", line 550, in _replace_prefix_in_path
assert last_idx is not None
AssertionError
```
1. Open a Command Prompt window.
2. Navigate to where you installed conda. The following command shows the default:
```sh theme={null}
cd C:\Users\
```
3. Run the following command:
```sh theme={null}
python -m conda init
```
4. Close the Command Prompt window.
If the above method didn't work, try running:
```sh theme={null}
conda update conda
```
### Recovering your Miniconda installation
If your Miniconda installation has become corrupted and is in a state where normal conda commands are not functioning, use the following steps to repair your installation and preserve your installed packages and environments.
1. Download a [new installer](https://repo.anaconda.com/miniconda/) for your operating system.
1. Open a terminal application, such as Command Prompt or PowerShell.
2. If necessary, navigate to the parent directory of your Miniconda installation (by default, this is your user profile).
3. Rename your existing installation directory so you do not overwrite it:
```sh Command Prompt theme={null}
move miniconda3 miniconda_old
```
```powershell PowerShell theme={null}
Move-Item miniconda3 miniconda_old
```
4. Run the new Miniconda installer. When prompted for an install location, choose the same directory as your original installation.
5. Copy your previous packages and environments to the new installation:
```sh theme={null}
robocopy miniconda_old miniconda3 /S
```
6. Delete your old Miniconda installation directory:
```sh Command Prompt theme={null}
rd /s /q miniconda_old
```
```powershell PowerShell theme={null}
Remove-Item -Recurse -Force miniconda_old
```
1. Open a terminal application.
2. If necessary, navigate to the parent directory of your Miniconda installation (by default, this is your home directory).
3. Rename your existing installation directory so you do not overwrite it:
```sh theme={null}
mv miniconda3 miniconda_old
```
4. Run the new Miniconda installer. When prompted for an install location, choose the same directory as your original installation:
```sh theme={null}
bash ~/Downloads/Miniconda3-latest-Linux-x86_64.sh
```
5. Copy your previous packages and environments to the new installation:
```sh theme={null}
rsync -a miniconda_old/ miniconda3/
```
6. Delete your old Miniconda installation directory:
```sh theme={null}
rm -rf miniconda_old
```
2. Run `conda list` to view the packages from the previous installation.
3. Run `conda info --envs` to list the environments created in the previous installation, which are now available in the new installation.
### Proxy request sent, not found
Your company likely has security policies or a firewall in place that prevent communications with external servers or certain URLs.
1. First, work with your IT team to allowlist connections to the following URLs:
```txt theme={null}
https://anaconda.org
https://repo.anaconda.com
https://repo.anaconda.cloud
```
Allowlisting `https://repo.anaconda.cloud` is only necessary if your company has an Anaconda Platform organization and you require access to channels in that organization.
2. [Install](/docs/getting-started/main) Anaconda Distribution or Miniconda again.
Once your installation is complete, you might also need to connect your company's firewall/proxy server to your conda configuration file (`.condarc`). For more information on this, see [Using Anaconda behind a firewall or proxy](/docs/anaconda-platform/getting-started-with-anaconda-platform#using-anaconda-behind-a-firewall-or-proxy-optional).
 Your Anaconda Prompt window will display something like the following, with your base environment activated by default:
```sh theme={null}
(base) C:\Users\myusername>
```
## Choose how you want to work with conda
Anaconda Navigator provides a graphical user interface (GUI) to interface with
Your Anaconda Prompt window will display something like the following, with your base environment activated by default:
```sh theme={null}
(base) C:\Users\myusername>
```
## Choose how you want to work with conda
Anaconda Navigator provides a graphical user interface (GUI) to interface with