> ## Documentation Index
> Fetch the complete documentation index at: https://anaconda.com/docs/llms.txt
> Use this file to discover all available pages before exploring further.
# macOS graphical installer
export const TroubleshootSolution = ({children}) => <>
Solution
{children}
;
export const TroubleshootCause = ({children}) =>
Cause
;
export const BeginnerGlasses = () => {
return ;
};
* You might need to purchase a license to stay compliant with our [Terms of Service](https://www.anaconda.com/legal).
* If your company security policies do not allow admin privileges for end users, you will be unable to install Miniconda manually. Consider requesting that your IT admin add Miniconda to a software delivery or fleet management system (such as Kandji or Jamf).
This page provides instructions for installing Miniconda on macOS with a graphical installer.
## Installation steps
The graphical installer for macOS installs Miniconda into `/opt/miniconda3` in your file system. If you want to install Miniconda into your Home directory or if you have multiple users on a system and want to manage your installation more carefully, Anaconda recommends the [command-line installer](/docs/getting-started/miniconda/install/mac-cli-install).
1. Navigate to [anaconda.com/download](https://www.anaconda.com/download), register with Anaconda, and then select **64-bit (Apple silicon) Graphical Installer** under Miniconda.
As of August 15, 2025, Anaconda has stopped building packages for Intel Mac computers (osx-64). Existing Intel (`MacOSX-x86_64`) installers are still available at [https://repo.anaconda.com/miniconda/](https://repo.anaconda.com/miniconda/). The last Miniconda installer release for Intel Mac computers will be 25.7.x. For more information, see [our blog on the end of Intel mac support](https://www.anaconda.com/blog/intel-mac-package-support-deprecation).
2. Double-click the `.pkg` file.
3. View the Read Me instructions and select **Continue**.
4. Read through [Miniconda's End User License Agreement (EULA)](https://www.anaconda.com/legal/terms/miniconda) and select **Continue**, then select **Agree** to agree to the terms. You can view Anaconda's Terms of Service (TOS) at [https://www.anaconda.com/legal](https://www.anaconda.com/legal).
5. Choose an install location:
Install for all users of this computer (Recommended)
Installs Miniconda into `/opt/miniconda3` for all users of the computer.
Install on a specific disk
Enables you to choose a different location to install Miniconda.
6. Select **Install**. When the installation finishes, open your terminal application.
You should see `(base)` in the command line prompt. This tells you that you're in your base conda environment. To learn more about environments, see [Environments](/docs/getting-started/working-with-conda/environments).
## Verify your install
Verify your installation by opening your terminal application and running `conda list`. If conda has been installed correctly, a list of installed packages appears:
```sh Command theme={null}
conda list
```
```sh Example output theme={null}
# packages in environment at /opt/miniconda3:
#
# Name Version Build Channel
ca-certificates 2024.9.24 h06a4308_0
certifi 2024.8.30 py312h06a4308_0
conda 24.9.2 py312h06a4308_0
openssl 3.0.15 h5eee18b_0
python 3.12.7 h5148396_1
...
```
## Choose how you want to work with conda
Anaconda Navigator provides a graphical user interface (GUI) to interface with conda, without using the command line.
If you prefer working at the command line, you can interface with conda directly through [Anaconda Prompt](/docs/reference/glossary#anaconda-prompt) (Windows) or your system's terminal (macOS and Linux) after you complete your installation.
Anaconda Navigator is not included with Miniconda. Follow the instructions on [Installing Navigator](/docs/legacy/anaconda-navigator/install) to manually install Navigator onto your computer.
Manage packages and environments with a desktop application
Use command-line tools for package and environment management
## Advanced install options
For more advanced installation options, such as installing with silent mode, installing on older operating systems, or installing for multiple users, see [Advanced installation](/docs/getting-started/advanced-install/main).
## Troubleshooting
### command not found: conda
The `command not found: conda` error occurs when your command line interface (CLI) can't find the conda command in order to use it. This might be because:
* You don't have conda properly initialized.
* You have set `auto_activate_base` to `false`.
* You're using a shell that conda doesn't support.
* Conda is not installed or the install was incomplete or corrupted.
These issues primarily occur on macOS/Linux computers. Anaconda Distribution and Miniconda installations on Windows include [Anaconda Prompt](/docs/reference/glossary#anaconda-prompt), which opens with conda initialized by default.
If you recently installed Anaconda Distribution or Miniconda, make sure you closed and reopened your CLI to make conda's initialization take effect.
If you don't want to close your CLI, you can also use one of the following `source` commands to refresh your shell:
```sh bash theme={null}
source ~/.bashrc
```
```sh zsh theme={null}
source ~/.zshrc
```
```sh fish theme={null}
source ~/.config/fish/config.fish
```
```sh cshrc theme={null}
source ~/.cshrc
```
```sh xonshrc theme={null}
source ~/.xonshrc
```
Use the command that matches your shell.
You can also initialize conda directly from its `bin` directory:
```sh Initialization command theme={null}
/bin/conda init
```
```sh Examples theme={null}
miniconda3/bin/conda init
/opt/miniconda3/bin/conda init
anaconda3/bin/conda init
/opt/anaconda3/bin/conda init
```
Replace \ with a path to your conda installation.
To see the value for `auto_activate_base`, run the following command:
```sh theme={null}
conda config --describe auto_activate_base
```
If your terminal returns `false`, this means that conda is not automatically activating your base environment when you start a new shell. This behavior emulates your system Python, and some users prefer to have their conda environment be inactive until they need it. However, this is not conda's default behavior after installation.
To change the value of `auto_activate_base` to `true`, run the following command:
```sh theme={null}
conda config --set auto_activate_base true
```
If you have `auto_activate_base` set as `false`, the conda command will still be available as a shell function, but your base environment will not be active when a new shell is started. To activate your base environment, run `conda activate`.
For information on which shells conda supports, see [Conda activate](https://docs.conda.io/projects/conda/en/stable/dev-guide/deep-dives/activation.html#conda-activate) in the official conda documentation.
If you have tried to initialize conda in your shell but it didn't work, try uninstalling and reinstalling [Anaconda Distribution](/docs/getting-started/installation) or [Miniconda](/docs/getting-started/installation).
Make sure that you say yes to the initialization option, and, if installing from the CLI, reinitialize your shell by restarting it or using its `source` command. For more information, see [Initialize conda in your shell](#initialize-conda-in-your-shell).
### Error message on install: Already installed
This situation can occur if you are getting a conda error and you want to reinstall Miniconda to fix it.
These instructions are for macOS and Linux.
1. [Download the latest Miniconda installer for your operating system](https://anaconda.com/download).
2. Install Miniconda with the `--force` or `-f` option by running the following command:
```sh theme={null}
bash ~/Downloads/Miniconda3-latest-MacOSX-x86_64.sh -f
```
Replace the name of the installer if you need a different version or operating system.
Make sure to install to the same location as your existing install so it overwrites the core conda files and does not install duplicates in a new folder.
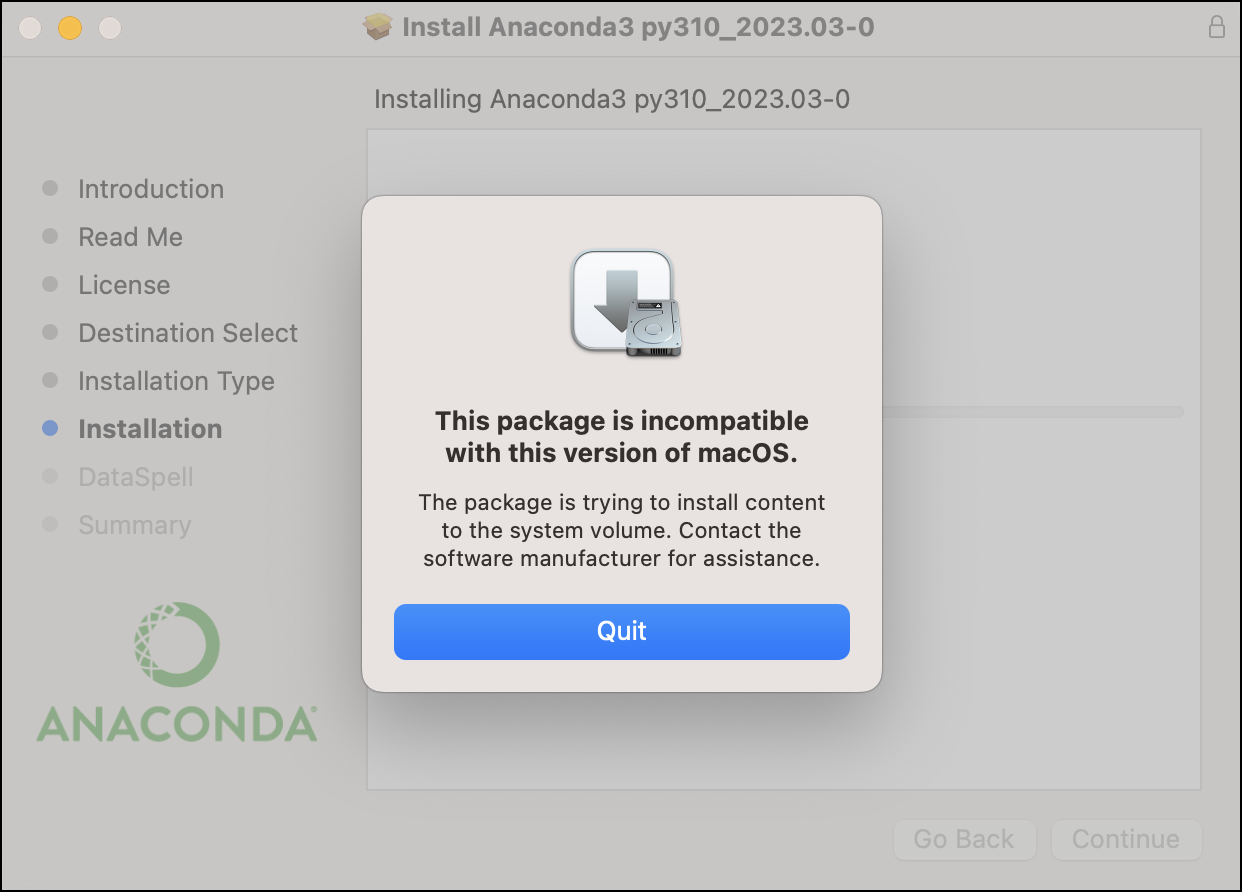
This package is incompatible with this version of macOS error when running a .pkg installer on OSX
When running the `.pkg` installer, you may encounter this error during the "Installation" step:
This error occurs when the installation attempts to write to a directory for which it does not have write permissions.
Manually select an appropriate install location. The following example shows how to select your user's home directory.
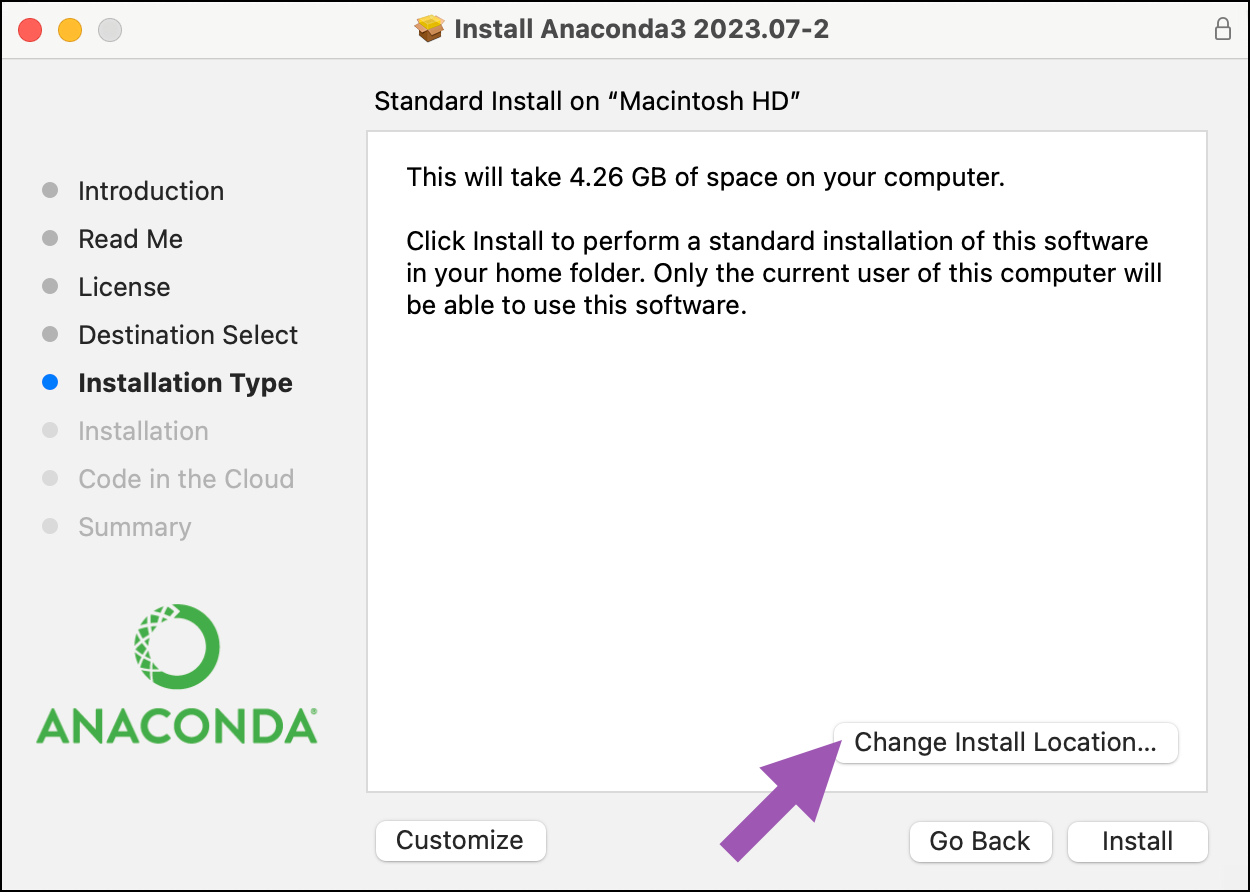
1. Re-run the installer and click through until you reach either the Installation Type or Destination Select page.
2. If you reach the Installation Type page first, click **Change Install Location…**. This will take you to the Destination Select page.
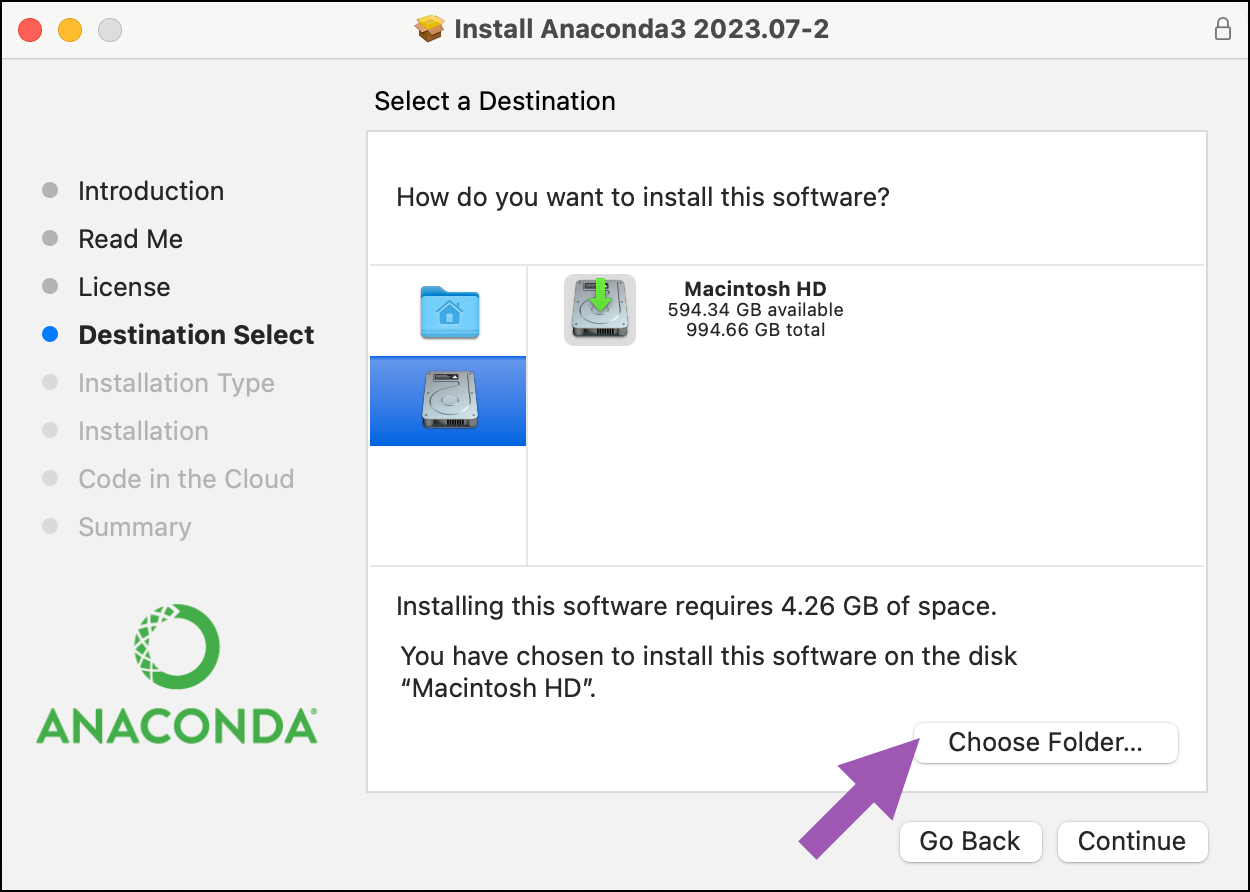
3. Click **Install on a specific disk…**.
4. Click the appropriate destination drive. Then click **Choose Folder…**.
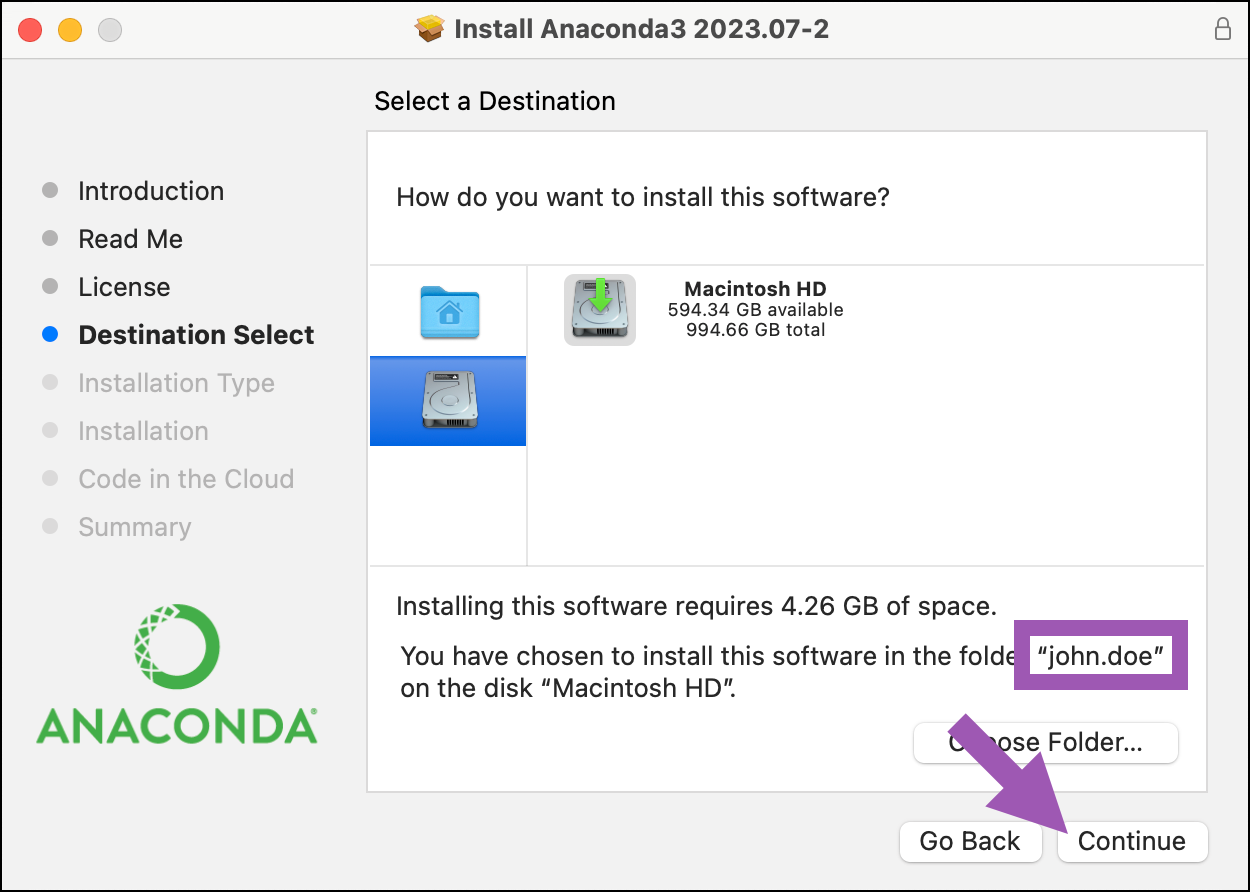
5. Click your user's home directory (for example, /Users/john.doe/). Then, click **Choose**.
6. In the message box, confirm the name of the install folder you chose in the previous step. Then click **Continue**.
7. Click **Install**, and then proceed with the rest of the installation.
If you continue to receive the same error message, please open an issue [here](https://github.com/ContinuumIO/anaconda-issues/issues/new/choose/), and be sure to include the installation log output from your `install.log` file, which can be found at `/var/log/install.log`.
### Recovering your Miniconda installation
If your Miniconda installation has become corrupted and is in a state where normal conda commands are not functioning, use the following steps to repair your installation and preserve your installed packages and environments.
1. Download a [new installer](https://repo.anaconda.com/miniconda/) for your operating system.
1. Open a terminal application, such as Command Prompt or PowerShell.
2. If necessary, navigate to the parent directory of your Miniconda installation (by default, this is your user profile).
3. Rename your existing installation directory so you do not overwrite it:
```sh Command Prompt theme={null}
move miniconda3 miniconda_old
```
```powershell PowerShell theme={null}
Move-Item miniconda3 miniconda_old
```
4. Run the new Miniconda installer. When prompted for an install location, choose the same directory as your original installation.
5. Copy your previous packages and environments to the new installation:
```sh theme={null}
robocopy miniconda_old miniconda3 /S
```
6. Delete your old Miniconda installation directory:
```sh Command Prompt theme={null}
rd /s /q miniconda_old
```
```powershell PowerShell theme={null}
Remove-Item -Recurse -Force miniconda_old
```
1. Open a terminal application.
2. If necessary, navigate to the parent directory of your Miniconda installation (by default, this is your home directory).
3. Rename your existing installation directory so you do not overwrite it:
```sh theme={null}
mv miniconda3 miniconda_old
```
4. Run the new Miniconda installer. When prompted for an install location, choose the same directory as your original installation:
```sh theme={null}
bash ~/Downloads/Miniconda3-latest-Linux-x86_64.sh
```
5. Copy your previous packages and environments to the new installation:
```sh theme={null}
rsync -a miniconda_old/ miniconda3/
```
6. Delete your old Miniconda installation directory:
```sh theme={null}
rm -rf miniconda_old
```
2. Run `conda list` to view the packages from the previous installation.
3. Run `conda info --envs` to list the environments created in the previous installation, which are now available in the new installation.
### Proxy request sent, not found
Your company likely has security policies or a firewall in place that prevent communications with external servers or certain URLs.
1. First, work with your IT team to allowlist connections to the following URLs:
```txt theme={null}
https://anaconda.org
https://repo.anaconda.com
https://repo.anaconda.cloud
```
Allowlisting `https://repo.anaconda.cloud` is only necessary if your company has an Anaconda Platform organization and you require access to channels in that organization.
2. [Install](/docs/getting-started/main) Anaconda Distribution or Miniconda again.
Once your installation is complete, you might also need to connect your company's firewall/proxy server to your conda configuration file (`.condarc`). For more information on this, see [Using Anaconda behind a firewall or proxy](/docs/anaconda-platform/getting-started-with-anaconda-platform#using-anaconda-behind-a-firewall-or-proxy-optional).
### macOS installation failure - x86\_64 (Intel chip)
Anaconda no longer supports Anaconda Distribution and Miniconda installers for Intel chip macOS computers (osx-64) and has removed these installers from the Anaconda.com website. If you downloaded a macOS installer from the website and your installation is failing, it is possible that you have an Intel chip macOS computer and the installer on the website is not compatible with your computer.
To check what architecture your macOS computer has:
1. Select the **Apple** icon on your title bar.
2. Select **About This Mac**.
3. A macOS computer with an Intel chip will have "Intel" in the **Processor** item, while a macOS computer with an Apple silicon chip will have a **Chip** item labeled "Apple M1" or similar.
macOS computers with Intel chip architecture use installers labeled `MacOSX-x86_64`, while macOS computers with Apple silicon chips use installers labeled `MacOSX-arm64`. While Anaconda no longer provides `MacOSX-x86_64` installers on its website, you can still find them in our installer archives.
* [Anaconda Distribution installer archive](https://repo.anaconda.com/archive)
* [Miniconda installer archive](https://repo.anaconda.com/miniconda)
 3. Click **Install on a specific disk…**.
4. Click the appropriate destination drive. Then click **Choose Folder…**.
3. Click **Install on a specific disk…**.
4. Click the appropriate destination drive. Then click **Choose Folder…**.
 5. Click your user's home directory (for example, /Users/john.doe/). Then, click **Choose**.
6. In the message box, confirm the name of the install folder you chose in the previous step. Then click **Continue**.
5. Click your user's home directory (for example, /Users/john.doe/). Then, click **Choose**.
6. In the message box, confirm the name of the install folder you chose in the previous step. Then click **Continue**.
 7. Click **Install**, and then proceed with the rest of the installation.
If you continue to receive the same error message, please open an issue [here](https://github.com/ContinuumIO/anaconda-issues/issues/new/choose/), and be sure to include the installation log output from your `install.log` file, which can be found at `/var/log/install.log`.
7. Click **Install**, and then proceed with the rest of the installation.
If you continue to receive the same error message, please open an issue [here](https://github.com/ContinuumIO/anaconda-issues/issues/new/choose/), and be sure to include the installation log output from your `install.log` file, which can be found at `/var/log/install.log`.