> ## Documentation Index
> Fetch the complete documentation index at: https://anaconda.com/docs/llms.txt
> Use this file to discover all available pages before exploring further.
# Project configurations
In Data Science & AI Workbench, projects are structured around a core configuration file called `anaconda-project.yml`. This file is crucial for orchestrating a project’s components for deployment and ensuring operational consistency over time. There are several parameters that must be included within each project’s `anaconda-project.yml` file to ensure that it operates as intended:
* **Packages**: You must specify all conda or pip packages the project requires to function in its `anaconda-project.yml` file. By default, Workbench is configured to use packages from its internal repository to create project environments. However, it is possible to use packages from external repositories.
* **Environment**: You must define at least one named environment to accurately manage the project’s packages and their dependencies, ensuring stability across different settings. Projects use template environments when they are initially created, which can be updated or replaced. For more information about template environments, see [Configuring persistent environments and sample projects](../../admin/custom_env_proj).
* **Commands**: You must define at least one command to properly deploy and run jobs for your project in its intended environment.
* **Environmental variables**: If necessary, set up the required environment variables needed to control how your project interacts with external resources and services.
It is possible to edit a project’s `anaconda-project.yml` file manually to add the required configurations; however, this method is prone to human error, especially for users who are unfamiliar with `.yml` file formatting.
Instead, Anaconda recommends using `anaconda-project` commands from a terminal within your project to update its configurations when possible. For more information about `anaconda-project`, see the [official documentation here](https://anaconda-project.readthedocs.io/en/latest/).
*All* `anaconda-project` commands *must* be run from the `lab_launch` environment! Enter the `lab_launch` environment by running the following command in a project terminal:
```sh theme={null}
conda activate lab_launch
```
Once you are finished configuring your project, Anaconda recommends that you [add a lock file](#locking-project-configurations) to your project to ensure its reproducibility across different environments at scale.
## Configuring project environments
The conda environments in [standard project templates](./project-templates) are pre-solved to reduce initialization time when additional packages are added. However, you might want to create an environment specifically for your project.
To create a new environment with specific packages and add it to your project:
1. Create a new project.
2. Start a session.
3. Open a terminal within your session editor.
4. Create an environment and include the packages you need for it by running the following command:
```sh theme={null}
# Replace with the name of the environment you are creating to add to your project's configuration
# Replace with the name of the packages you want to add to your project's configuration
anaconda-project add-env-spec --name
```
5. Remove the template environment that you used to create your project by running the following command:
```sh theme={null}
# Replace with the name of the template environment you used to initially create the project
anaconda-project remove-env-spec --name
```
6. [Commit and push your updates to the project](./collaborate#committing-and-pushing-changes).
7. Stop and re-start the project.
To edit and run notebooks in Jupyter Notebook or JupyterLab, you must include the `notebook` package in your project’s environment.
1. Open a terminal within your session editor.
2. Run the following commands:
```sh theme={null}
cd /opt/continuum/
ls
```
If the environment is being initialized, you will see a file named `preparing`. Once initialization is complete, you will see a file named `prepare.log`. To troubleshoot environment initialization, view the log from the terminal by running the following command:
```sh theme={null}
cat /opt/continuum/prepare.log
```
## Configuring project packages
Adding a package to a project’s configuration file *persists for future project sessions and deployments*. This is different than using `conda install` to add a package using the conda environment during a session, which impacts the project *during the current session only*.
Networks that are **air-gapped** (operate without internet access) must [mirror the Anaconda repository into your organization’s internal package repository](../../admin/chan-pkg/mirror) to provide them to users.
### Adding conda packages
To add a conda package to your project’s `anaconda-project.yml` file:
1. Open your project.
2. If necessary, start a session.
3. Open a terminal within your session editor.
4. Verify that you are in the `lab_launch` environment.
5. Run the following command:
```sh theme={null}
# Replace with the name of the packages you want to add to your project's configuration
anaconda-project add-packages
```
```sh theme={null}
# Replace with the name of the channel that contains the packages you want to add
# Replace with the name of the packages you want to add to your project's configuration
anaconda-project add-packages --channel
```
To use packages from an external repository, you will need to specify the full channel URL in the command:
```sh theme={null}
# Replace with the address of the channel that contains the packages you want to add
# Replace with the name of the packages you want to add to your project's configuration
anaconda-project add-packages --channel
```
The command may take a moment to run as it solves the environment to collect dependencies and download packages. Once complete, the added packages appear in the project’s `anaconda-project.yml` file. If the file is open when you run the command, close and reopen it to view your changes.
6. [Commit and push your updates to the project](./collaborate#committing-and-pushing-changes).
7. Stop and re-start the project session.
### Adding pip packages
If your project requires you to `pip` install a package, you can use `anaconda-project` to add it to your project’s configuration.
To add a `pip` package to your project’s `anaconda-project.yml` file:
1. Open your project.
2. If necessary, start a session.
3. Open a terminal within your session editor.
4. Verify that you are in the `lab_launch` environment.
5. Run the following command:
```sh theme={null}
# Replace with the name of the packages you want to add to your project's configuration
anaconda-project add-packages --pip
```
6. [Commit and push your updates to the project](./collaborate#committing-and-pushing-changes).
7. Stop and re-start the project session.
### Removing packages
To remove a package from your project’s `anaconda-project.yml` file:
1. Open your project.
2. If necessary, start a session.
3. Open a terminal within your session editor.
4. Verify that you are in the `lab_launch` environment.
5. Run the following command:
```sh theme={null}
# Replace with the name of the packages you want to remove from your project's configuration
anaconda-project remove-packages
```
6. [Commit and push your updates to the project](./collaborate#committing-and-pushing-changes).
7. Stop and re-start the project session.
## Configuring project environment variables
Environment variables are key parameters that manage dynamic settings like API keys, database URLs, and memory limits without modifying the codebase. These variables are essential for deploying projects consistently.
To add environment variables with a default value to your project’s `anaconda-project.yml` file:
1. Open your project.
2. If necessary, start a session.
3. Open a terminal within your session editor.
4. Verify that you are in the `lab_launch` environment.
5. Run the following command:
```sh theme={null}
# Replace with the content of your environment variable
# Replace with the variable name
anaconda-project add-variable --default=
```
6. [Commit and push your updates to the project](./collaborate#committing-and-pushing-changes).
7. Stop and re-start the project session.
For more information and advanced command arguments, see [Working with environment variables](https://anaconda-project.readthedocs.io/en/latest/user-guide/tasks/work-with-variables.html) in the official `anaconda-project` documentation.
## Configuring project commands
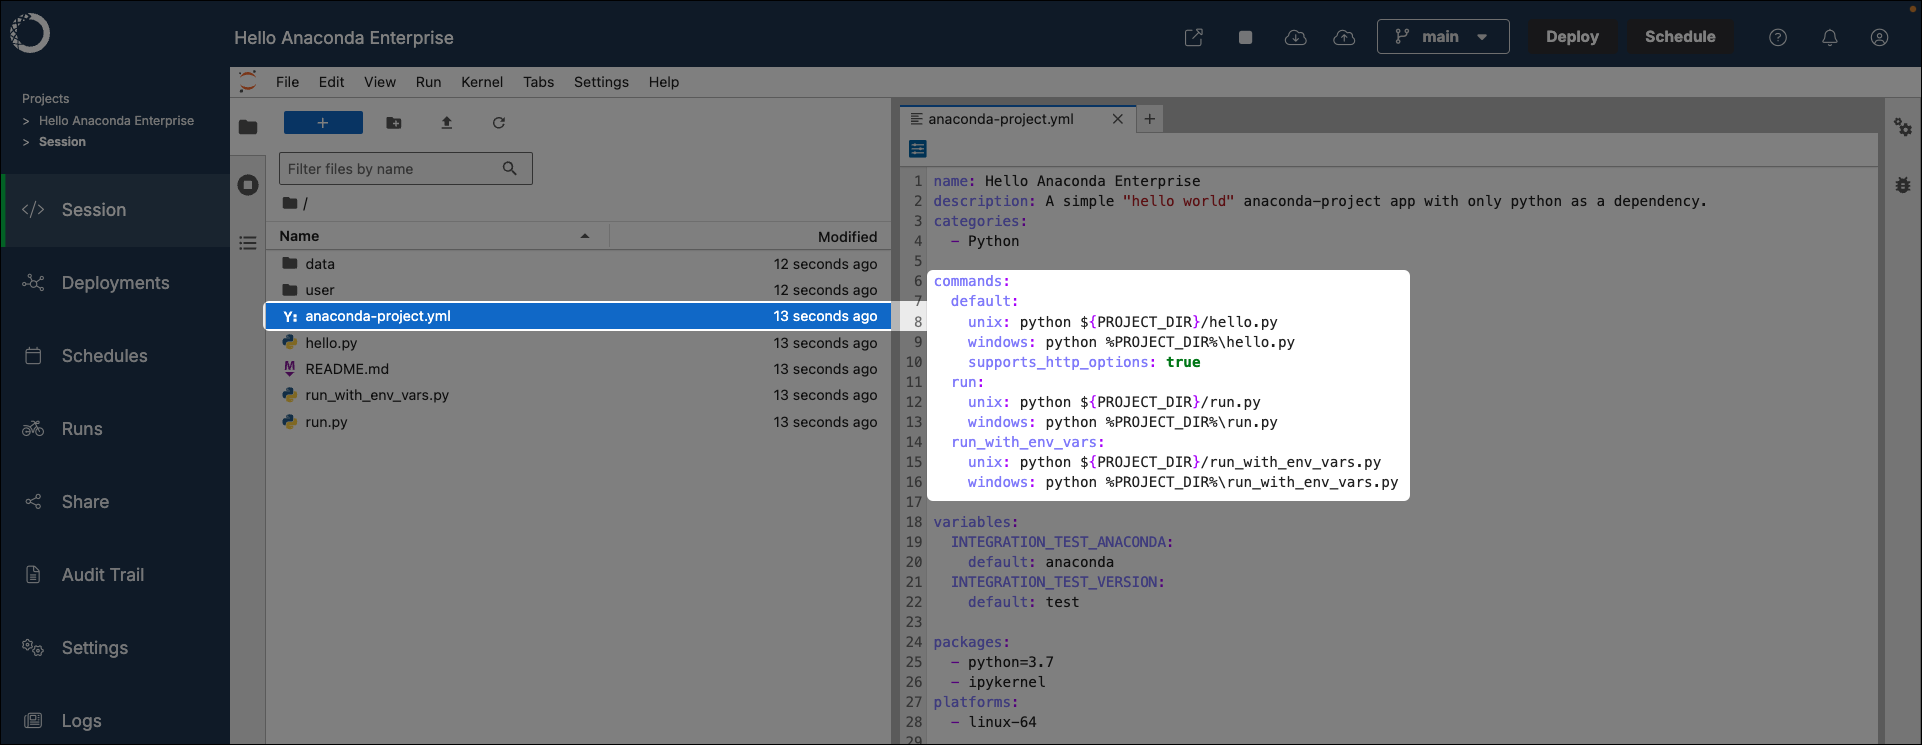
To deploy a project in Workbench, it must contain at least one appropriate deployment command defined in its `anaconda-project.yml` file. These commands specify how the project’s components, such as notebooks, scripts, or generic web frameworks, should be executed when the project is deployed.
To add a command to your project’s `anaconda-project.yml` file:
1. Open your project.
2. If necessary, start a session.
3. Open a terminal within your session editor.
4. Verify that you are in the `lab_launch` environment.
5. Run the following command:
```sh theme={null}
# Replace with a name for your deployment command
# Replace with the project filename that should be executed
anaconda-project add-command
```
6. [Commit and push your updates to the project](./collaborate#committing-and-pushing-changes).
7. Stop and re-start the project session.
For more information and advanced command arguments, see [Working with commands](https://anaconda-project.readthedocs.io/en/latest/user-guide/tasks/work-with-commands.html) in the official `anaconda-project` documentation.
The following are example deployment commands you can use:
**For a Notebook:**
```yaml theme={null}
commands:
default:
notebook: .ipynb
```
**For a Panel dashboard**:
```yaml theme={null}
commands:
default:
unix: panel serve
supports_http_options: True
```
**For a generic script or web framework, including Python or R:**
```yaml theme={null}
commands:
default:
unix: bash .sh
supports_http_options: true
```
```yaml theme={null}
commands:
default:
unix: python .py
supports_http_options: true
```
```yaml theme={null}
commands:
default:
unix: Rscript .R
supports_http_options: true
```
### Validating project deployment commands
To validate the `anaconda-project.yml` and verify your project will deploy successfully:
1. Open your project.
2. If necessary, start a session.
3. Open a terminal within your session editor.
4. Verify that you are in the `lab_launch` environment.
5. Prepare the environment and test the deployment command by running the following commands:
```sh theme={null}
# Replace with the name of the project's environment
# Replace with the deployment command that you want to test
anaconda-project prepare --env-spec
anaconda-project run
```
Any errors preventing a successful deployment are displayed in the terminal.
### Testing project deployments
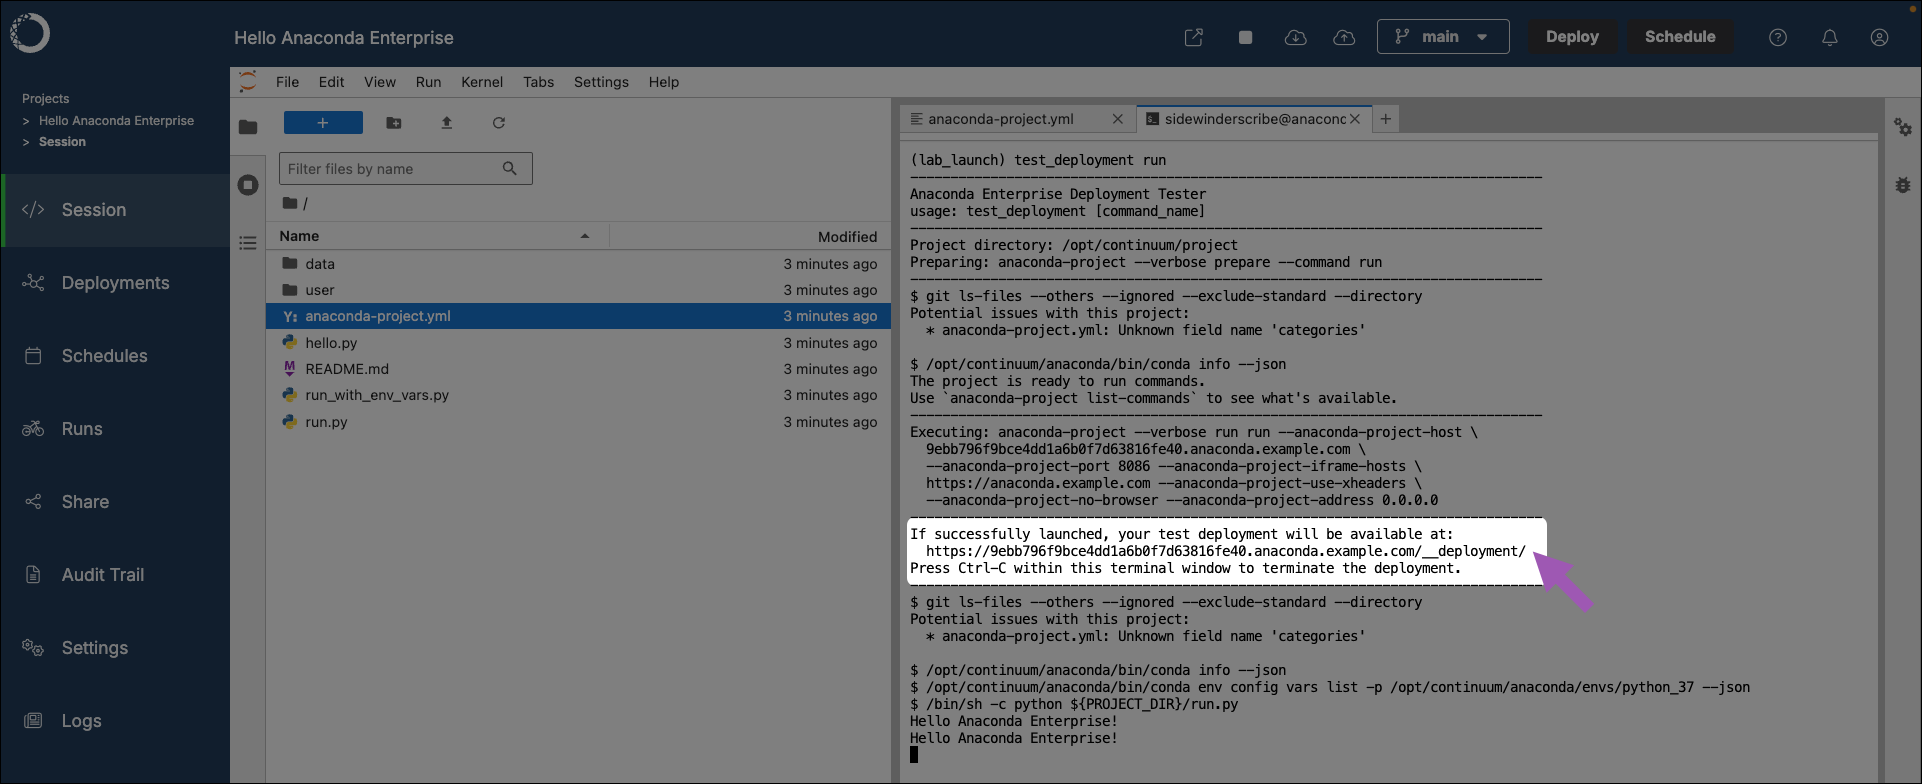
Once deployment commands are added to your project, you can test the deployment using the `test_deployment` command. This sets up a mini web application, allowing you to preview your deployment locally using a port within your session.
 To test a project deployment:
1. Open your project.
2. If necessary, start a session.
3. Open a terminal within your session editor.
4. Verify that you are in the `lab_launch` environment.
5. Test a deployment command you’ve added to your project by running the following command:
```sh theme={null}
# Replace with an available deployment command
test_deployment
```
If you do not supply a deployment command to test, the first command listed under the `commands:` section of the projects `.yml` configuration file will be run.
6. Navigate to the web address returned by the command to verify your project deployed successfully.
To test a project deployment:
1. Open your project.
2. If necessary, start a session.
3. Open a terminal within your session editor.
4. Verify that you are in the `lab_launch` environment.
5. Test a deployment command you’ve added to your project by running the following command:
```sh theme={null}
# Replace with an available deployment command
test_deployment
```
If you do not supply a deployment command to test, the first command listed under the `commands:` section of the projects `.yml` configuration file will be run.
6. Navigate to the web address returned by the command to verify your project deployed successfully.
 ## Locking project configurations
Project locking is a crucial step in ensuring your project is reproducible across multiple deployments at scale. It is best practice to lock your project once you have finalized configurations for your project, or if you are preparing to transition to a production or public deployment. For more information, see [Project reproducibility in Workbench](../../reference/reproducibility).
To lock your `anaconda-project.yml` file configurations to a fixed state:
1. Open your project.
2. If necessary, start a session.
3. Open a terminal within your session editor.
4. Verify that you are in the `lab_launch` environment.
5. Lock your project configurations by running the following command:
```sh theme={null}
anaconda-project lock
```
This instructs conda to solve the project’s environment, lock all packages and their dependencies to their current versions, and generates an `anaconda-project-lock.yml` file for your project.
## Locking project configurations
Project locking is a crucial step in ensuring your project is reproducible across multiple deployments at scale. It is best practice to lock your project once you have finalized configurations for your project, or if you are preparing to transition to a production or public deployment. For more information, see [Project reproducibility in Workbench](../../reference/reproducibility).
To lock your `anaconda-project.yml` file configurations to a fixed state:
1. Open your project.
2. If necessary, start a session.
3. Open a terminal within your session editor.
4. Verify that you are in the `lab_launch` environment.
5. Lock your project configurations by running the following command:
```sh theme={null}
anaconda-project lock
```
This instructs conda to solve the project’s environment, lock all packages and their dependencies to their current versions, and generates an `anaconda-project-lock.yml` file for your project.