> ## Documentation Index
> Fetch the complete documentation index at: https://anaconda.com/docs/llms.txt
> Use this file to discover all available pages before exploring further.
# Converting projects to pixi format
export const Comments = ({children}) => {
return ;
};
## Why convert to pixi?
Pixi is an alternative project format that replaces `anaconda-project.yml` with a `pixi.toml` manifest. It offers dramatically faster environment solves and reproducible lockfiles that ensure environments rebuild identically across sessions and machines.
A single `pixi.toml` file declares all package dependencies (`conda` and `pip`), environments, and tasks. You can also define multiple named environments for different workflows (for example, a default environment and a GPU-enabled variant).
## Converting a project to pixi
New projects are created in the classic `anaconda-project.yml` format. To use the `pixi.toml` format, convert an existing project from within a JupyterLab session.
Converting is non-destructive. Your original `anaconda-project.yml` is preserved alongside the `pixi.toml`.
1. Open the project in a JupyterLab session.
You must be in the JupyterLab Launcher to convert a project. If your project opens directly to a notebook or terminal, open the Launcher first.
2. Click **Convert to pixi**.
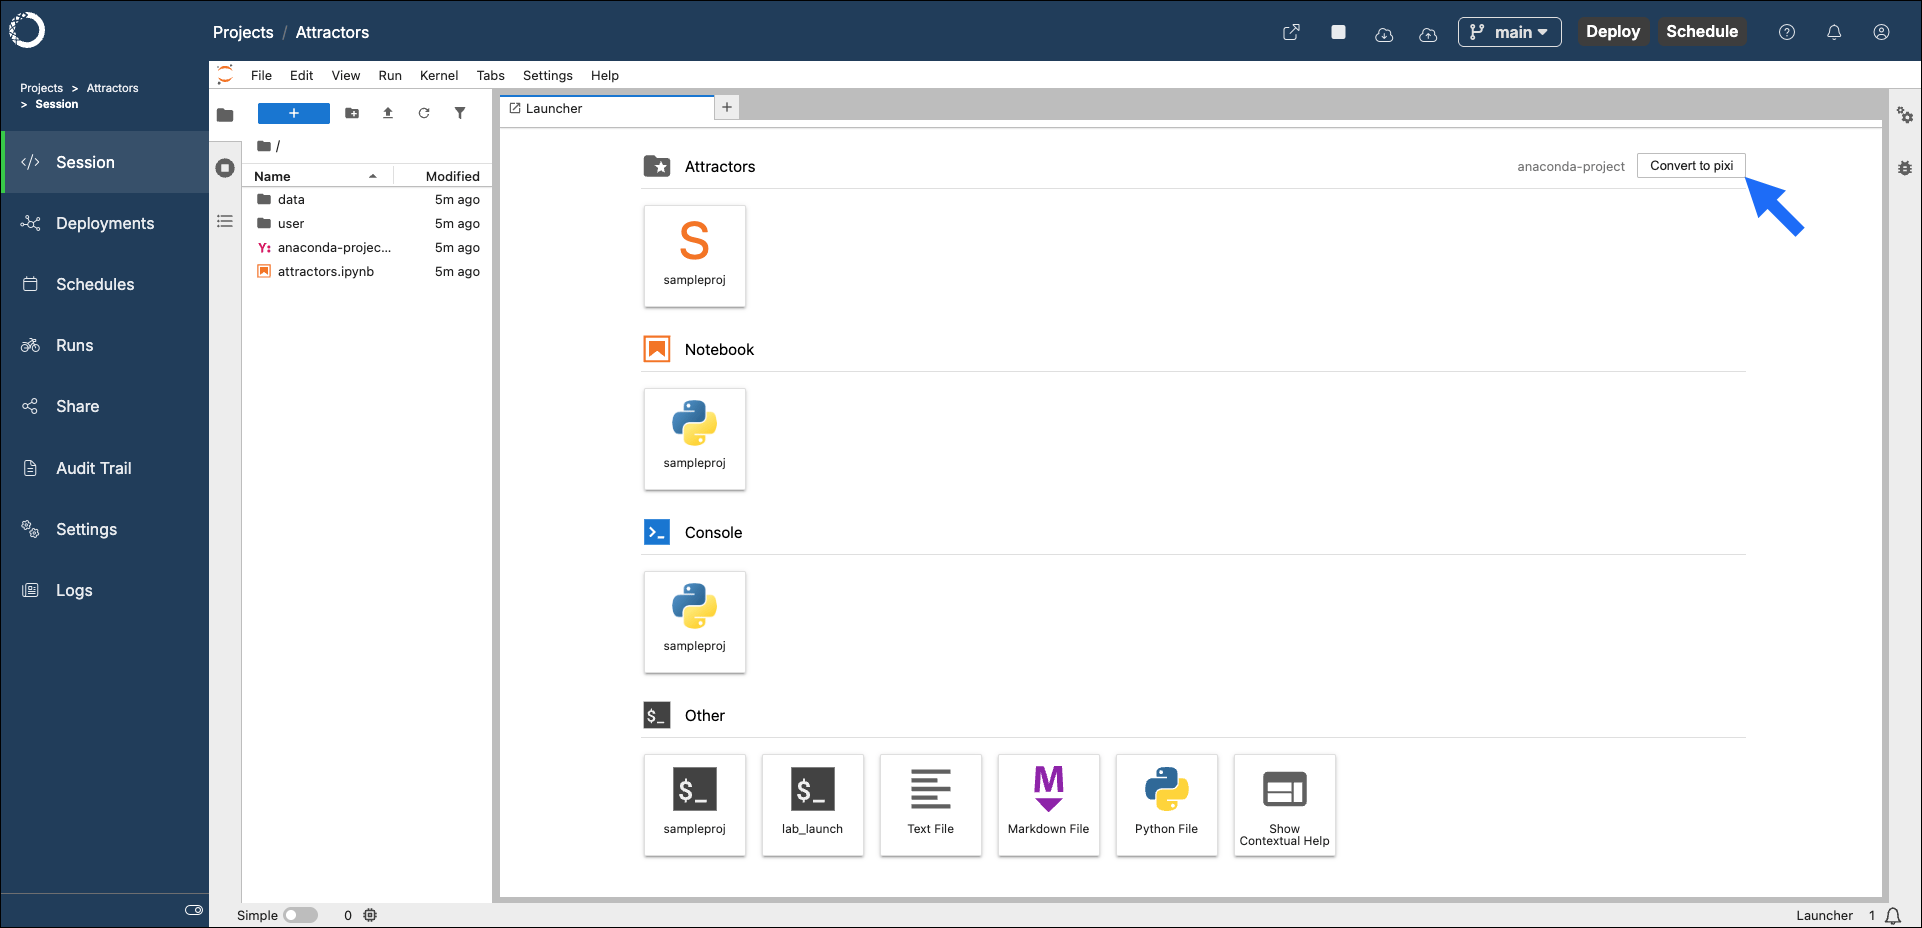 3. The project's environment is renamed to `default` during the conversion process. To retain the original environment name, clear the checkbox in the Convert to pixi modal.
4. Click **Convert**.
3. The project's environment is renamed to `default` during the conversion process. To retain the original environment name, clear the checkbox in the Convert to pixi modal.
4. Click **Convert**.
 Converted projects use the platform's configured channels (`pkgs/main`) by default. This differs from standalone pixi outside of Workbench, which defaults to `conda-forge`.
## Verifying the pixi environment
To confirm your project is running in the pixi-managed environment, verify that the Python path points under `.pixi/envs/`.
If the project's environment includes `ipykernel`, its kernel becomes available after the build completes.
1. Open a notebook.
2. Switch to the pixi environment kernel by clicking the kernel name in the top-right corner of the notebook, then selecting the pixi environment from the list.
3. Run the following in a cell:
```py theme={null}
import sys
print(sys.prefix)
```
The output path should be under `.pixi/envs/`.
If the environment does not include `ipykernel`, JupyterLab falls back to a global kernel. Add `ipykernel` to your `pixi.toml` and re-prepare to get a project-specific kernel.
1. Click the terminal tile for your environment in the Launcher. The environment is activated automatically.
2. Run the following command:
```sh theme={null}
python -c "import sys; print(sys.prefix)"
```
The output path should be under `.pixi/envs/`.
## Updating the pixi environment
After conversion, the environment is automatically prepared. If you later add or remove packages in `pixi.toml`, click the **Prepare environment** action on the Launcher card to rebuild the environment. No session restart is needed.
## Using your pixi environment
Once you are satisfied with your pixi environment, commit and push both `pixi.toml` and `pixi.lock` to the project repository. This ensures that other collaborators and future sessions use the same resolved environment.
Only tagged commits can be deployed or scheduled. After committing your pixi configuration, tag the commit before attempting to deploy or schedule the project.
## Running tasks
To run a task defined in `pixi.toml`, use the project's Launcher or run it from a terminal:
```sh theme={null}
pixi run
```
Replace \ with the name of the task you want to run.
Converted projects use the platform's configured channels (`pkgs/main`) by default. This differs from standalone pixi outside of Workbench, which defaults to `conda-forge`.
## Verifying the pixi environment
To confirm your project is running in the pixi-managed environment, verify that the Python path points under `.pixi/envs/`.
If the project's environment includes `ipykernel`, its kernel becomes available after the build completes.
1. Open a notebook.
2. Switch to the pixi environment kernel by clicking the kernel name in the top-right corner of the notebook, then selecting the pixi environment from the list.
3. Run the following in a cell:
```py theme={null}
import sys
print(sys.prefix)
```
The output path should be under `.pixi/envs/`.
If the environment does not include `ipykernel`, JupyterLab falls back to a global kernel. Add `ipykernel` to your `pixi.toml` and re-prepare to get a project-specific kernel.
1. Click the terminal tile for your environment in the Launcher. The environment is activated automatically.
2. Run the following command:
```sh theme={null}
python -c "import sys; print(sys.prefix)"
```
The output path should be under `.pixi/envs/`.
## Updating the pixi environment
After conversion, the environment is automatically prepared. If you later add or remove packages in `pixi.toml`, click the **Prepare environment** action on the Launcher card to rebuild the environment. No session restart is needed.
## Using your pixi environment
Once you are satisfied with your pixi environment, commit and push both `pixi.toml` and `pixi.lock` to the project repository. This ensures that other collaborators and future sessions use the same resolved environment.
Only tagged commits can be deployed or scheduled. After committing your pixi configuration, tag the commit before attempting to deploy or schedule the project.
## Running tasks
To run a task defined in `pixi.toml`, use the project's Launcher or run it from a terminal:
```sh theme={null}
pixi run
```
Replace \ with the name of the task you want to run.
For example, if your `pixi.toml` defines a task named `train`, you would run: `pixi run train`.
## Reverting to anaconda-project
To revert a project to its original format, delete the `pixi.toml` file. The original `anaconda-project.yml` is preserved during conversion and the project returns to `anaconda-project` mode.