> ## Documentation Index
> Fetch the complete documentation index at: https://anaconda.com/docs/llms.txt
> Use this file to discover all available pages before exploring further.
# Managing channels and packages
export const Danger = ({children}) => {
return ;
};
Data Science & AI Workbench allows all users to create channels in the internal Workbench repository and allows users with the `ae-uploader` role to upload packages to channels that they have read-write permissions for.
* For more information about assigning user permissions, see [roles](/docs/data-science/latest/admin/user-mgmt/groups#roles).
* For more information about channel permissions, see [sharing channels](#sharing-channels).
* For more information about how Workbench manages channels, see [configuring conda in Workbench](./conda-config).
As an administrator, it is your responsibility to monitor and maintain the channels and packages that are available in the internal Workbench repository for your users.
Do not modify the `anaconda-enterprise` channel. Modifications to this channel can cause serious problems for the platform!
## Viewing all channels
As an administrator, you are able to view and manage all channels.
1. Log in to Workbench as a user with administrator permissions.
The `anaconda-enterprise` user has the correct permissions.
2. Open the **My Account** dropdown menu and select *Admin Console*.
3. Select **Channels** from the left-hand menu.
The channels page displays a complete list of channels that exist within the internal Workbench repository. Each channel’s owner and when the channel was last updated is displayed for all channels.
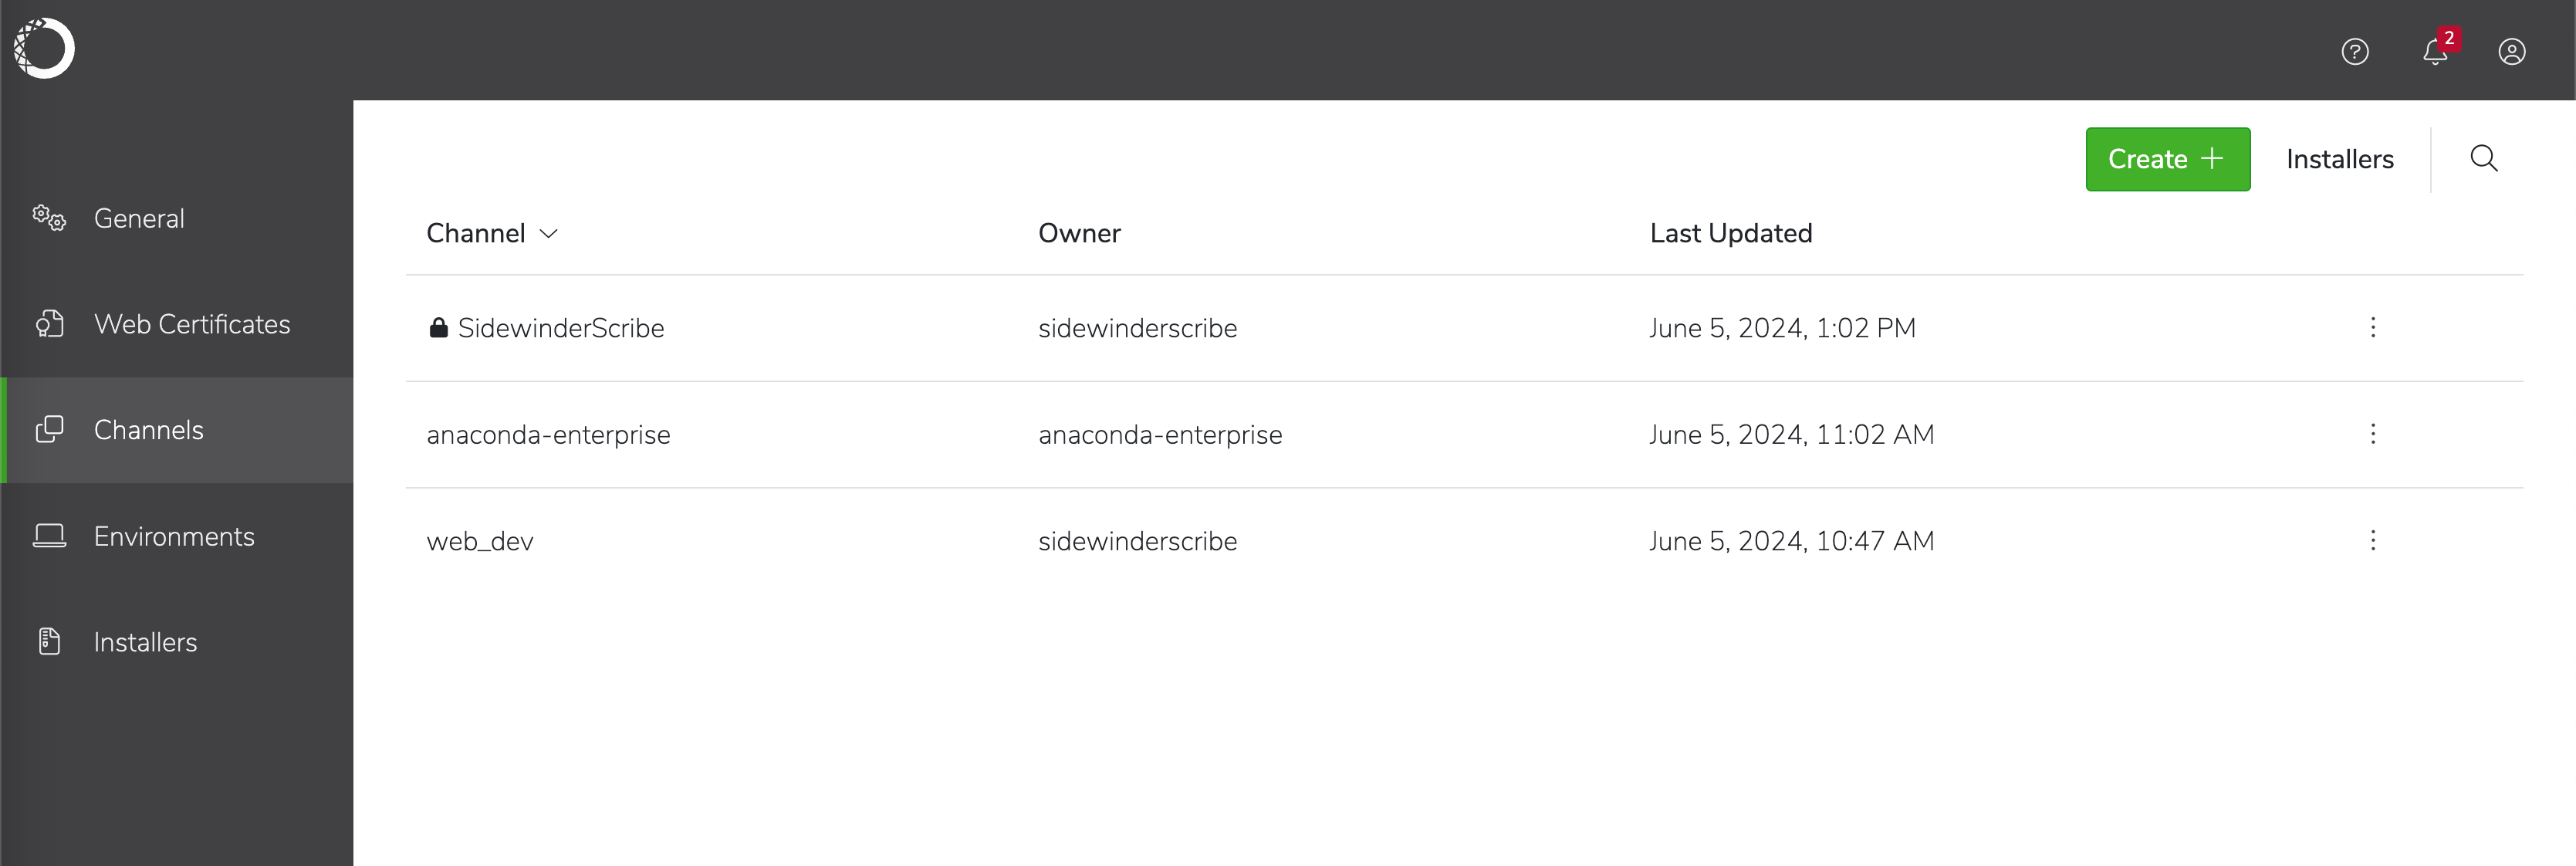 Channels that display a lock beside their name are private. For more information about private channels, see [sharing channels](#sharing-channels).
## Creating a channel
To create a channel in the internal Workbench repository:
1. Log in to Workbench.
2. Select **Channels** from the left-hand menu.
3. Click **Create** in the upper-right corner.
4. Set the channel to public or private access.
5. Enter a name for the channel, then click **Create**.
## Viewing channel packages
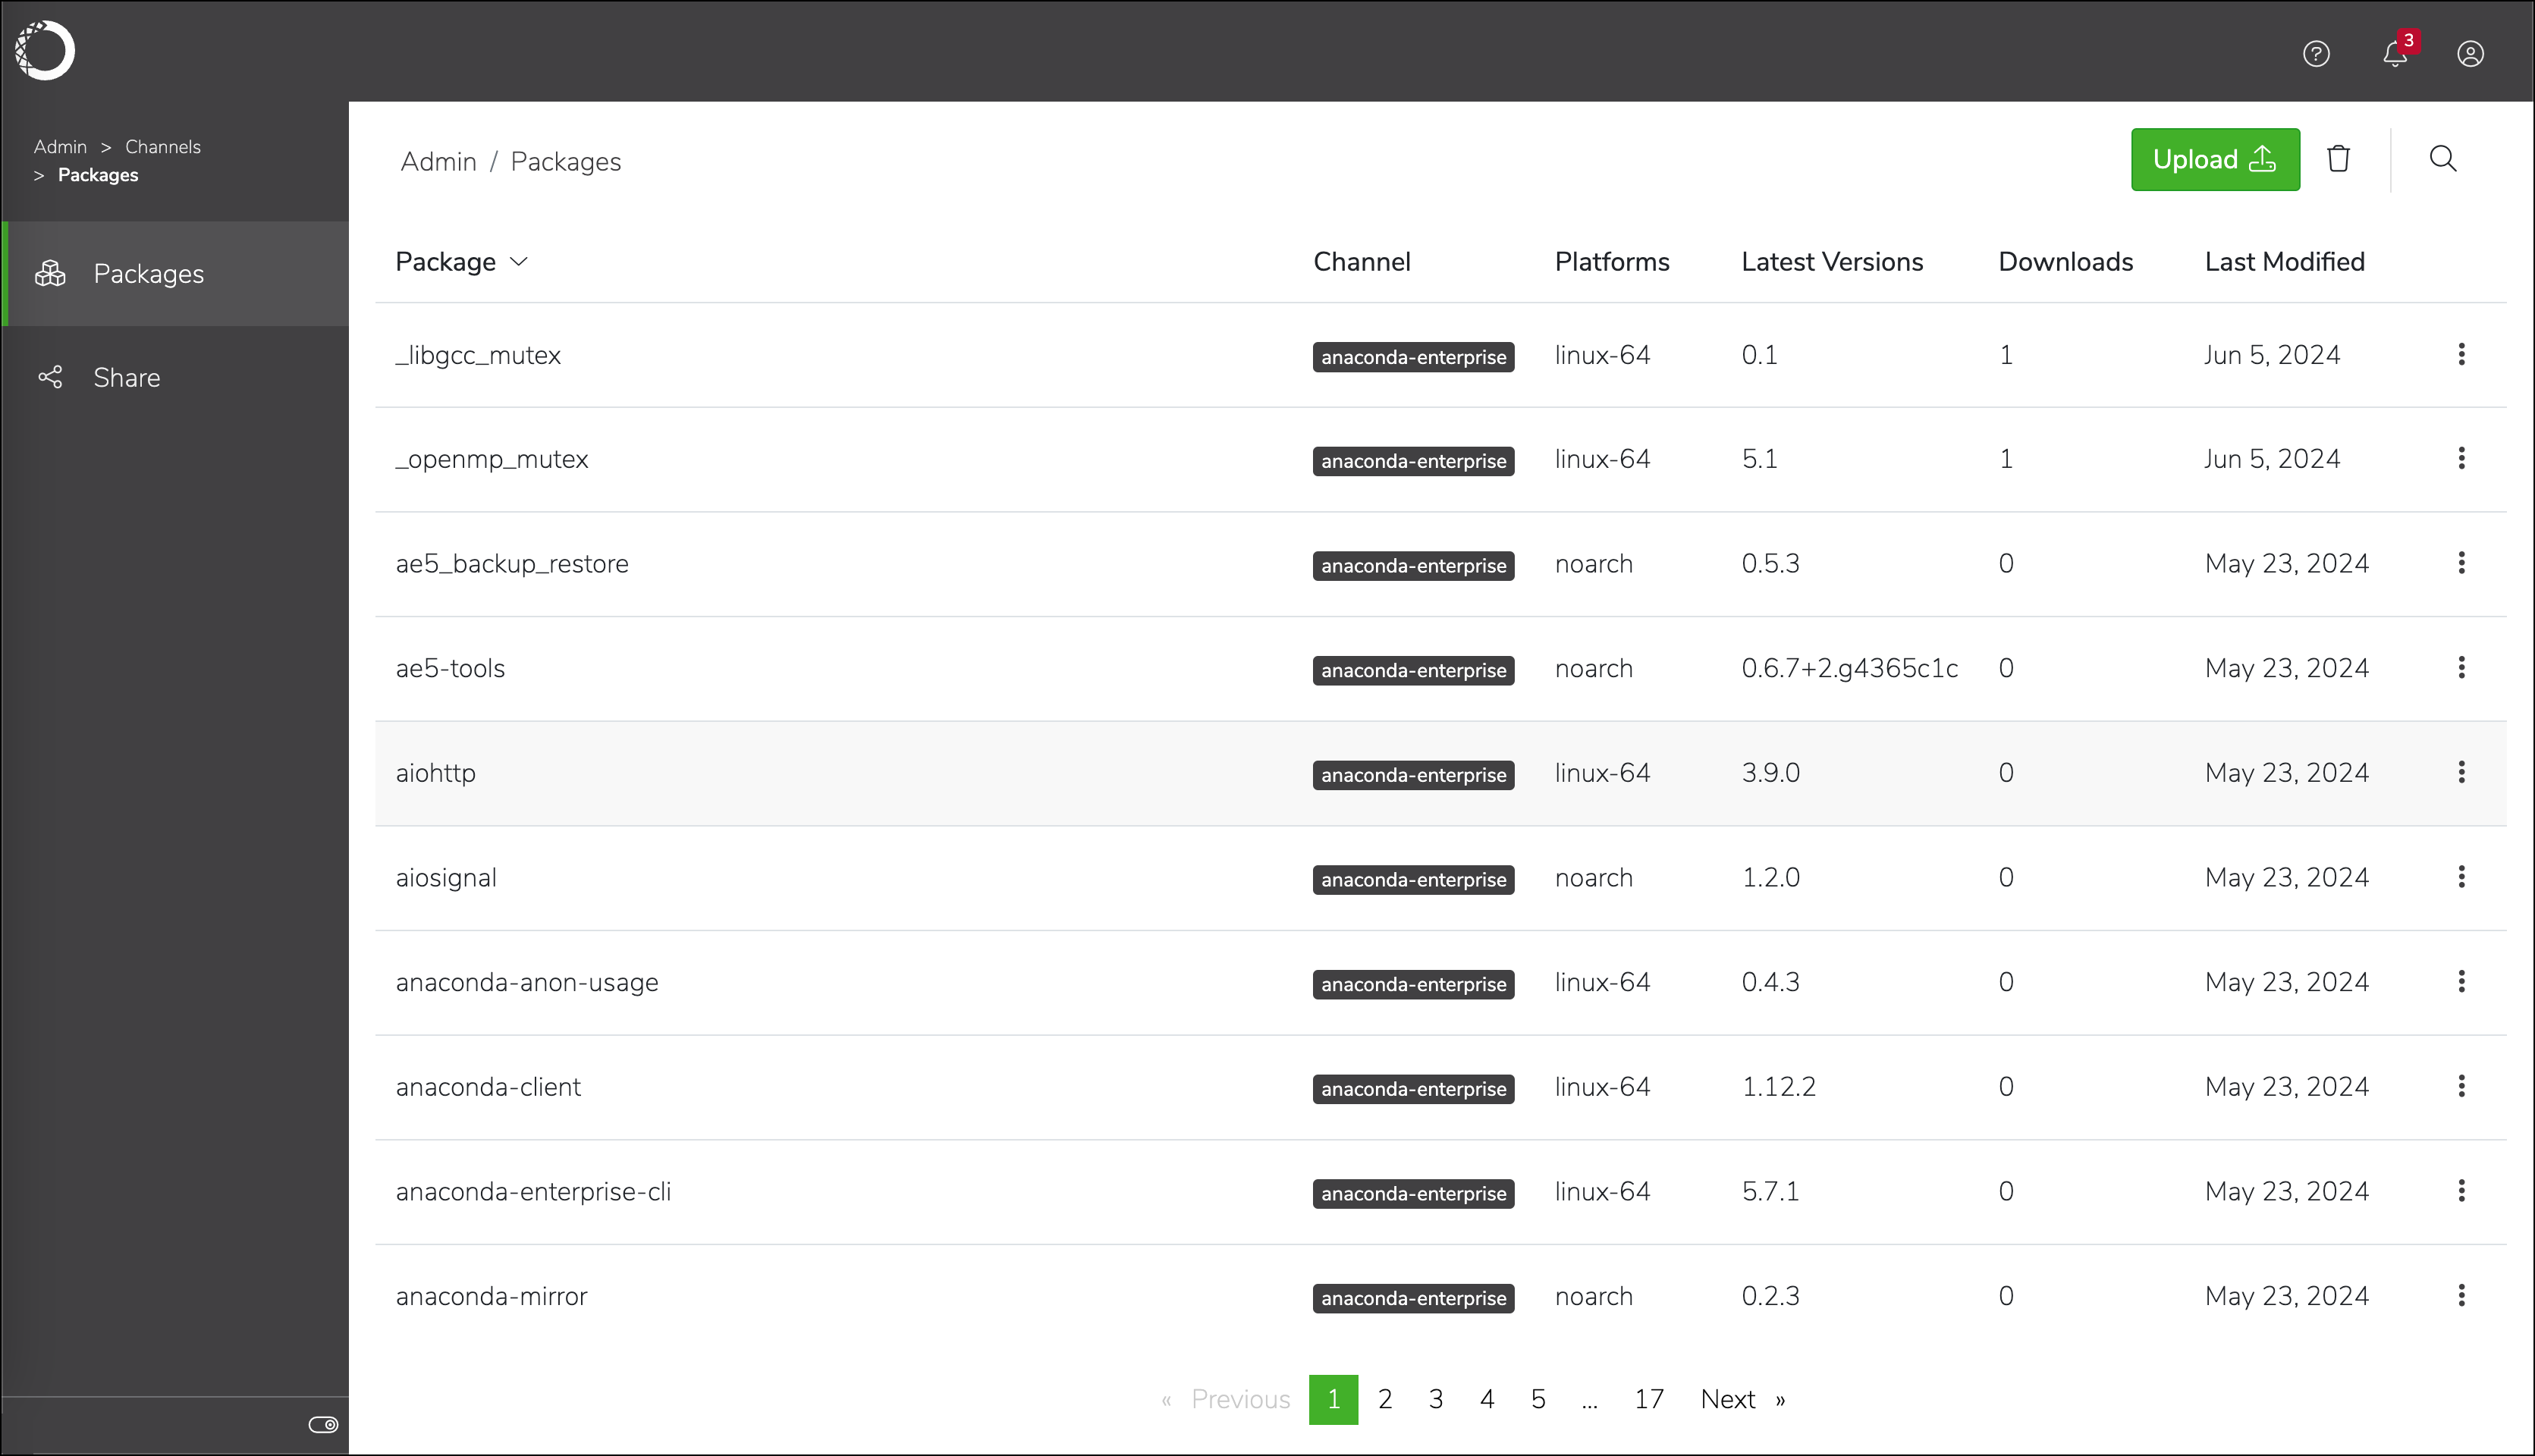
From the channels page, click on a channel name to view its packages.
You can see the supported platforms, latest versions, when each package in the channel was last modified, and the number of times each package has been downloaded.
Channels that display a lock beside their name are private. For more information about private channels, see [sharing channels](#sharing-channels).
## Creating a channel
To create a channel in the internal Workbench repository:
1. Log in to Workbench.
2. Select **Channels** from the left-hand menu.
3. Click **Create** in the upper-right corner.
4. Set the channel to public or private access.
5. Enter a name for the channel, then click **Create**.
## Viewing channel packages
From the channels page, click on a channel name to view its packages.
You can see the supported platforms, latest versions, when each package in the channel was last modified, and the number of times each package has been downloaded.
 ## Viewing package details
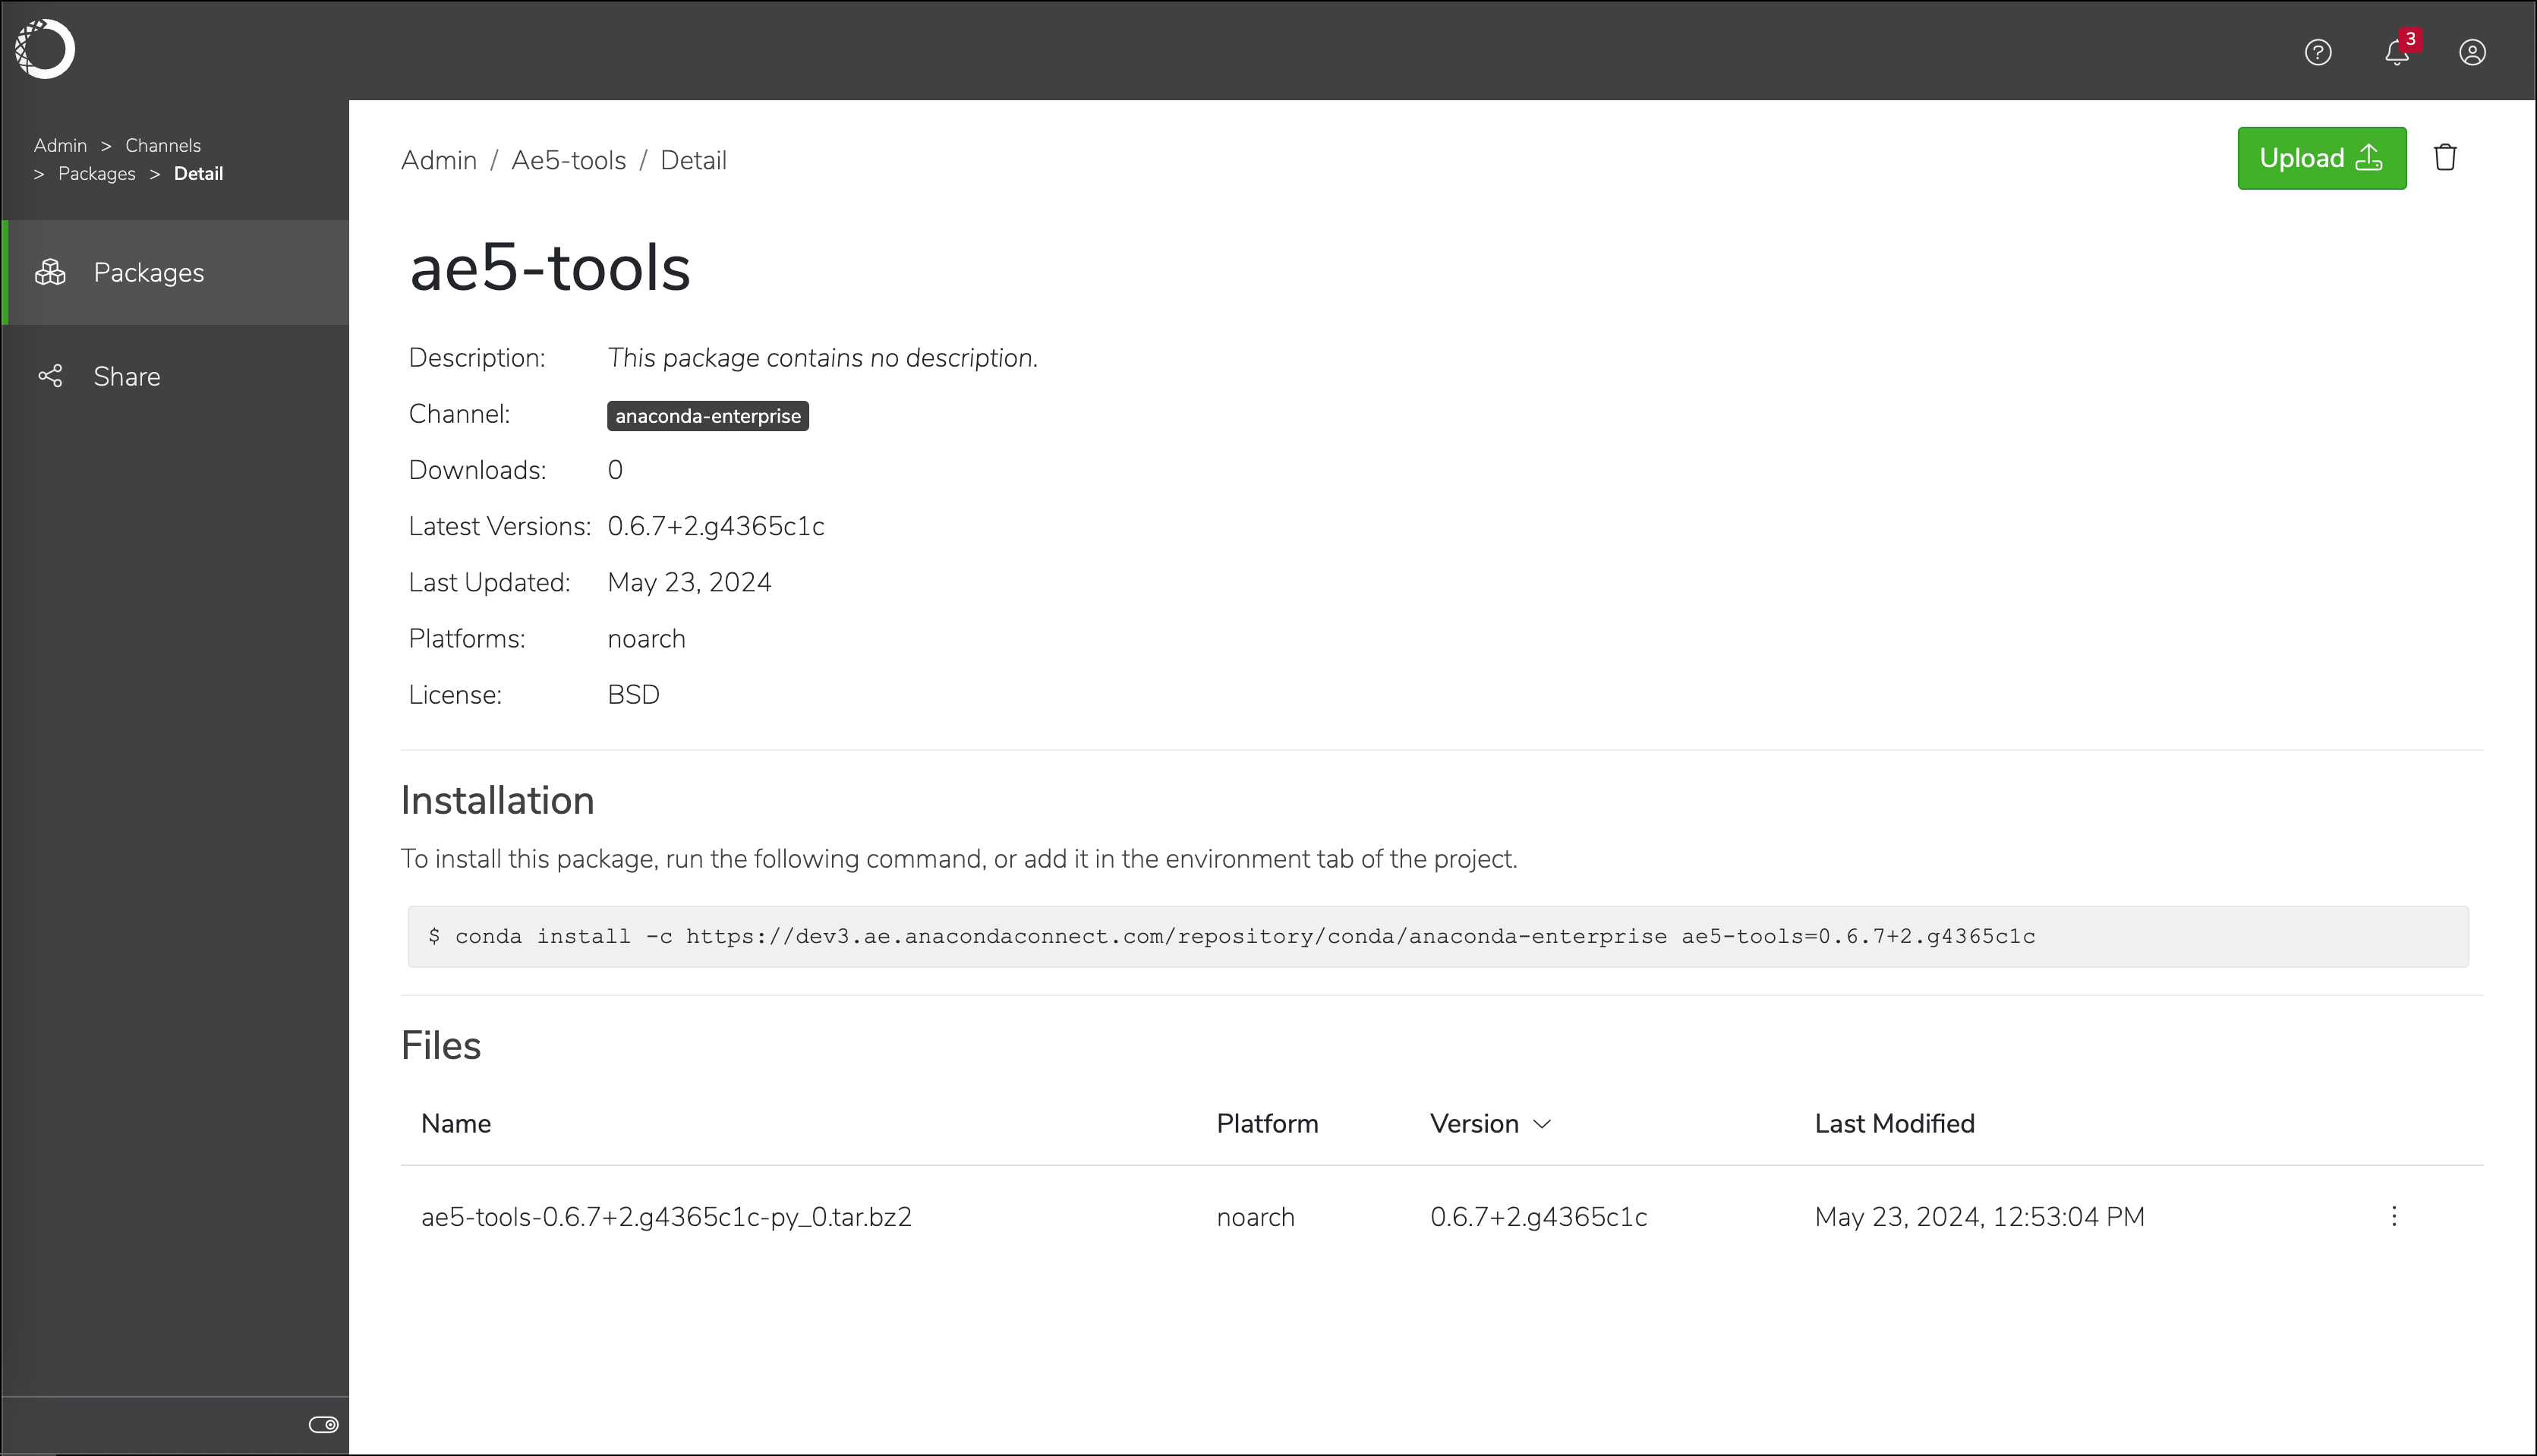
Each package in Workbench presents valuable information pertaining to the package, such as its platform architecture, version, license, number of downloads, and the last time the package was updated. You can also find a command on this page to assist you with installing the package in your environment.
From the channel packages page, select any package to view the package details page.
You can search for packages by name to locate them more efficiently.
## Viewing package details
Each package in Workbench presents valuable information pertaining to the package, such as its platform architecture, version, license, number of downloads, and the last time the package was updated. You can also find a command on this page to assist you with installing the package in your environment.
From the channel packages page, select any package to view the package details page.
You can search for packages by name to locate them more efficiently.
 ## Uploading a package to a channel
To add a package to an existing channel:
1. From the channels page, click on a channel name to view its packages.
2. Click **Upload** .
3. Click **Browse** and locate the package in your file system.
4. Click **Upload**.
There is a 1GB file size limit for package file uploads.
## Installing a package from a channel
To install a package from an internal Workbench channel:
1. From the channels page, click on a channel name to view its packages.
2. Select any package to view the package details page.
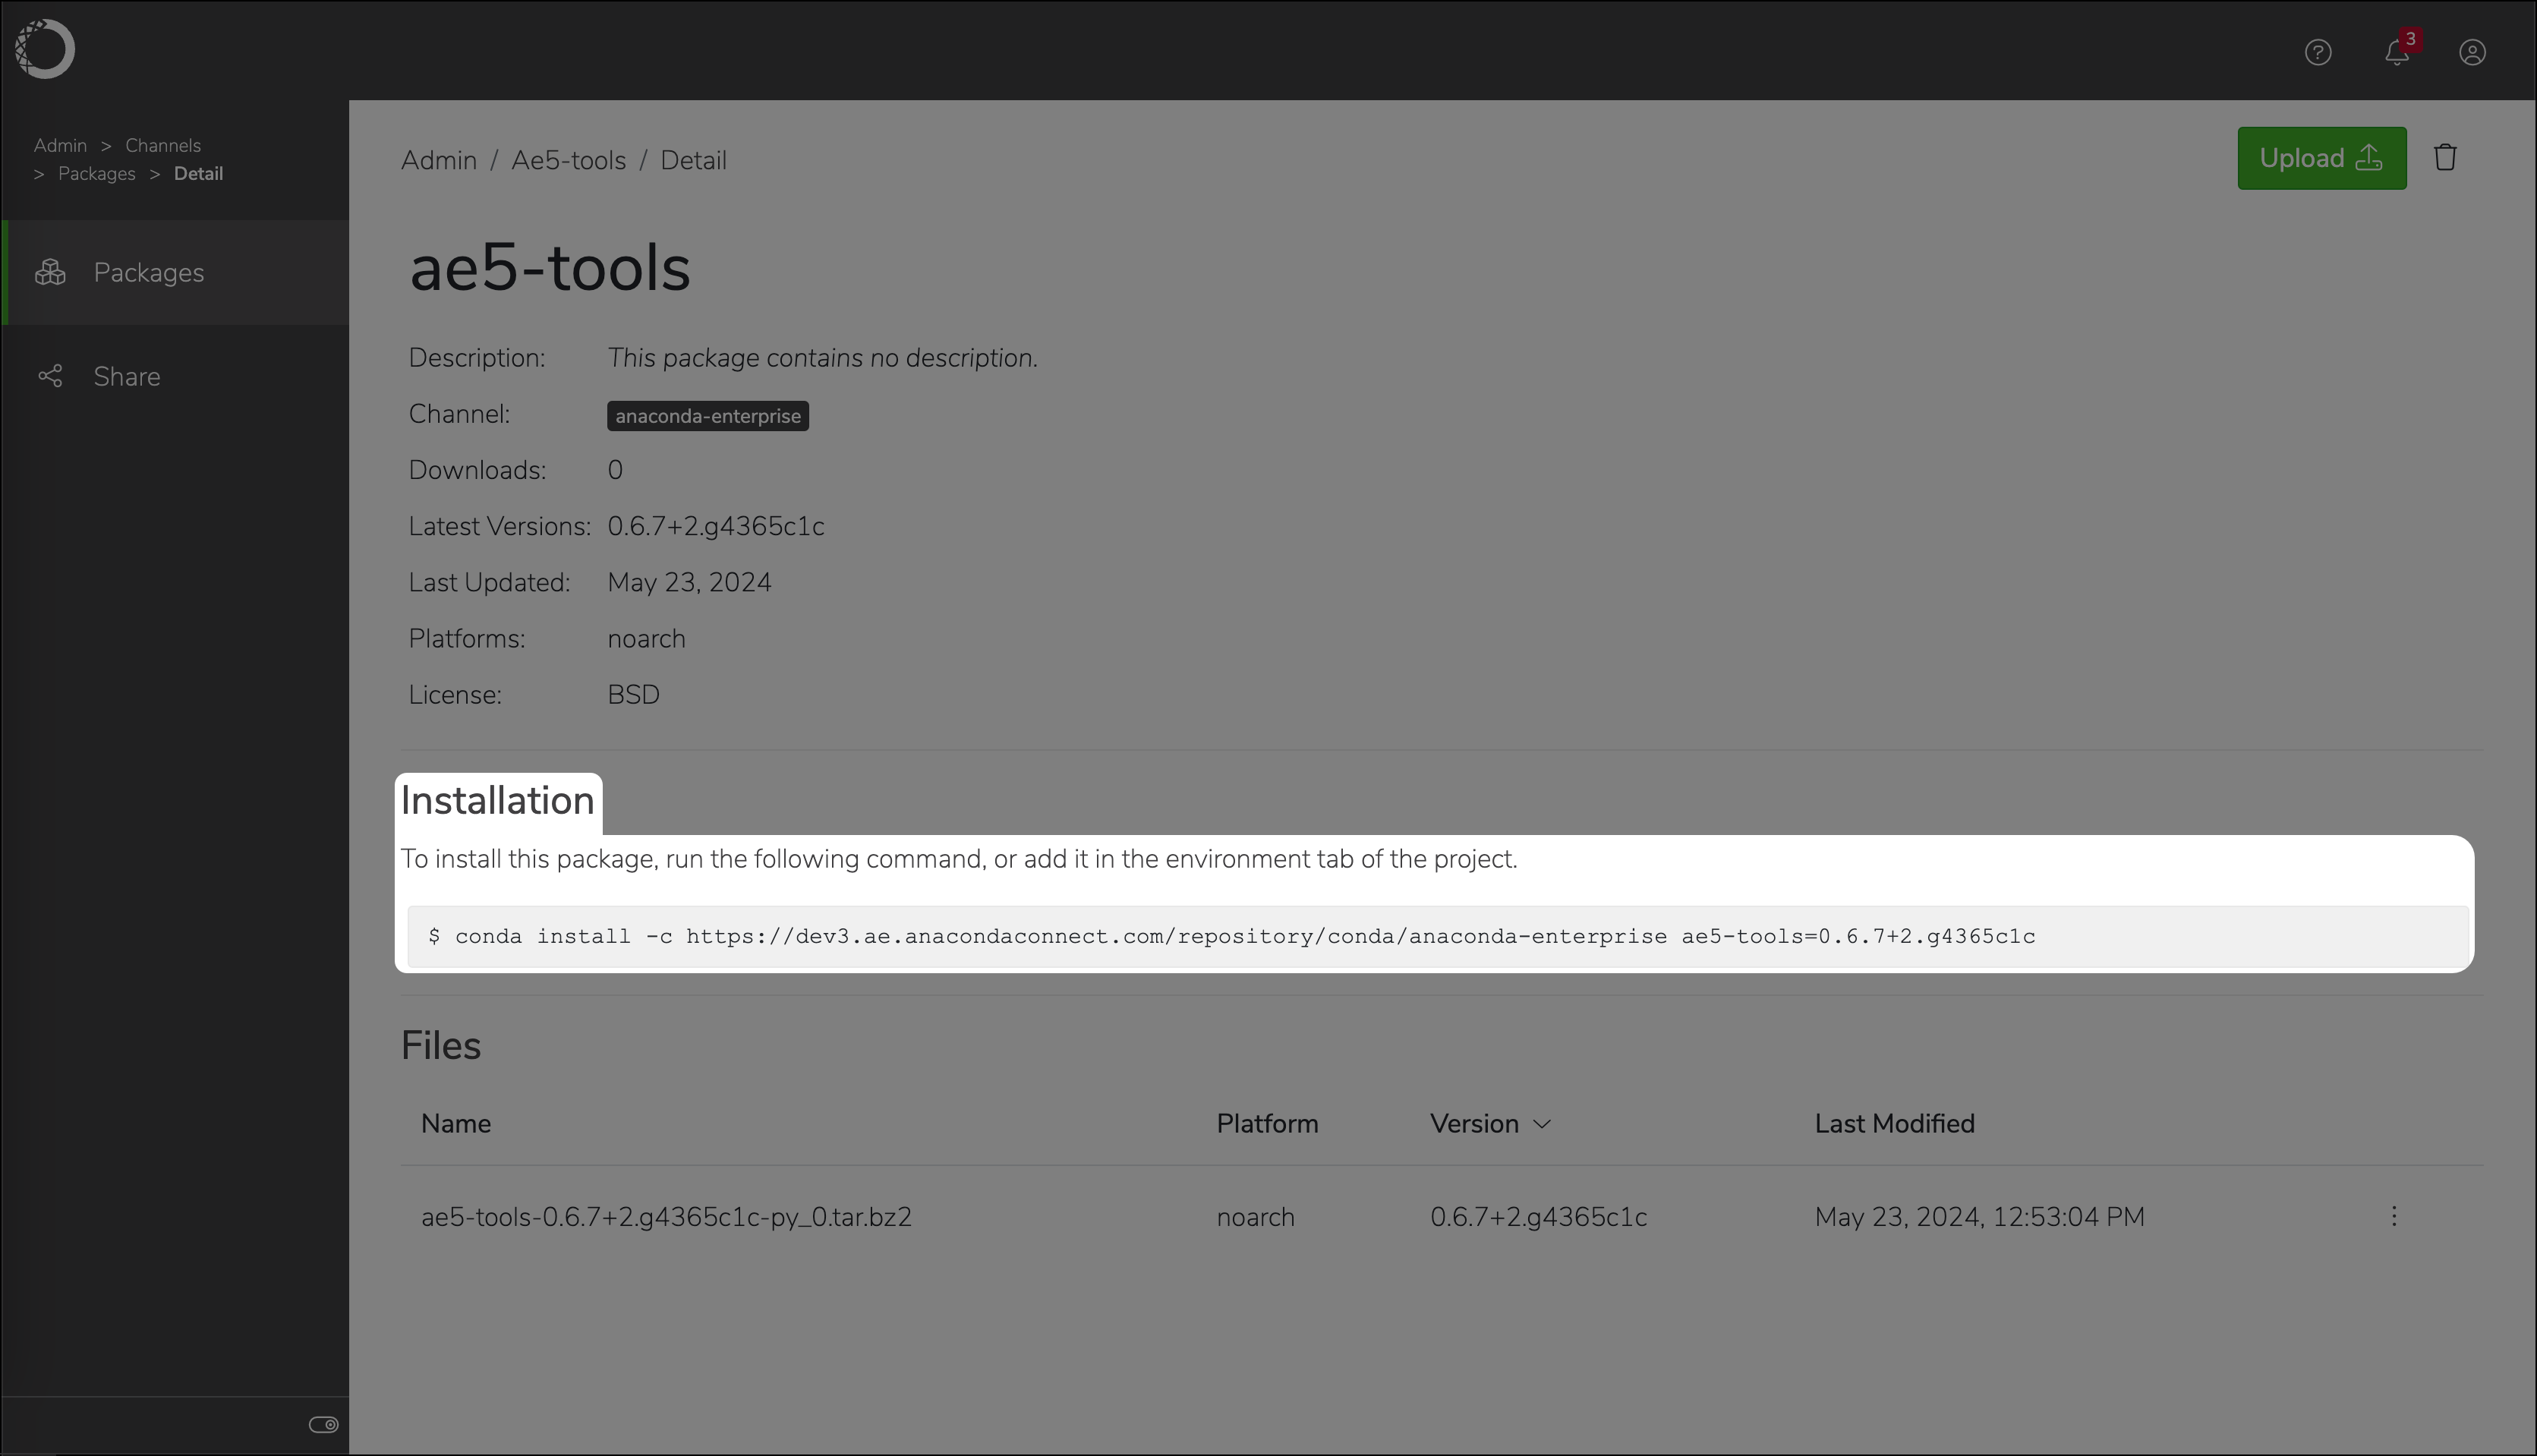
3. Copy the installation command provided.
4. Run the copied command in the environment you want to install the package in.
## Uploading a package to a channel
To add a package to an existing channel:
1. From the channels page, click on a channel name to view its packages.
2. Click **Upload** .
3. Click **Browse** and locate the package in your file system.
4. Click **Upload**.
There is a 1GB file size limit for package file uploads.
## Installing a package from a channel
To install a package from an internal Workbench channel:
1. From the channels page, click on a channel name to view its packages.
2. Select any package to view the package details page.
3. Copy the installation command provided.
4. Run the copied command in the environment you want to install the package in.
 ## Removing a package from a channel
To remove a package from an internal Workbench channel:
1. From the channels page, click on a channel name to view its packages.
2. Open the package’s actions dropdown menu, then select *Delete*.
3. Click **Delete**.
## Sharing channels
There are two types of channels within the internal Workbench repository, public and private. Channels are set to public access by default.
### Sharing public channels
Public channels are accessible by non-authenticated users. In other words, people that do not have access to Workbench can still access packages in the internal Workbench repository channels.
To share a public channel:
1. From the channels page, click on a channel name to view its details.
2. Select **Share** from the left-hand navigation.
3. Copy the channel address and distribute it to individuals who need access to the channel.
### Sharing private channels
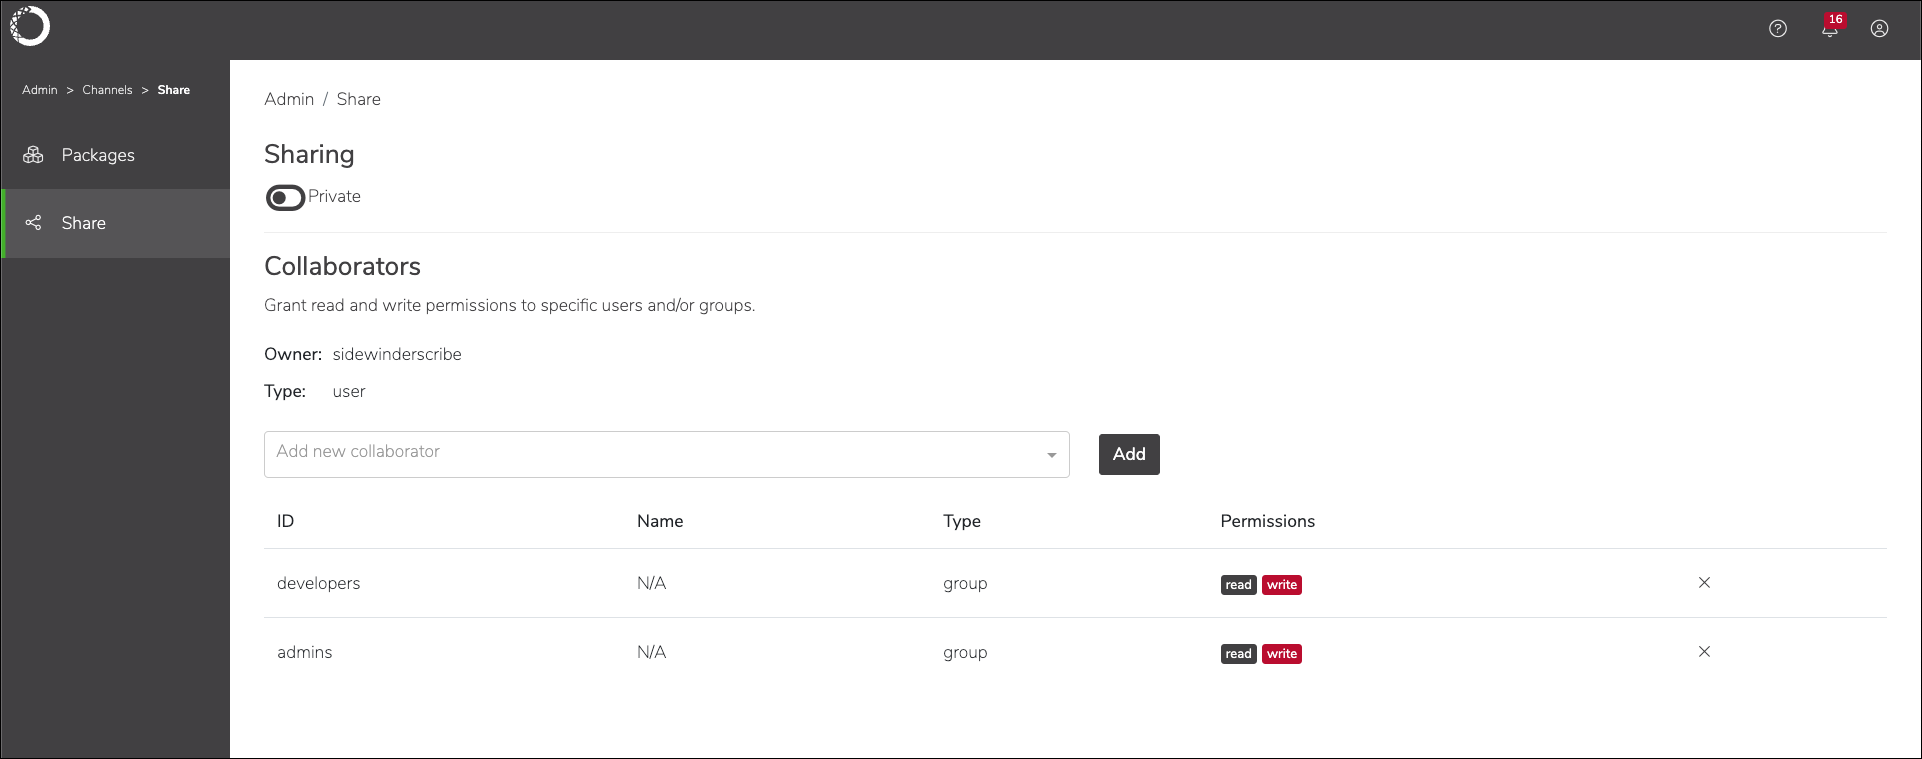
Private channels are accessible only to other Workbench users that you have added as collaborators to the channel.
To mark a channel as private:
1. From the channels page, click on a channel name to view its details.
2. Select **Share** from the left-hand navigation.
3. Set the **Sharing** toggle to **Private**.
To share a private channel with other Workbench users:
1. From the channels page, click on a channel name to view its details.
2. Select **Share** from the left-hand navigation.
3. Begin typing a user or group name in the **Add New Collaborator** dropdown to search for matches. Select the correct entry, then click **Add**.
By default, collaborators are granted read-write access to your shared channel. If you want to prevent collaborators from adding or removing packages in your channel, you’ll need to [restrict them to read-only access using the CLI](#managing-channels-using-the-cli).
## Removing a package from a channel
To remove a package from an internal Workbench channel:
1. From the channels page, click on a channel name to view its packages.
2. Open the package’s actions dropdown menu, then select *Delete*.
3. Click **Delete**.
## Sharing channels
There are two types of channels within the internal Workbench repository, public and private. Channels are set to public access by default.
### Sharing public channels
Public channels are accessible by non-authenticated users. In other words, people that do not have access to Workbench can still access packages in the internal Workbench repository channels.
To share a public channel:
1. From the channels page, click on a channel name to view its details.
2. Select **Share** from the left-hand navigation.
3. Copy the channel address and distribute it to individuals who need access to the channel.
### Sharing private channels
Private channels are accessible only to other Workbench users that you have added as collaborators to the channel.
To mark a channel as private:
1. From the channels page, click on a channel name to view its details.
2. Select **Share** from the left-hand navigation.
3. Set the **Sharing** toggle to **Private**.
To share a private channel with other Workbench users:
1. From the channels page, click on a channel name to view its details.
2. Select **Share** from the left-hand navigation.
3. Begin typing a user or group name in the **Add New Collaborator** dropdown to search for matches. Select the correct entry, then click **Add**.
By default, collaborators are granted read-write access to your shared channel. If you want to prevent collaborators from adding or removing packages in your channel, you’ll need to [restrict them to read-only access using the CLI](#managing-channels-using-the-cli).
 ## Managing channels using the CLI
[Log in to the CLI](/docs/data-science/latest/admin/advanced/ae-cli#logging-in-to-the-cli) before you begin attempting to manage channels.
### Creating a channel
Create a new channel in the internal Workbench repository by running the following command:
```sh theme={null}
# Replace with the name of the channel you want to create
anaconda-enterprise-cli channels create
```
### Uploading a package to a channel
Upload a conda package to a channel by running the following command:
```sh theme={null}
anaconda-enterprise-cli upload --channel
```
### Listing all channels
Get a list of all the channels on the platform with the `channels list` command:
```sh theme={null}
anaconda-enterprise-cli channels list
```
### Sharing channels
Share and manage permissions for channels with the `share` command:
```sh theme={null}
# Replace with the name of the channel you want to share
# Replace with the username of the user you want to share the channel with
anaconda-enterprise-cli channels share --user
```
```sh theme={null}
# Replace with the name of the channel you want to share
# Replace with the name of group you want to share with
anaconda-enterprise-cli channels share --group
```
By default, sharing a channel with a user or group provides them with read-write access to the channel. Restrict access to the channel to read-only by including `--level r` before the ``.
For example:
```sh theme={null}
anaconda-enterprise-cli channels share --group --level r
```
### Revoking channel access
Revoke a user’s or a group’s access to a channel by running one of the following commands:
```sh theme={null}
# Replace with the name of the channel you want to revoke access to
# Replace with the username of the user whose access you want to revoke
anaconda-enterprise-cli channels share --user --remove
```
```sh theme={null}
# Replace with the name of the channel you want to revoke access to
# Replace with the name of the group whose access you want to revoke
anaconda-enterprise-cli channels share --group --remove
```
### Setting a default channel
The `default_channel` value is not set when `anaconda-enterprise-cli` is installed. This means every time you run an `upload` command, you need to supply a specific channel name.
If you don’t want to include the `--channel` option with each command, set a default channel by running the following command:
```sh theme={null}
# Replace with the name of the channel you want to upload to by default
anaconda-enterprise-cli config set default_channel
```
View your current default channel by running the following command:
```sh theme={null}
# Replace with the name of the channel you want to upload to by default
anaconda-enterprise-cli config get default_channel ''
```
For more information about actions you can take with channels in the CLI, run the following command:
```sh theme={null}
anaconda-enterprise-cli channels --help
```
## Managing channels using the CLI
[Log in to the CLI](/docs/data-science/latest/admin/advanced/ae-cli#logging-in-to-the-cli) before you begin attempting to manage channels.
### Creating a channel
Create a new channel in the internal Workbench repository by running the following command:
```sh theme={null}
# Replace with the name of the channel you want to create
anaconda-enterprise-cli channels create
```
### Uploading a package to a channel
Upload a conda package to a channel by running the following command:
```sh theme={null}
anaconda-enterprise-cli upload --channel
```
### Listing all channels
Get a list of all the channels on the platform with the `channels list` command:
```sh theme={null}
anaconda-enterprise-cli channels list
```
### Sharing channels
Share and manage permissions for channels with the `share` command:
```sh theme={null}
# Replace with the name of the channel you want to share
# Replace with the username of the user you want to share the channel with
anaconda-enterprise-cli channels share --user
```
```sh theme={null}
# Replace with the name of the channel you want to share
# Replace with the name of group you want to share with
anaconda-enterprise-cli channels share --group
```
By default, sharing a channel with a user or group provides them with read-write access to the channel. Restrict access to the channel to read-only by including `--level r` before the ``.
For example:
```sh theme={null}
anaconda-enterprise-cli channels share --group --level r
```
### Revoking channel access
Revoke a user’s or a group’s access to a channel by running one of the following commands:
```sh theme={null}
# Replace with the name of the channel you want to revoke access to
# Replace with the username of the user whose access you want to revoke
anaconda-enterprise-cli channels share --user --remove
```
```sh theme={null}
# Replace with the name of the channel you want to revoke access to
# Replace with the name of the group whose access you want to revoke
anaconda-enterprise-cli channels share --group --remove
```
### Setting a default channel
The `default_channel` value is not set when `anaconda-enterprise-cli` is installed. This means every time you run an `upload` command, you need to supply a specific channel name.
If you don’t want to include the `--channel` option with each command, set a default channel by running the following command:
```sh theme={null}
# Replace with the name of the channel you want to upload to by default
anaconda-enterprise-cli config set default_channel
```
View your current default channel by running the following command:
```sh theme={null}
# Replace with the name of the channel you want to upload to by default
anaconda-enterprise-cli config get default_channel ''
```
For more information about actions you can take with channels in the CLI, run the following command:
```sh theme={null}
anaconda-enterprise-cli channels --help
```