> ## Documentation Index
> Fetch the complete documentation index at: https://anaconda.com/docs/llms.txt
> Use this file to discover all available pages before exploring further.
# Mounting an external file share
Data Science & AI Workbench provides a mechanism to mount shared volumes into sessions, deployments, and jobs, using the `volumes:` section of the platform configuration YAML file. In Workbench 5.4 and earlier, this was limited strictly to NFS volumes.
With Workbench version 5.5+ and the Bring Your Own Kubernetes (BYOK8s) option, this capability has been extended to support standard Kubernetes [Persistent Volumes (PVs) and Persistent Volume Claims (PVCs)](https://kubernetes.io/docs/concepts/storage/persistent-volumes/). This addition allows sessions, deployments, and pods to access a much wider variety of shared volumes. The specific set choices available to you will depend on the specific Kubernetes implementation and host. See [this section](https://kubernetes.io/docs/concepts/storage/volumes/) of the Kubernetes documentation for a list of volume types—but again, check the documentation for your specific Kubernetes provider for the subset of those choices available to you.
**Before you begin:**
Adding a new file share requires editing the Workbench configmap and restarting the workspace and deploy pods. For that reason, Anaconda recommends scheduling a maintenance window for this task and backing up the current version of `anaconda-enterprise-anaconda-platform.yml` before making changes to it.
## Creating the volume list
Volume specifications are provided to Workbench in the `volumes:` section of the configmap, as seen in the following example:
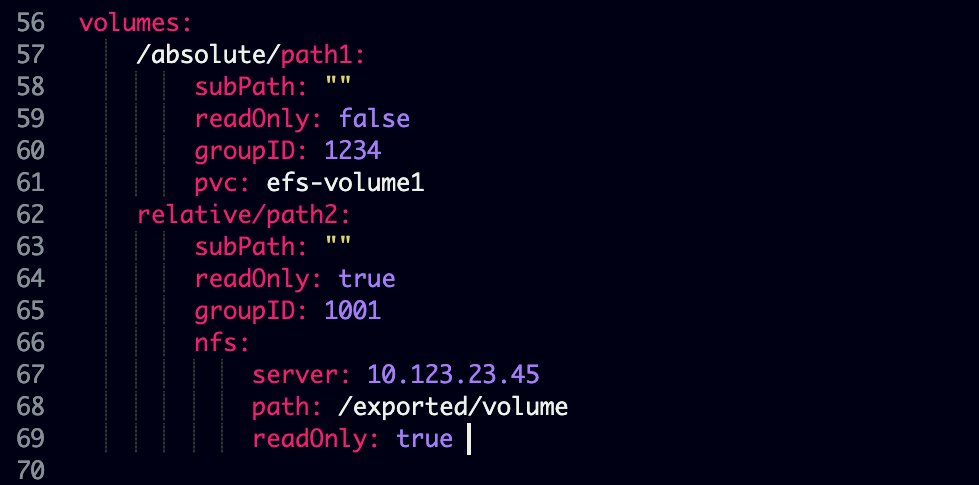 **This section is a dictionary with one entry for each mount.**
The dictionary key is the *mount* path for the volume. If the path does not begin with a forward slash `/`, then it is assumed to be *relative* to the `/data` subdirectory. So, for instance, the second mount path above will be `/data/relative/path2`.
`subPath` (optional): the subfolder of the shared filesystem to mount. Any leading slashes are ignored, and the path is assumed relative to the root of the exported mount. This is a somewhat advanced configuration; see [SubPaths and Template Expansion](#advanced-subpaths-and-template-expansion) section below for an advanced use case that can take advantage of this option.
`readOnly` (optional): if `true`, the file share will be mounted as read-only; that is, sessions, deployments, and jobs will not be able to write to the volume. If `false`, or omitted entirely, the file share will be mounted read-write.
For back-compatibility, the `readOnly` flag can be provided in two different locations: either within the `nfs` specification or outside of it. The volume will be mounted read-only if either value is `true`.
`groupID` (optional): a Unix GID which has read and/or write access to the volume. See the section [Ensuring Access](#ensuring-access) below for more information.
Finally, the volume specification itself is given by *one* of the two entries: `pvc` or `nfs`.
`pvc`: the name of the Kubernetes Persistent Volume Claim. This PVC must meet the following criteria:
* The PVC must be *pre-created*. Workbench will *not* auto-create a PVC for you. Thus the PVC and the Persistent Volume (PV) it is bound to must already exist.
* If `readOnly` is `false`, it must have a `ReadWriteMany` access policy. If `readOnly` is `true`, it must be either `ReadWriteMany` or `ReadOnlyMany`.
`nfs`: this is an NFS import specification, and its syntax has not changed from Workbench 5.4—and remains the only option for multi-node, Gravity-based clusters.
* `server`: the FQDN or IP address of the NFS server.
* `path`: the exported path from the NFS server.
* `readOnly`: see above.
## Ensuring access
For all mounted volumes, it is important to ensure that both read and write permissions are aligned with those of the session, deployment, and job containers. By default, containers run with a fixed, nonzero UID—identical across all users—and a GID of 0. Kubernetes also provides the facility to add [supplemental groups](https://kubernetes.io/docs/concepts/policy/pod-security-policy/#users-and-groups) to the containers, and we have added a limited ability to utilize this capability. To that end, here are the scenarios that Workbench supports in this standard case:
**If the GID of the content on the volume is 0**, then sessions, deployments, and pods will be able to access it without further configuration.
**If the GID of the content is a single, nonzero value**, then sessions, deployments, and pods can be given access to it by taking one of the following steps:
* Specify the GID using a `pv.beta.kubernetes.io/gid` [Persistent Volume annotation](https://kubernetes.io/docs/tutorials/configuration/configure-persistent-volume-storage/#access-control). (This must be added to the PV, *not* to the PVC.) Many persistent volume providers do this automatically—if so, Workbench 5.5 will pick this up automatically as well, and no further configuration is needed.
* Specify the GID for the volume using the `groupID` option above.
In all of these scenarios, only one GID is allowed per volume. So, for instance, in the example configuration above, the GID list will be `0,1001,1234`. Files accessible by any of these three GIDs will be accessible.
To access volumes with more complex Unix access permissions, including individual user permissions, the Authenticated NFS integration pattern will likely be necessary. See the dedicated documentation for that pattern for details.
## Adding the volume list to the configmap
The example provided in this section is for Gravity installs. Bring your own Kubernetes installs do not have the Operations Center and need to use a different method of managing the configmap.
1. Log in to Workbench, select **Menu** in the top right corner and click the **Administrative Console** link displayed at the bottom of the slide out window.
2. Click **Manage Resources**.
3. Log in to the Operations Center using the Administrator credentials [configured after installation](../../install/config).
4. Select **Kubernetes** from the menu on the left.
At this point Anaconda recommends copying the existing configuration into a backup text file, should you need to restore it.
5. Under the **configmaps** tab, select the `anaconda-enterprise-anaconda-platform.yml` configuration file.
**This section is a dictionary with one entry for each mount.**
The dictionary key is the *mount* path for the volume. If the path does not begin with a forward slash `/`, then it is assumed to be *relative* to the `/data` subdirectory. So, for instance, the second mount path above will be `/data/relative/path2`.
`subPath` (optional): the subfolder of the shared filesystem to mount. Any leading slashes are ignored, and the path is assumed relative to the root of the exported mount. This is a somewhat advanced configuration; see [SubPaths and Template Expansion](#advanced-subpaths-and-template-expansion) section below for an advanced use case that can take advantage of this option.
`readOnly` (optional): if `true`, the file share will be mounted as read-only; that is, sessions, deployments, and jobs will not be able to write to the volume. If `false`, or omitted entirely, the file share will be mounted read-write.
For back-compatibility, the `readOnly` flag can be provided in two different locations: either within the `nfs` specification or outside of it. The volume will be mounted read-only if either value is `true`.
`groupID` (optional): a Unix GID which has read and/or write access to the volume. See the section [Ensuring Access](#ensuring-access) below for more information.
Finally, the volume specification itself is given by *one* of the two entries: `pvc` or `nfs`.
`pvc`: the name of the Kubernetes Persistent Volume Claim. This PVC must meet the following criteria:
* The PVC must be *pre-created*. Workbench will *not* auto-create a PVC for you. Thus the PVC and the Persistent Volume (PV) it is bound to must already exist.
* If `readOnly` is `false`, it must have a `ReadWriteMany` access policy. If `readOnly` is `true`, it must be either `ReadWriteMany` or `ReadOnlyMany`.
`nfs`: this is an NFS import specification, and its syntax has not changed from Workbench 5.4—and remains the only option for multi-node, Gravity-based clusters.
* `server`: the FQDN or IP address of the NFS server.
* `path`: the exported path from the NFS server.
* `readOnly`: see above.
## Ensuring access
For all mounted volumes, it is important to ensure that both read and write permissions are aligned with those of the session, deployment, and job containers. By default, containers run with a fixed, nonzero UID—identical across all users—and a GID of 0. Kubernetes also provides the facility to add [supplemental groups](https://kubernetes.io/docs/concepts/policy/pod-security-policy/#users-and-groups) to the containers, and we have added a limited ability to utilize this capability. To that end, here are the scenarios that Workbench supports in this standard case:
**If the GID of the content on the volume is 0**, then sessions, deployments, and pods will be able to access it without further configuration.
**If the GID of the content is a single, nonzero value**, then sessions, deployments, and pods can be given access to it by taking one of the following steps:
* Specify the GID using a `pv.beta.kubernetes.io/gid` [Persistent Volume annotation](https://kubernetes.io/docs/tutorials/configuration/configure-persistent-volume-storage/#access-control). (This must be added to the PV, *not* to the PVC.) Many persistent volume providers do this automatically—if so, Workbench 5.5 will pick this up automatically as well, and no further configuration is needed.
* Specify the GID for the volume using the `groupID` option above.
In all of these scenarios, only one GID is allowed per volume. So, for instance, in the example configuration above, the GID list will be `0,1001,1234`. Files accessible by any of these three GIDs will be accessible.
To access volumes with more complex Unix access permissions, including individual user permissions, the Authenticated NFS integration pattern will likely be necessary. See the dedicated documentation for that pattern for details.
## Adding the volume list to the configmap
The example provided in this section is for Gravity installs. Bring your own Kubernetes installs do not have the Operations Center and need to use a different method of managing the configmap.
1. Log in to Workbench, select **Menu** in the top right corner and click the **Administrative Console** link displayed at the bottom of the slide out window.
2. Click **Manage Resources**.
3. Log in to the Operations Center using the Administrator credentials [configured after installation](../../install/config).
4. Select **Kubernetes** from the menu on the left.
At this point Anaconda recommends copying the existing configuration into a backup text file, should you need to restore it.
5. Under the **configmaps** tab, select the `anaconda-enterprise-anaconda-platform.yml` configuration file.
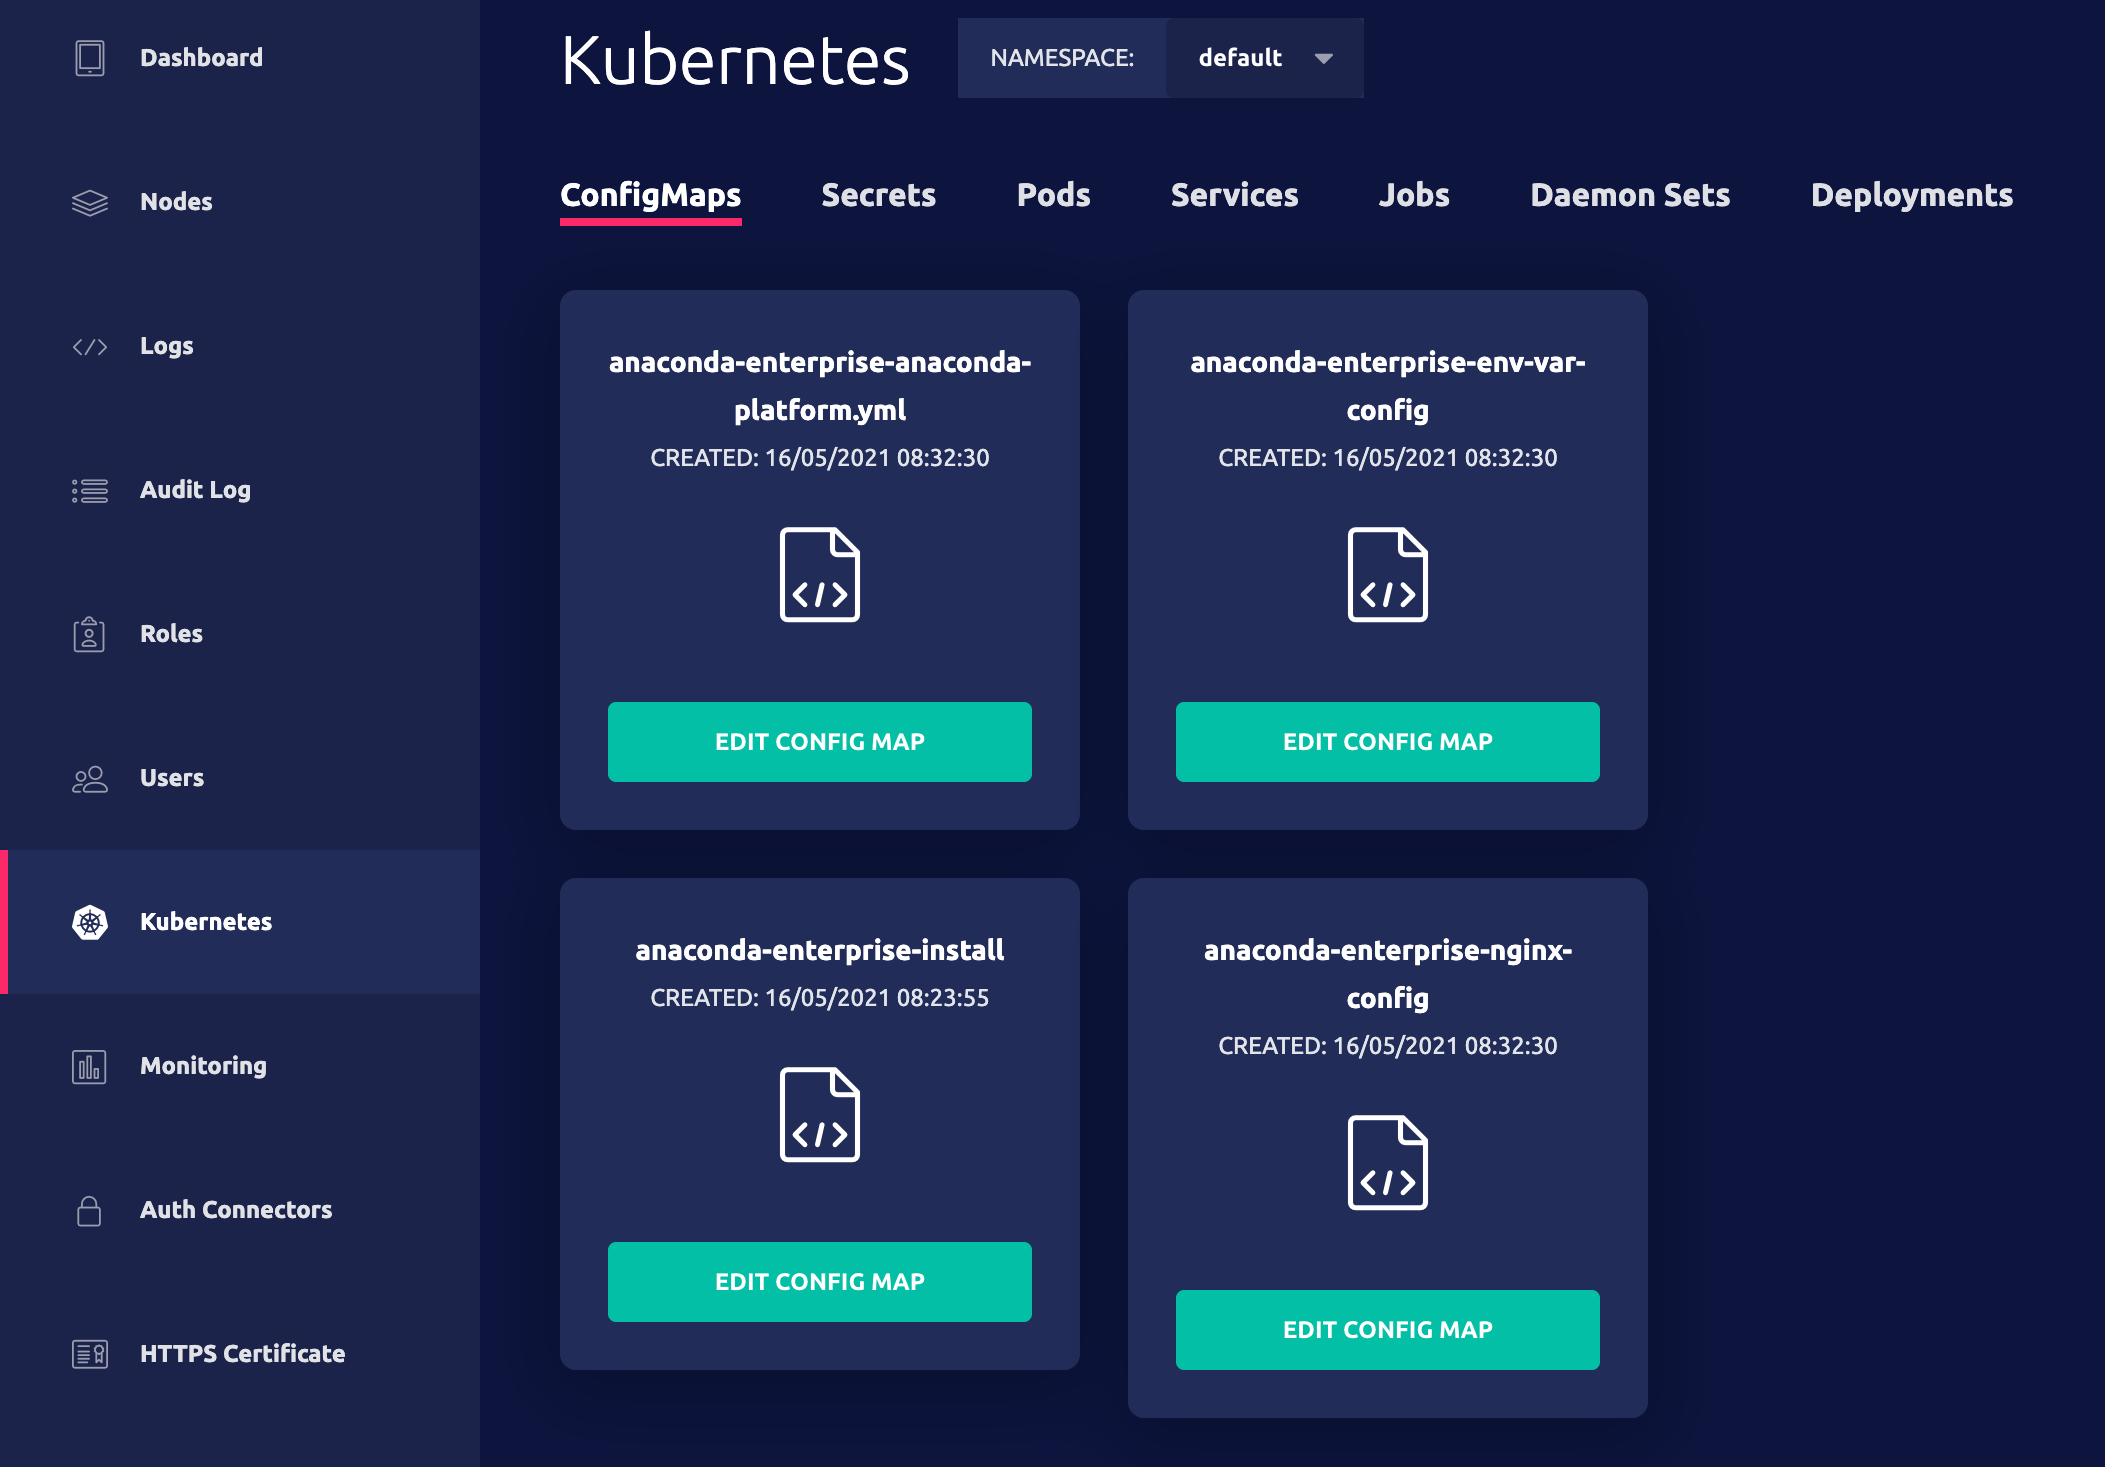 6. If the volume section is commented out, uncomment it. Whether it’s commented out or not, replace it with the new volume configuration according to the [volume section](#creating-the-volume-list) above. It is very important to respect the indentation of the volume section, so confirm that before saving.
7. Click **Apply** to save your changes to the configmap.
8. To update the Workbench server with your changes, restart services by running these commands *on the master node*:
```sh theme={null}
sudo gravity enter
kubectl get pods | grep 'workspace\|deploy' | cut -d' ' -f1 | xargs kubectl delete pods
```
9. Wait about 10 seconds, and then run `kubectl get pods`. Examine the workspace and deploy pods. You may still see the old versions of the pods shutting down, which is expected. The new pods should be running as expected. If for some reason there are errors, it is likely because your configmap is improperly formatted. Double check your editing and repeat steps 5 through 7 above to correct the issue.
10. To verify that Workbench users can access the volumes you add, start a new project editing session or restart an existing one and confirm that the volumes are listed as available directories. See [Loading data](../../data-science-workflows/data/load) for more information.
## Addressing file share downtime
If a server that you have configured as a volume mount in Workbench goes offline, editor sessions, applications and deployment jobs that use it will not start. If downtime occurs, Anaconda recommends disabling the mount until the server resumes proper functioning.
### Disabling a volume mount
1. Stop any sessions, deployments, or jobs that rely on that shared volume.
2. Open the configmap and comment out the `volume` section.
3. Restart the workspace and deploy pods as described in step 8 above.
## ADVANCED: SubPaths and template expansion
The capability described in this section should be considered advanced and/or experimental in nature. Most customers can safely ignore this section. Instead, they should consider the new Managed Persistence feature, which leverages these capabilities in a very specific and tested manner. If you do find a novel use case for subPaths and templating, please share it with us!
The `subPath` option can be used to mount just a *subdirectory* of a shared volume at multiple mount points in the session. Anything above that subdirectory would not be visible within the container. For example, consider a shared volume with the following fileset:
```
/testA
/user1/testB
/user2/testC
```
Suppose this volume is exported via a PVC called `pv1`, and consider the following mount configuration:
```
mount1:
pvc: pv1
subPath: user1
mount2/mount3:
pvc: pv1
subPath: user2
```
If nothing else is mounted into the `/data` path, the container would see the following tree:
```
/data/mount1/testB
/data/mount2/mount3/testC
```
Notice that `testA` is not accessible at all, and the `user1` and `user2` are not even at the same “depth” of the directory tree anymore. As a result, sub path mounting offers a simple form of access control, allowing only portions of a shared volume to be made available to sessions, deployments, and jobs.
The usefulness of this subpath functionality has been enhanced with simple *templating* functionality. Specifically, the `subPath` value can include one or more of the following strings (braces included), and Workbench will dynamically substitute a relevant value in its place:
* `{user}`: the username of the person *running* the session, deployment, or job
* `{owner}`: the username of the owner of the project associated with the session, deployment, or job. These will differ in a collaboration scenario: if `userA` created a project and shared it with `userB`, who is now running a session, `{user}` would be `userB` and `{owner}` would be `userA`.
* `{id}`: the 32-character uuid of the session, deployment, or job.
* `{project}`: the 32-character uuid of the project itself. This will be the same across all sessions, deployments, and jobs associated with that project.
Using these templates, we can construct mounting configurations that dynamically select subdirectories based upon the context of the running container. For example, consider the following mount configuration:
```
shared_data:
pvc: pv1
subPath: owner/{owner}/{project}
unshared_data:
pvc: pv1
subPath: user/{user}/{project}
scratch:
pvc: pv1
subPath: scratch/{id}
```
Then given a project owned by `userA`, and a session being run by `userB`, the three subpaths might be
```
/data/shared_data -> owner/userA/23dc83c697ca4c21bdc3c96e6b7d2c86
/data/unshared_data -> user/userB/23dc83c697ca4c21bdc3c96e6b7d2c86
/data/scratch -> scratch/bf38438b5a8044d190de3c2899d6da9e
```
depending, of course, on the precise UUID values for the project and session.
As mentioned in the note in the beginning of this section, subpaths and templating represent an advanced feature and Anaconda recommends it only for experimental use. But they do sit at the core of our Managed Persistence support, so we are ensuring this functionality is tested and supported for that use case. If you find a new use for this capability, please let us know so that we can ensure it is included in our support.
6. If the volume section is commented out, uncomment it. Whether it’s commented out or not, replace it with the new volume configuration according to the [volume section](#creating-the-volume-list) above. It is very important to respect the indentation of the volume section, so confirm that before saving.
7. Click **Apply** to save your changes to the configmap.
8. To update the Workbench server with your changes, restart services by running these commands *on the master node*:
```sh theme={null}
sudo gravity enter
kubectl get pods | grep 'workspace\|deploy' | cut -d' ' -f1 | xargs kubectl delete pods
```
9. Wait about 10 seconds, and then run `kubectl get pods`. Examine the workspace and deploy pods. You may still see the old versions of the pods shutting down, which is expected. The new pods should be running as expected. If for some reason there are errors, it is likely because your configmap is improperly formatted. Double check your editing and repeat steps 5 through 7 above to correct the issue.
10. To verify that Workbench users can access the volumes you add, start a new project editing session or restart an existing one and confirm that the volumes are listed as available directories. See [Loading data](../../data-science-workflows/data/load) for more information.
## Addressing file share downtime
If a server that you have configured as a volume mount in Workbench goes offline, editor sessions, applications and deployment jobs that use it will not start. If downtime occurs, Anaconda recommends disabling the mount until the server resumes proper functioning.
### Disabling a volume mount
1. Stop any sessions, deployments, or jobs that rely on that shared volume.
2. Open the configmap and comment out the `volume` section.
3. Restart the workspace and deploy pods as described in step 8 above.
## ADVANCED: SubPaths and template expansion
The capability described in this section should be considered advanced and/or experimental in nature. Most customers can safely ignore this section. Instead, they should consider the new Managed Persistence feature, which leverages these capabilities in a very specific and tested manner. If you do find a novel use case for subPaths and templating, please share it with us!
The `subPath` option can be used to mount just a *subdirectory* of a shared volume at multiple mount points in the session. Anything above that subdirectory would not be visible within the container. For example, consider a shared volume with the following fileset:
```
/testA
/user1/testB
/user2/testC
```
Suppose this volume is exported via a PVC called `pv1`, and consider the following mount configuration:
```
mount1:
pvc: pv1
subPath: user1
mount2/mount3:
pvc: pv1
subPath: user2
```
If nothing else is mounted into the `/data` path, the container would see the following tree:
```
/data/mount1/testB
/data/mount2/mount3/testC
```
Notice that `testA` is not accessible at all, and the `user1` and `user2` are not even at the same “depth” of the directory tree anymore. As a result, sub path mounting offers a simple form of access control, allowing only portions of a shared volume to be made available to sessions, deployments, and jobs.
The usefulness of this subpath functionality has been enhanced with simple *templating* functionality. Specifically, the `subPath` value can include one or more of the following strings (braces included), and Workbench will dynamically substitute a relevant value in its place:
* `{user}`: the username of the person *running* the session, deployment, or job
* `{owner}`: the username of the owner of the project associated with the session, deployment, or job. These will differ in a collaboration scenario: if `userA` created a project and shared it with `userB`, who is now running a session, `{user}` would be `userB` and `{owner}` would be `userA`.
* `{id}`: the 32-character uuid of the session, deployment, or job.
* `{project}`: the 32-character uuid of the project itself. This will be the same across all sessions, deployments, and jobs associated with that project.
Using these templates, we can construct mounting configurations that dynamically select subdirectories based upon the context of the running container. For example, consider the following mount configuration:
```
shared_data:
pvc: pv1
subPath: owner/{owner}/{project}
unshared_data:
pvc: pv1
subPath: user/{user}/{project}
scratch:
pvc: pv1
subPath: scratch/{id}
```
Then given a project owned by `userA`, and a session being run by `userB`, the three subpaths might be
```
/data/shared_data -> owner/userA/23dc83c697ca4c21bdc3c96e6b7d2c86
/data/unshared_data -> user/userB/23dc83c697ca4c21bdc3c96e6b7d2c86
/data/scratch -> scratch/bf38438b5a8044d190de3c2899d6da9e
```
depending, of course, on the precise UUID values for the project and session.
As mentioned in the note in the beginning of this section, subpaths and templating represent an advanced feature and Anaconda recommends it only for experimental use. But they do sit at the core of our Managed Persistence support, so we are ensuring this functionality is tested and supported for that use case. If you find a new use for this capability, please let us know so that we can ensure it is included in our support.