> ## Documentation Index
> Fetch the complete documentation index at: https://anaconda.com/docs/llms.txt
> Use this file to discover all available pages before exploring further.
# Getting started with Anaconda Desktop
export const TroubleshootSolution = ({children}) => <>
Solution
{children}
;
export const TroubleshootCause = ({children}) =>
Cause
{children}
;
export const TroubleshootTitle = ({children}) => <>
{children}
;
export const Troubleshoot = ({children}) => ;
Anaconda Desktop is currently available through a limited early access program. [Anaconda AI Navigator](/docs/legacy/ai-navigator/getting-started-ai-navigator) provides many of the same capabilities and is available to all users.
This guide is designed to walk you through the essential steps to begin using Anaconda Desktop. It provides guidance on signing in, launching applications, downloading models, chatting with a model, and loading models into the API server.
## Before you start
Make sure you have [Anaconda Desktop installed](/docs/anaconda-desktop/install-desktop).
## Launching Desktop
Open Desktop using the following instructions:
From the Start menu, search for "Anaconda Desktop" and select to open.
Open Launchpad, then select the Anaconda Desktop icon.
Open your applications menu and select Anaconda Desktop.
This step describes the Ubuntu GUI application launch process. To launch Anaconda Desktop on a different Linux distribution, follow the application launch steps for your Linux distribution.
## Signing in
Anaconda Desktop requires you to have an Anaconda account to sign in. If you're a part of an Anaconda Platform organization, sign in with your assigned credentials.
 ## Understanding Desktop
### The Dashboard
When Desktop opens, you'll start at the **Dashboard**, where you're provided a few ideas on how to get started. After you've interacted with Desktop by, for example, downloading a model or starting a chat, your most recent activities will appear on your dashboard.
## Understanding Desktop
### The Dashboard
When Desktop opens, you'll start at the **Dashboard**, where you're provided a few ideas on how to get started. After you've interacted with Desktop by, for example, downloading a model or starting a chat, your most recent activities will appear on your dashboard.
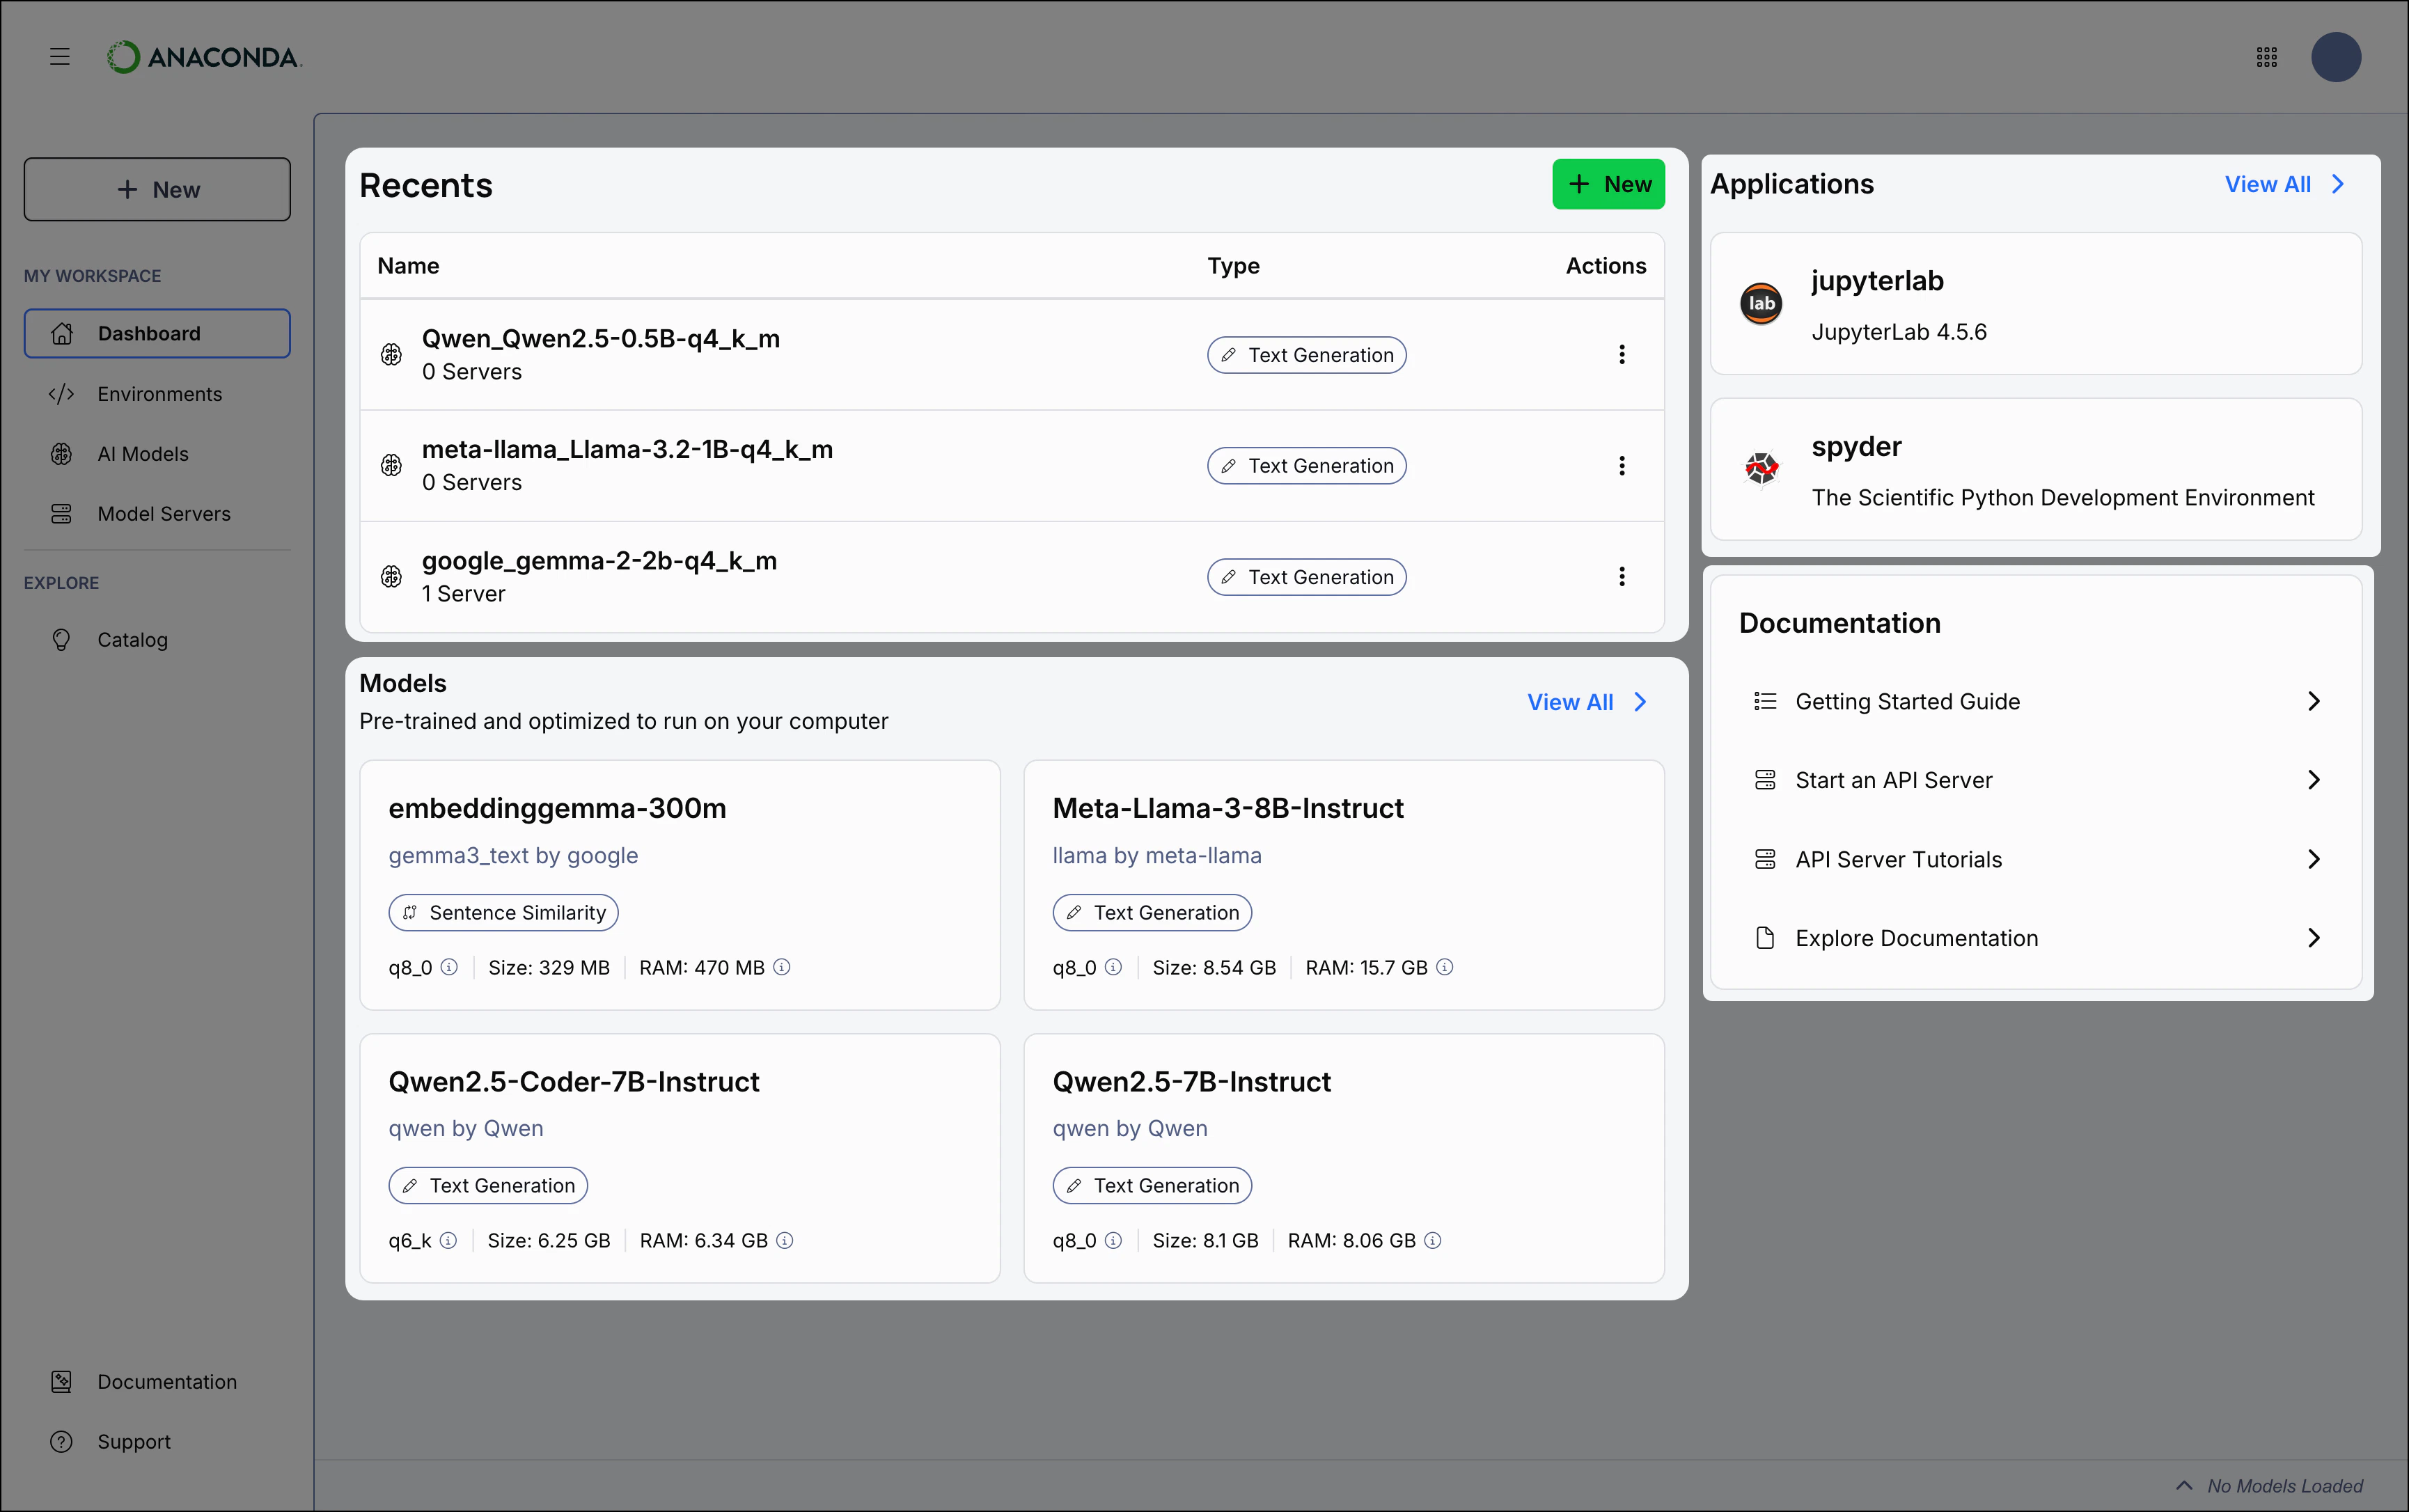 From the **Recents** table, you can return to a previous chat, start a new chat with a model (`text-generation` type models only), or start an API server. Hover over a table row and select **Chat** or **Start Server**. Select the **Actions** menu to **Delete** a table item.
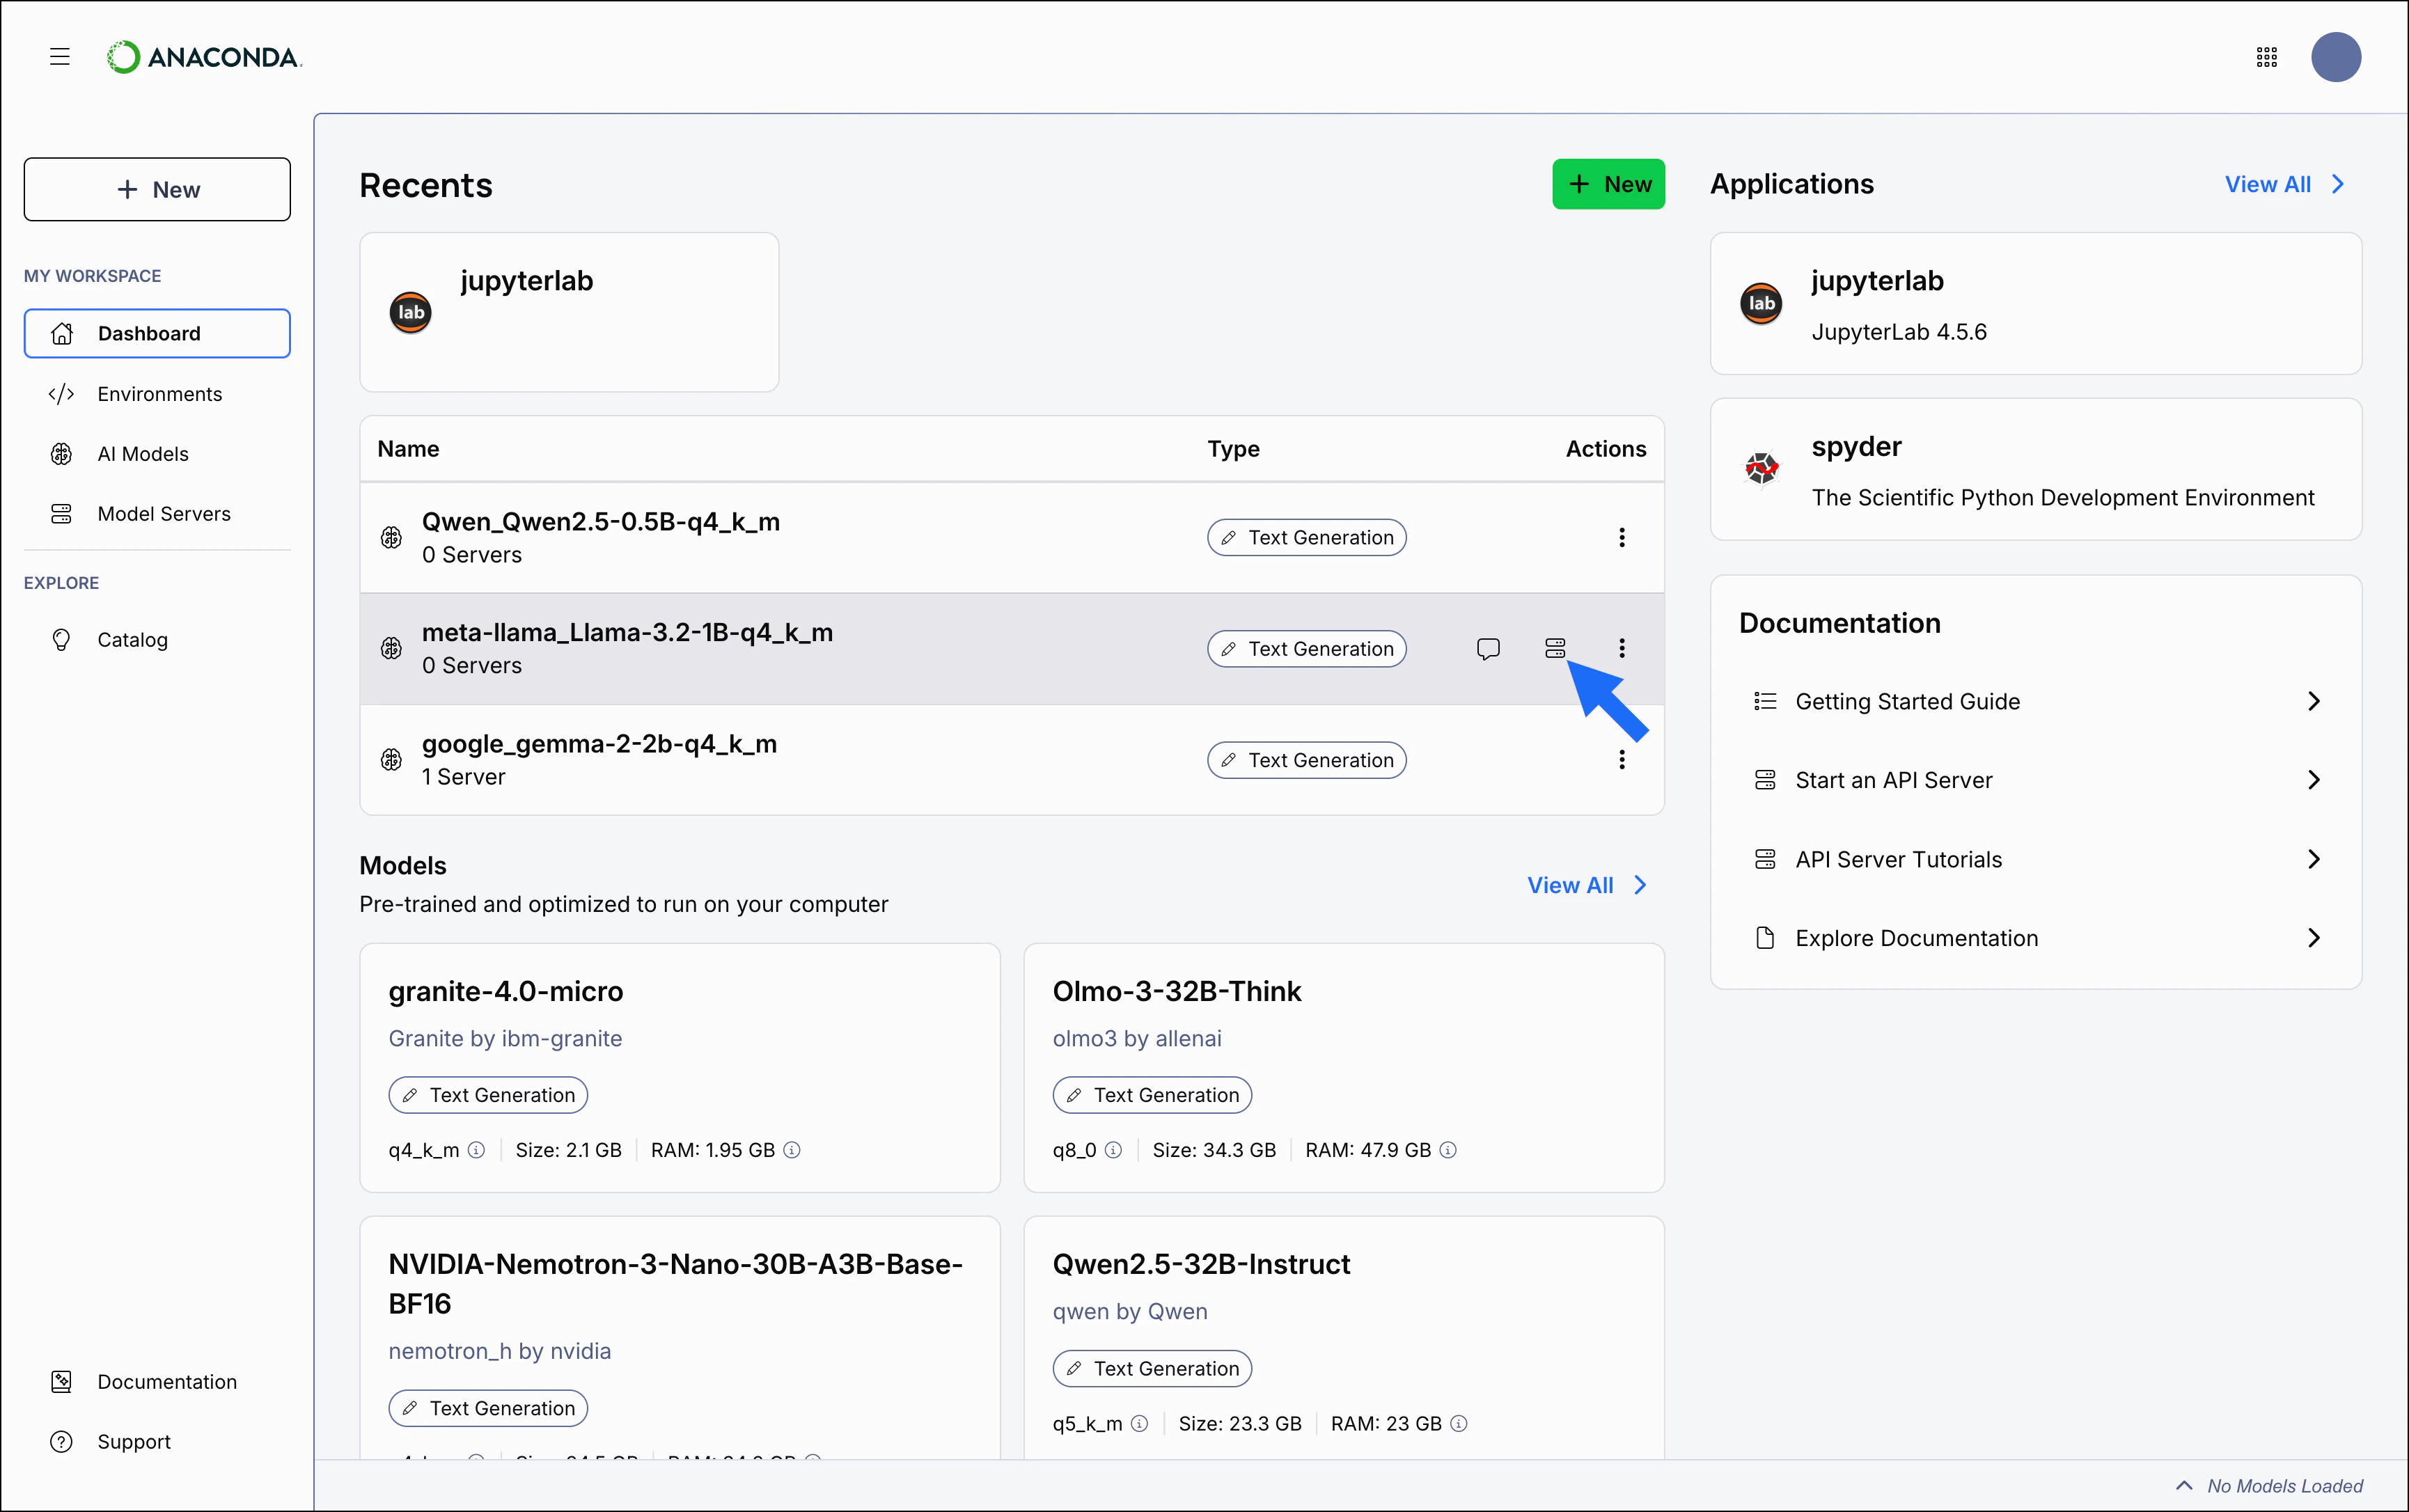 You can also download one of Anaconda's recommended models from your dashboard. Select the model's tile to view the model details, select a file quantization level, then select **Download**.
The downloaded model appears in the **Recents** table on your dashboard and the [**AI Models**](/docs/anaconda-desktop/models) page.
### Navigating Desktop
Let's take a look at the Anaconda Desktop navigation menu.
You can also download one of Anaconda's recommended models from your dashboard. Select the model's tile to view the model details, select a file quantization level, then select **Download**.
The downloaded model appears in the **Recents** table on your dashboard and the [**AI Models**](/docs/anaconda-desktop/models) page.
### Navigating Desktop
Let's take a look at the Anaconda Desktop navigation menu.
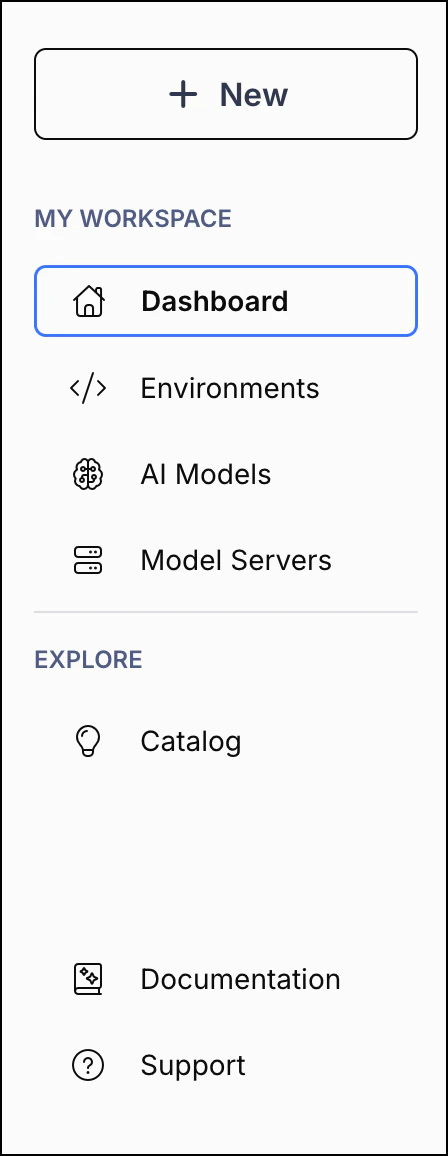 }>
Quickly open a new chat or navigate to the **Model Catalog** page.
}>
See your most recent activity, view and download popular models, and access learning materials.
}>
View your [downloaded models](/docs/anaconda-desktop/models).
}>
Start an [API server](/docs/anaconda-desktop/servers) to interact with your models.
}>
[Search, filter, and download models](/docs/anaconda-desktop/model-catalog) to interact with locally.
}>
Visit Anaconda's Desktop documentation (you're already here!).
}>
Open a [Support ticket](https://support.anaconda.com/hc/en-us/requests/new?ticket_form_id=37435274912659) to request help with a technical issue.
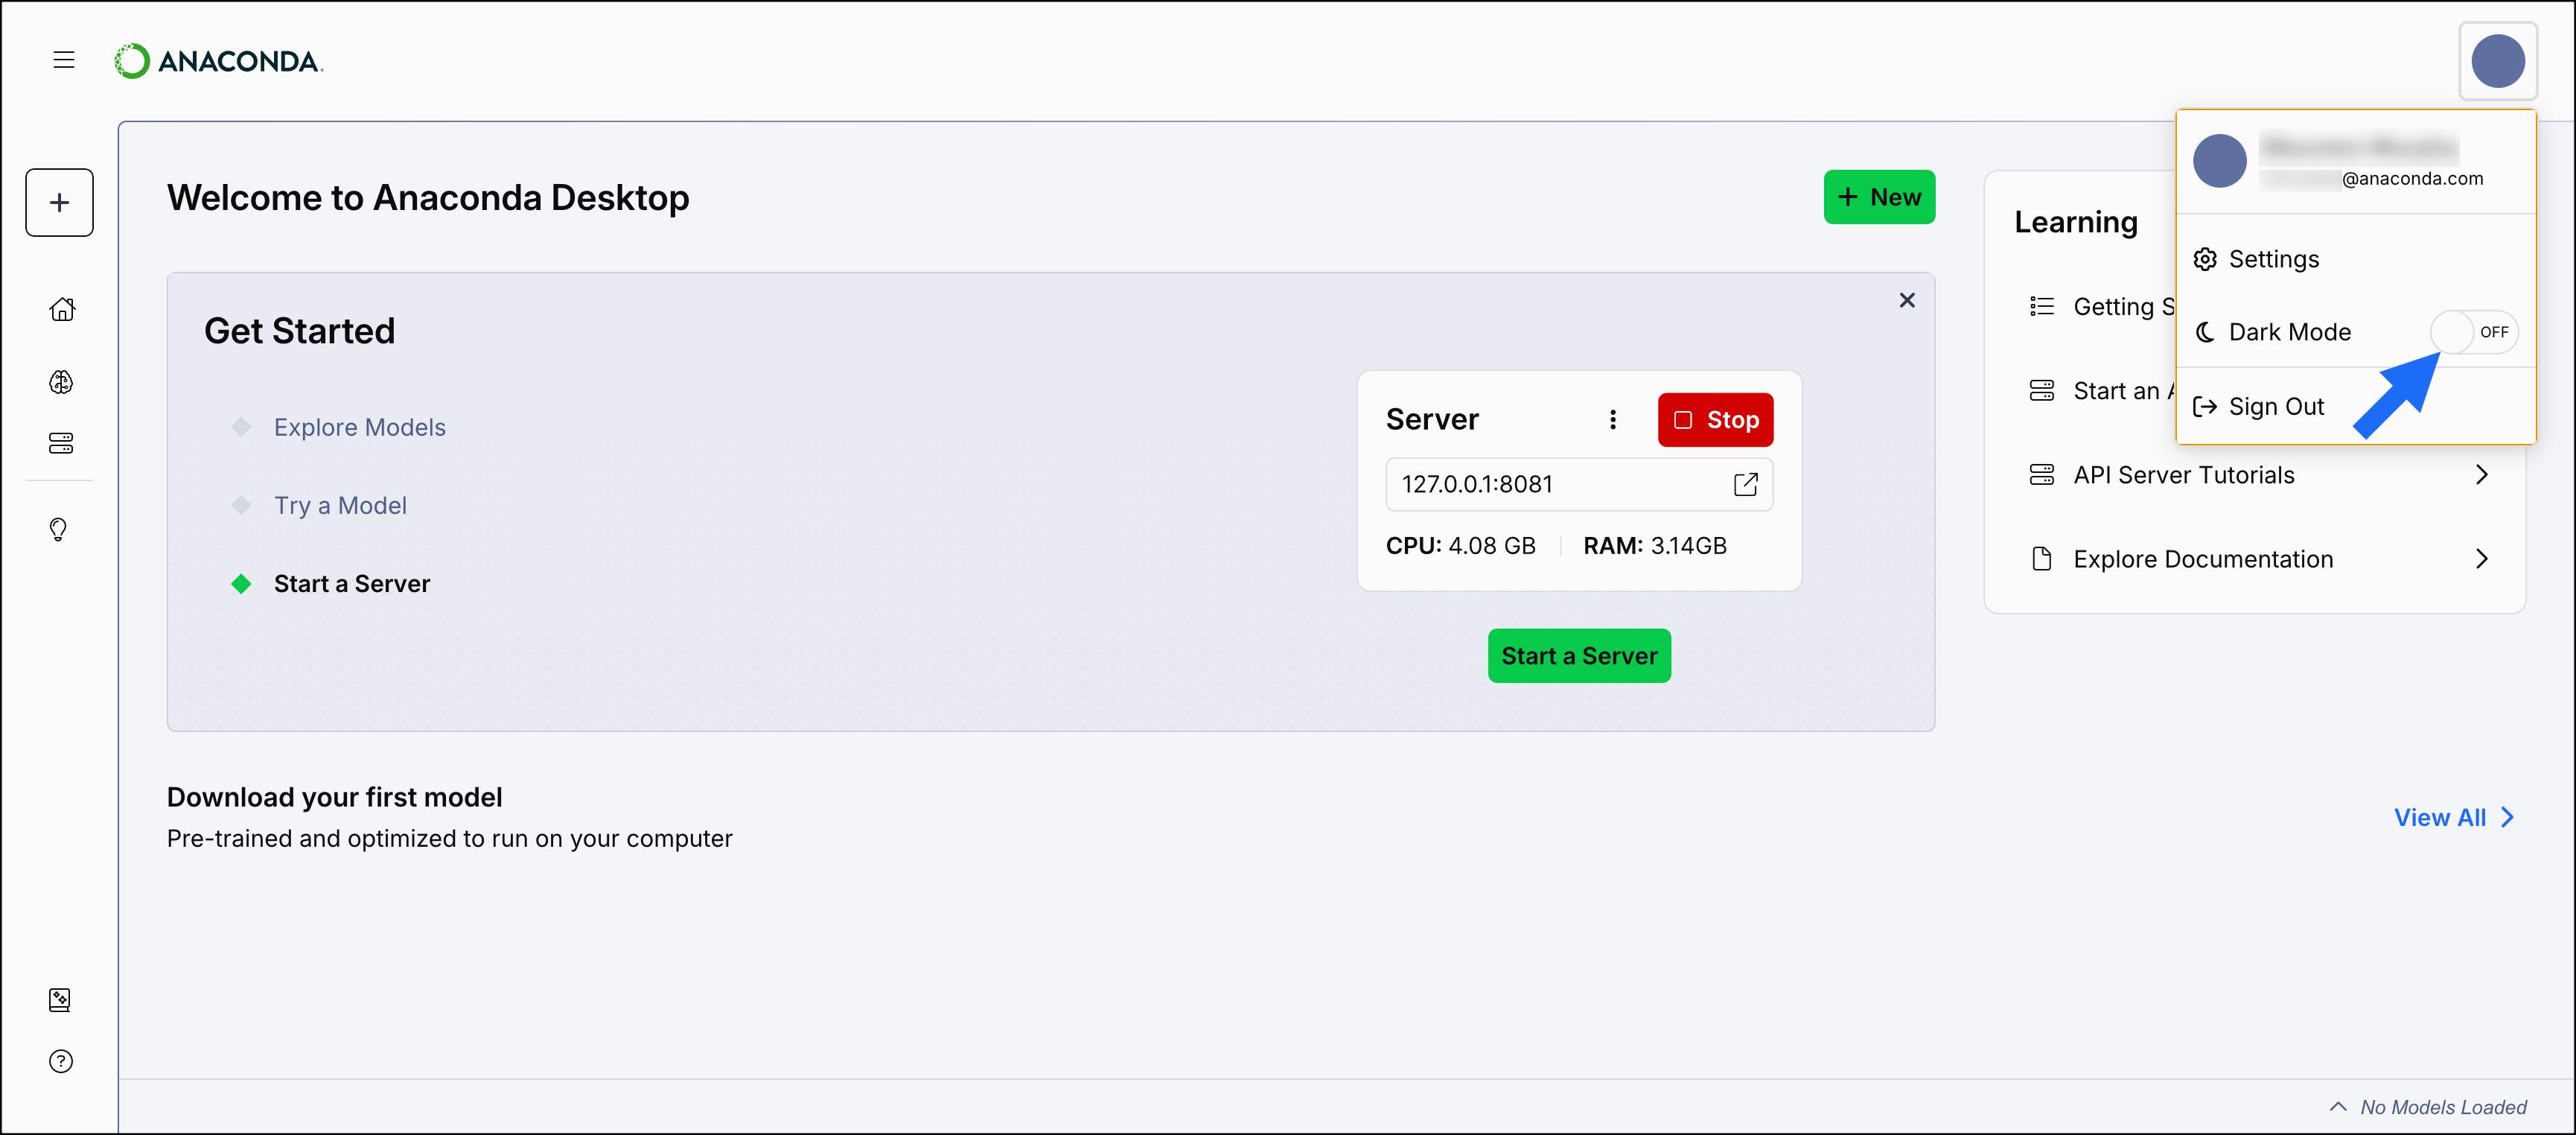
You can toggle **Dark Mode** on and off from your profile icon.
}>
Quickly open a new chat or navigate to the **Model Catalog** page.
}>
See your most recent activity, view and download popular models, and access learning materials.
}>
View your [downloaded models](/docs/anaconda-desktop/models).
}>
Start an [API server](/docs/anaconda-desktop/servers) to interact with your models.
}>
[Search, filter, and download models](/docs/anaconda-desktop/model-catalog) to interact with locally.
}>
Visit Anaconda's Desktop documentation (you're already here!).
}>
Open a [Support ticket](https://support.anaconda.com/hc/en-us/requests/new?ticket_form_id=37435274912659) to request help with a technical issue.
You can toggle **Dark Mode** on and off from your profile icon.
 ## Downloading and interacting with models
A typical workflow in Desktop might start with browsing available models and downloading one, then chatting with the model to understand its capabilities, and finally using it in a development workflow with the API server.
### Exploring and downloading models
If you haven't downloaded a model yet, you can explore Anaconda's curated collection:
1. Select **Model Catalog** from the left-hand navigation.
2. Browse the available models or use the [search and filter options](/docs/anaconda-desktop/model-catalog#filtering-models) to find one that suits your needs.
3. Select a model tile to view its details, including resource requirements and performance information.
4. Select a **Quantization Method** from the dropdown.
5. Select **Download** to download the model locally.
Models are listed alphabetically by name. Verify that you have the available disk space and RAM required before you download a model. Most models fall between 2-10 GB, but some require up to 150 GB of storage space.
For more information about models and quantization methods, see [Model Catalog](/docs/anaconda-desktop/model-catalog).
### Chatting with a model
Once you have a model downloaded, the easiest way to interact with it is through the chat interface:
You can only chat with models labeled `text-generation`. Learn more about [model types](/docs/anaconda-desktop/model-catalog#model-types-and-tags).
1. Select **Dashboard** from the left-hand navigation.
2. Locate your downloaded model in the **Recents** table.
3. Hover over the model and select **Chat**.
4. Enter a prompt to start chatting with the model!
Alternatively, you can navigate to **AI Models**, hover over the model, and select **Chat**.
For more information on using the chat feature, see [Chat](/docs/anaconda-desktop/chat).
### Starting an API server
If you want to test a model's performance within applications you're developing, load the model into the built-in API server:
1. Select **Model Servers** from the left-hand navigation.
2. Choose your model from the **Model** dropdown.
3. Select your model file from the **File** dropdown.
4. Configure your server settings (address, port, API key) as needed.
5. Select **Start** to start the server.
Alternatively, you can navigate to **AI Models**, hover over the model, and select **Start Server**.
Your model is now accessible via API calls at the specified server address for use in your own applications.
For more information about the API server, see [API server](/docs/anaconda-desktop/servers).
## Troubleshooting
### Unable to retrieve local user environment error in Anaconda Desktop on Windows
Windows limits file paths to 260 characters by default. Anaconda Desktop stores packages under a nested path inside `%USERPROFILE%\.anaconda-desktop\micromamba\envs\pkgs\`. Some packages include test files nested deep enough to exceed this limit, causing micromamba to report `Invalid package cache` or `Package cache error` and abort the install. This surfaces as an `INSTALL_FAILED` error in the logs and an "Unable to retrieve local user environments" notification in the Desktop UI.
1. Enable Win32 long paths using the method that matches your Windows edition:
1. In the Windows Search bar, type "group policy" and select **Edit group policy** from the results.
2. In the left panel, navigate to **Computer Configuration** > **Administrative Templates**.
3. In the right panel, select **System**, then select **Filesystem**.
4. In the right panel, double-click **Enable Win32 long paths**.
## Downloading and interacting with models
A typical workflow in Desktop might start with browsing available models and downloading one, then chatting with the model to understand its capabilities, and finally using it in a development workflow with the API server.
### Exploring and downloading models
If you haven't downloaded a model yet, you can explore Anaconda's curated collection:
1. Select **Model Catalog** from the left-hand navigation.
2. Browse the available models or use the [search and filter options](/docs/anaconda-desktop/model-catalog#filtering-models) to find one that suits your needs.
3. Select a model tile to view its details, including resource requirements and performance information.
4. Select a **Quantization Method** from the dropdown.
5. Select **Download** to download the model locally.
Models are listed alphabetically by name. Verify that you have the available disk space and RAM required before you download a model. Most models fall between 2-10 GB, but some require up to 150 GB of storage space.
For more information about models and quantization methods, see [Model Catalog](/docs/anaconda-desktop/model-catalog).
### Chatting with a model
Once you have a model downloaded, the easiest way to interact with it is through the chat interface:
You can only chat with models labeled `text-generation`. Learn more about [model types](/docs/anaconda-desktop/model-catalog#model-types-and-tags).
1. Select **Dashboard** from the left-hand navigation.
2. Locate your downloaded model in the **Recents** table.
3. Hover over the model and select **Chat**.
4. Enter a prompt to start chatting with the model!
Alternatively, you can navigate to **AI Models**, hover over the model, and select **Chat**.
For more information on using the chat feature, see [Chat](/docs/anaconda-desktop/chat).
### Starting an API server
If you want to test a model's performance within applications you're developing, load the model into the built-in API server:
1. Select **Model Servers** from the left-hand navigation.
2. Choose your model from the **Model** dropdown.
3. Select your model file from the **File** dropdown.
4. Configure your server settings (address, port, API key) as needed.
5. Select **Start** to start the server.
Alternatively, you can navigate to **AI Models**, hover over the model, and select **Start Server**.
Your model is now accessible via API calls at the specified server address for use in your own applications.
For more information about the API server, see [API server](/docs/anaconda-desktop/servers).
## Troubleshooting
### Unable to retrieve local user environment error in Anaconda Desktop on Windows
Windows limits file paths to 260 characters by default. Anaconda Desktop stores packages under a nested path inside `%USERPROFILE%\.anaconda-desktop\micromamba\envs\pkgs\`. Some packages include test files nested deep enough to exceed this limit, causing micromamba to report `Invalid package cache` or `Package cache error` and abort the install. This surfaces as an `INSTALL_FAILED` error in the logs and an "Unable to retrieve local user environments" notification in the Desktop UI.
1. Enable Win32 long paths using the method that matches your Windows edition:
1. In the Windows Search bar, type "group policy" and select **Edit group policy** from the results.
2. In the left panel, navigate to **Computer Configuration** > **Administrative Templates**.
3. In the right panel, select **System**, then select **Filesystem**.
4. In the right panel, double-click **Enable Win32 long paths**.
 5. Select **Enabled**, then click **OK**.
6. Close the editor.
1. In the Windows Search bar, type "registry editor" and select **Registry Editor** from the results.
2. In the address bar at the top, paste the following path and press Enter:
```
HKEY_LOCAL_MACHINE\SYSTEM\CurrentControlSet\Control\FileSystem
```
5. Select **Enabled**, then click **OK**.
6. Close the editor.
1. In the Windows Search bar, type "registry editor" and select **Registry Editor** from the results.
2. In the address bar at the top, paste the following path and press Enter:
```
HKEY_LOCAL_MACHINE\SYSTEM\CurrentControlSet\Control\FileSystem
```
 3. In the right panel, double-click `LongPathsEnabled`.
4. Change the **Value data** field from `0` to `1`, then click **OK**.
5. Close the Registry Editor.
2. Reboot your machine.
3. Clear the package cache to remove any corrupt entries by deleting the contents of the following folder:
```
%USERPROFILE%\.anaconda-desktop\micromamba\envs\pkgs
```
4. Restart Anaconda Desktop and wait for it to finish setting up your environment.
If the issue persists, delete the entire `%USERPROFILE%\.anaconda-desktop\micromamba` folder and restart the app.
## What's next?
Now that you have Desktop set up and running:
* **Learn with tutorials**: Get hands-on experience by building a [chatbot application](/docs/anaconda-desktop/tutorials/chatbot-tutorial) or [text comparison tool](/docs/anaconda-desktop/tutorials/embedding-tutorial) with step-by-step guidance.
* **Explore different models**: Try various models or quantization methods to see how they handle different types of tasks.
* **Use the Desktop API**: Explore the [Desktop API](/docs/anaconda-desktop/desktop-api/getting-started) to programmatically manage models, control servers, and integrate Desktop's capabilities directly into your applications.
* **Dive deeper**: Check out the user guide for detailed information on [chat settings](/docs/anaconda-desktop/chat), [API servers](/docs/anaconda-desktop/servers), [resource consumption](/docs/anaconda-desktop/resource-consumption), and [settings](/docs/anaconda-desktop/settings).
3. In the right panel, double-click `LongPathsEnabled`.
4. Change the **Value data** field from `0` to `1`, then click **OK**.
5. Close the Registry Editor.
2. Reboot your machine.
3. Clear the package cache to remove any corrupt entries by deleting the contents of the following folder:
```
%USERPROFILE%\.anaconda-desktop\micromamba\envs\pkgs
```
4. Restart Anaconda Desktop and wait for it to finish setting up your environment.
If the issue persists, delete the entire `%USERPROFILE%\.anaconda-desktop\micromamba` folder and restart the app.
## What's next?
Now that you have Desktop set up and running:
* **Learn with tutorials**: Get hands-on experience by building a [chatbot application](/docs/anaconda-desktop/tutorials/chatbot-tutorial) or [text comparison tool](/docs/anaconda-desktop/tutorials/embedding-tutorial) with step-by-step guidance.
* **Explore different models**: Try various models or quantization methods to see how they handle different types of tasks.
* **Use the Desktop API**: Explore the [Desktop API](/docs/anaconda-desktop/desktop-api/getting-started) to programmatically manage models, control servers, and integrate Desktop's capabilities directly into your applications.
* **Dive deeper**: Check out the user guide for detailed information on [chat settings](/docs/anaconda-desktop/chat), [API servers](/docs/anaconda-desktop/servers), [resource consumption](/docs/anaconda-desktop/resource-consumption), and [settings](/docs/anaconda-desktop/settings).