> ## Documentation Index
> Fetch the complete documentation index at: https://anaconda.com/docs/llms.txt
> Use this file to discover all available pages before exploring further.
# Environments
export const Comments = ({children}) => {
return ;
};
export const Beginner = ({children}) => {
return ;
};
export const GCell = ({children, className}) =>
{children}
;
export const GTH = ({children, className}) =>
{children}
;
export const GRow = ({children}) => {children}
;
export const GBody = ({children}) => {children}
;
export const GHead = ({children}) => {children}
;
export const GTable = ({children, className, cols}) =>
{children}
;
With Anaconda Desktop, you can create and manage conda environments to isolate your projects and dependencies using a graphical interface.
Conda environments manage both the Python interpreter itself as well as packages from multiple programming languages. To learn more about conda environments, see [What is an environment?](/docs/getting-started/concepts/what-is-an-environment)
Anaconda Desktop also includes several pre-configured [quick start environments](#using-a-quick-start-environment) that come with curated packages for fields that rely on data analytics.
## Viewing environments
To view your environments, select **Environments** from the left navigation.
The **Environments** page displays your environments in a table. Select a column header to sort environments by name, number of packages, or when it was last updated.
Business or Custom plan only The **CVEs** column shows the number of active Common Vulnerabilities and Exposures (CVEs) detected in each environment. Hover over a CVE count to see a breakdown by severity: Critical, High, Medium, and Low.
CVE data is for reference only.
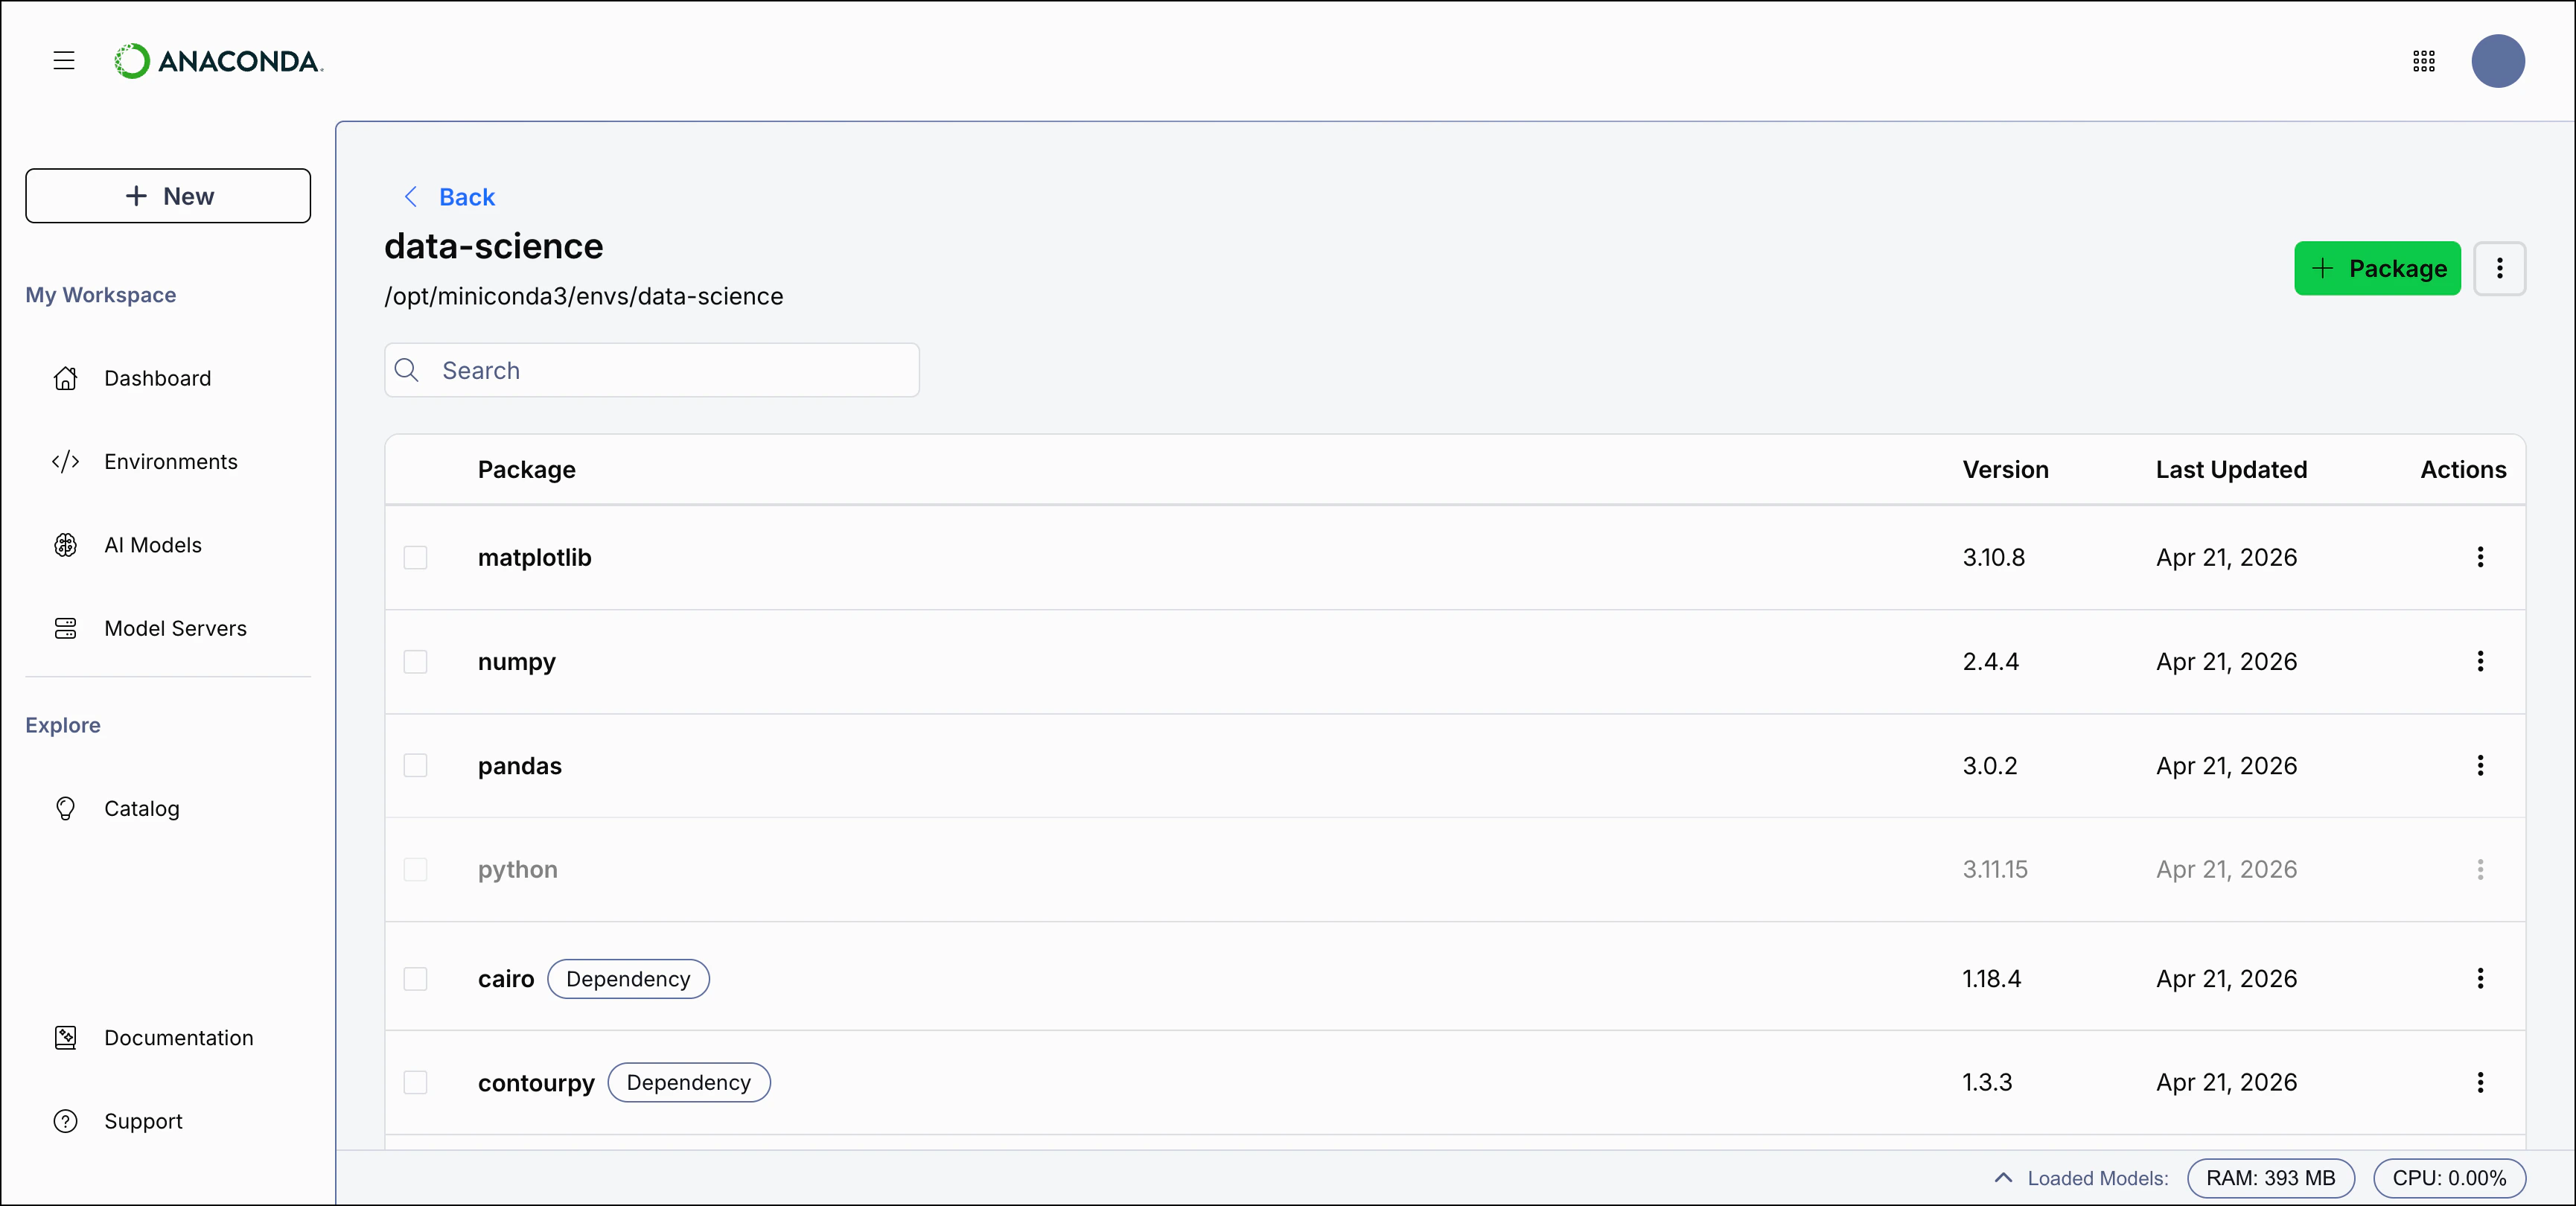
Select an environment's name to open the environment's details page. From the details page, you can view the environment's packages, dependencies, and channels. For more information on managing packages, see [Packages](/docs/anaconda-desktop/packages), and for more information on managing channels, see [Channels](/docs/anaconda-desktop/channels).
 ## Searching for an environment
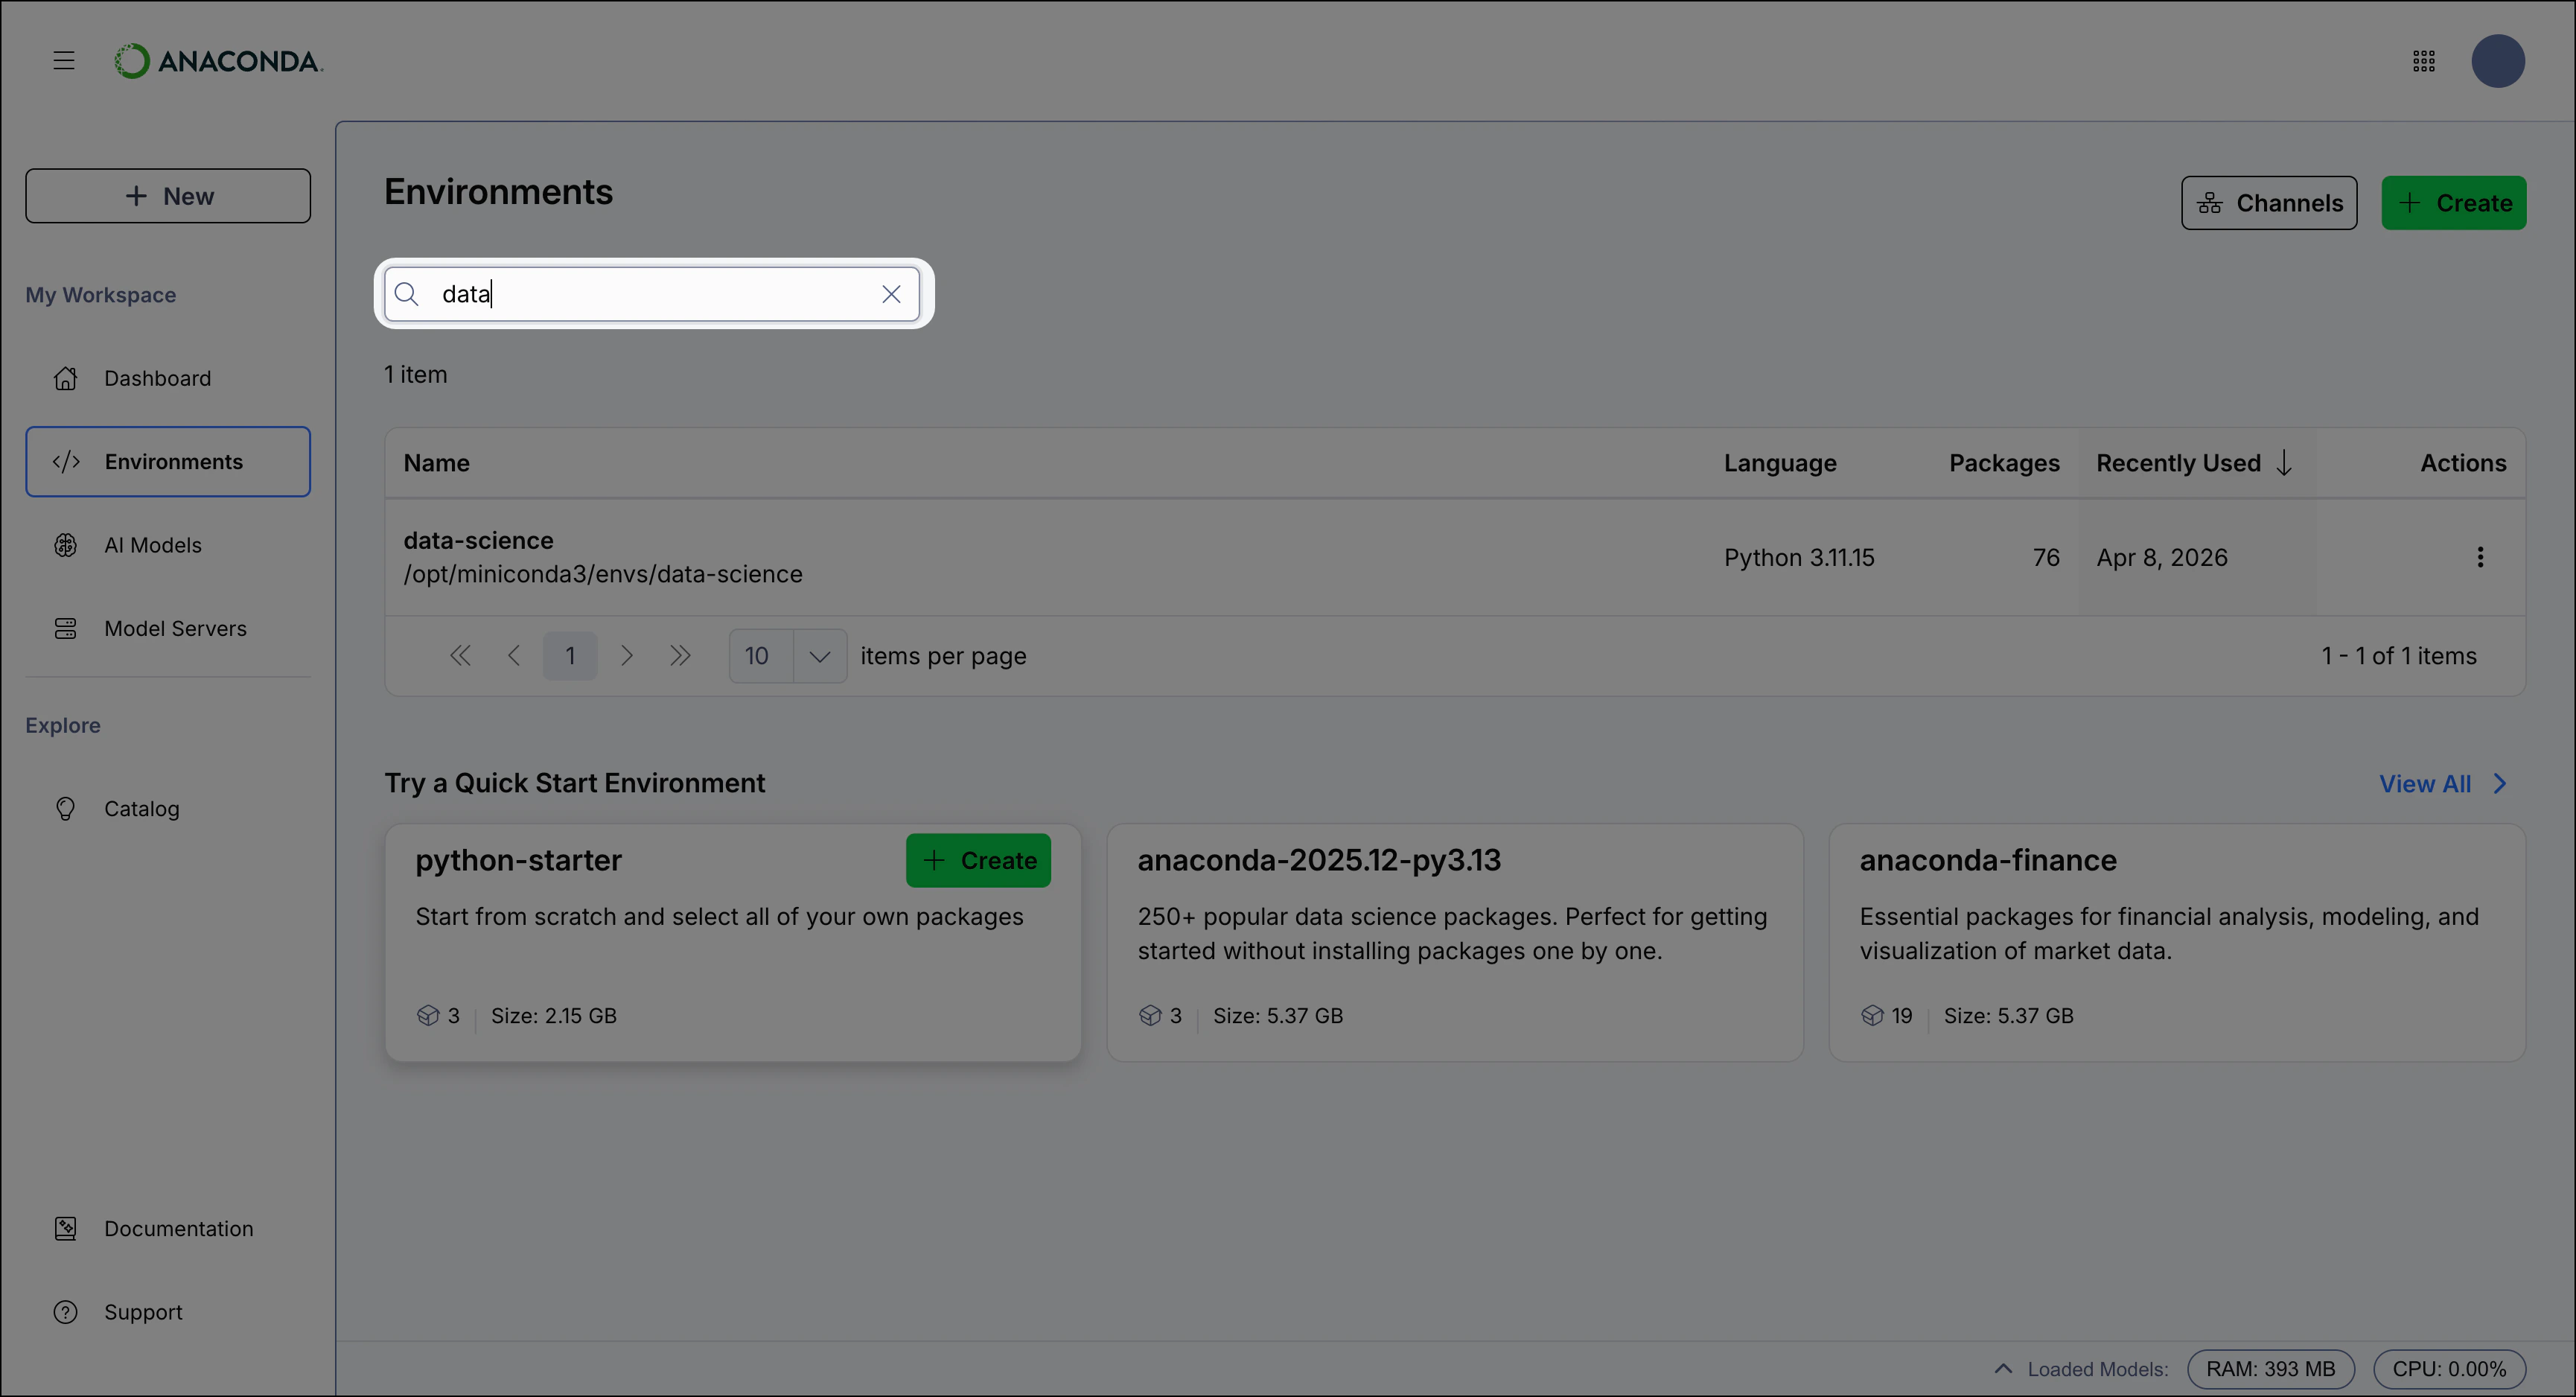
Use the **Search** box to locate an environment by name. Enter all (or part of) an environment's name to filter the list to display only environments that contain the search string.
## Searching for an environment
Use the **Search** box to locate an environment by name. Enter all (or part of) an environment's name to filter the list to display only environments that contain the search string.
 ## Using a quick start environment
Anaconda Desktop provides a set of quick start environments that come pre-configured with curated packages for a variety of use cases.
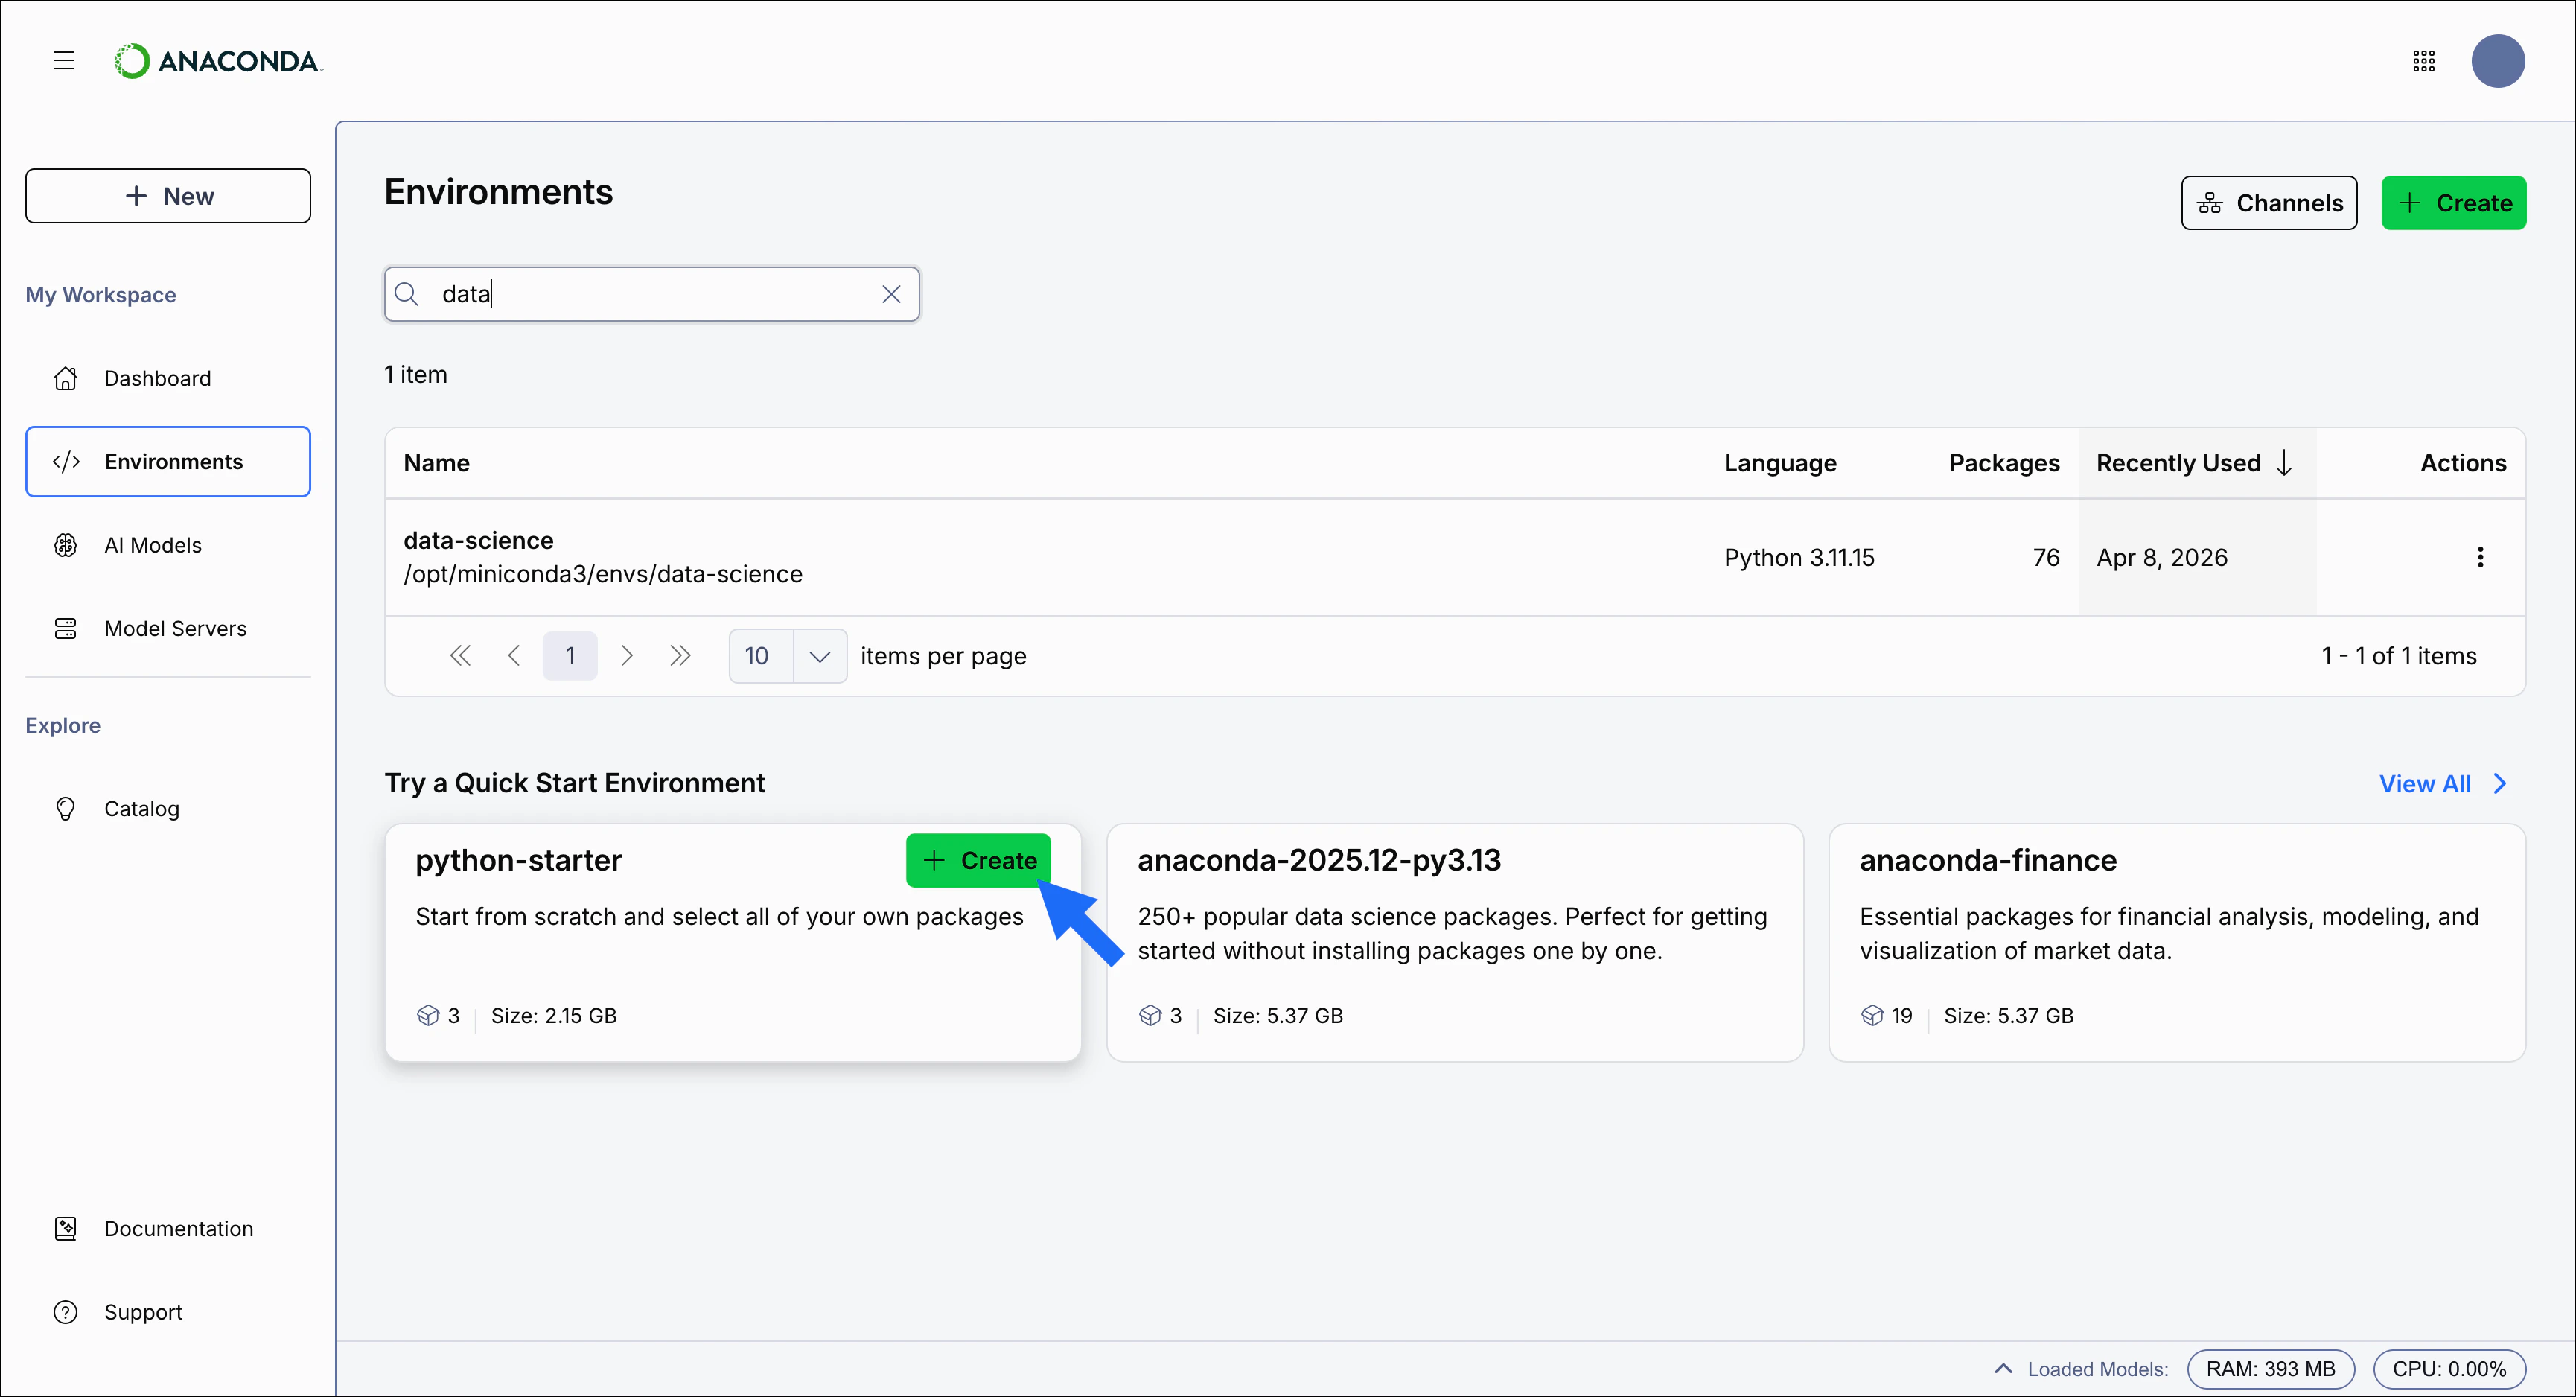
To install a quick start environment using its default configuration, click the **Create** button on the environment's card:
## Using a quick start environment
Anaconda Desktop provides a set of quick start environments that come pre-configured with curated packages for a variety of use cases.
To install a quick start environment using its default configuration, click the **Create** button on the environment's card:
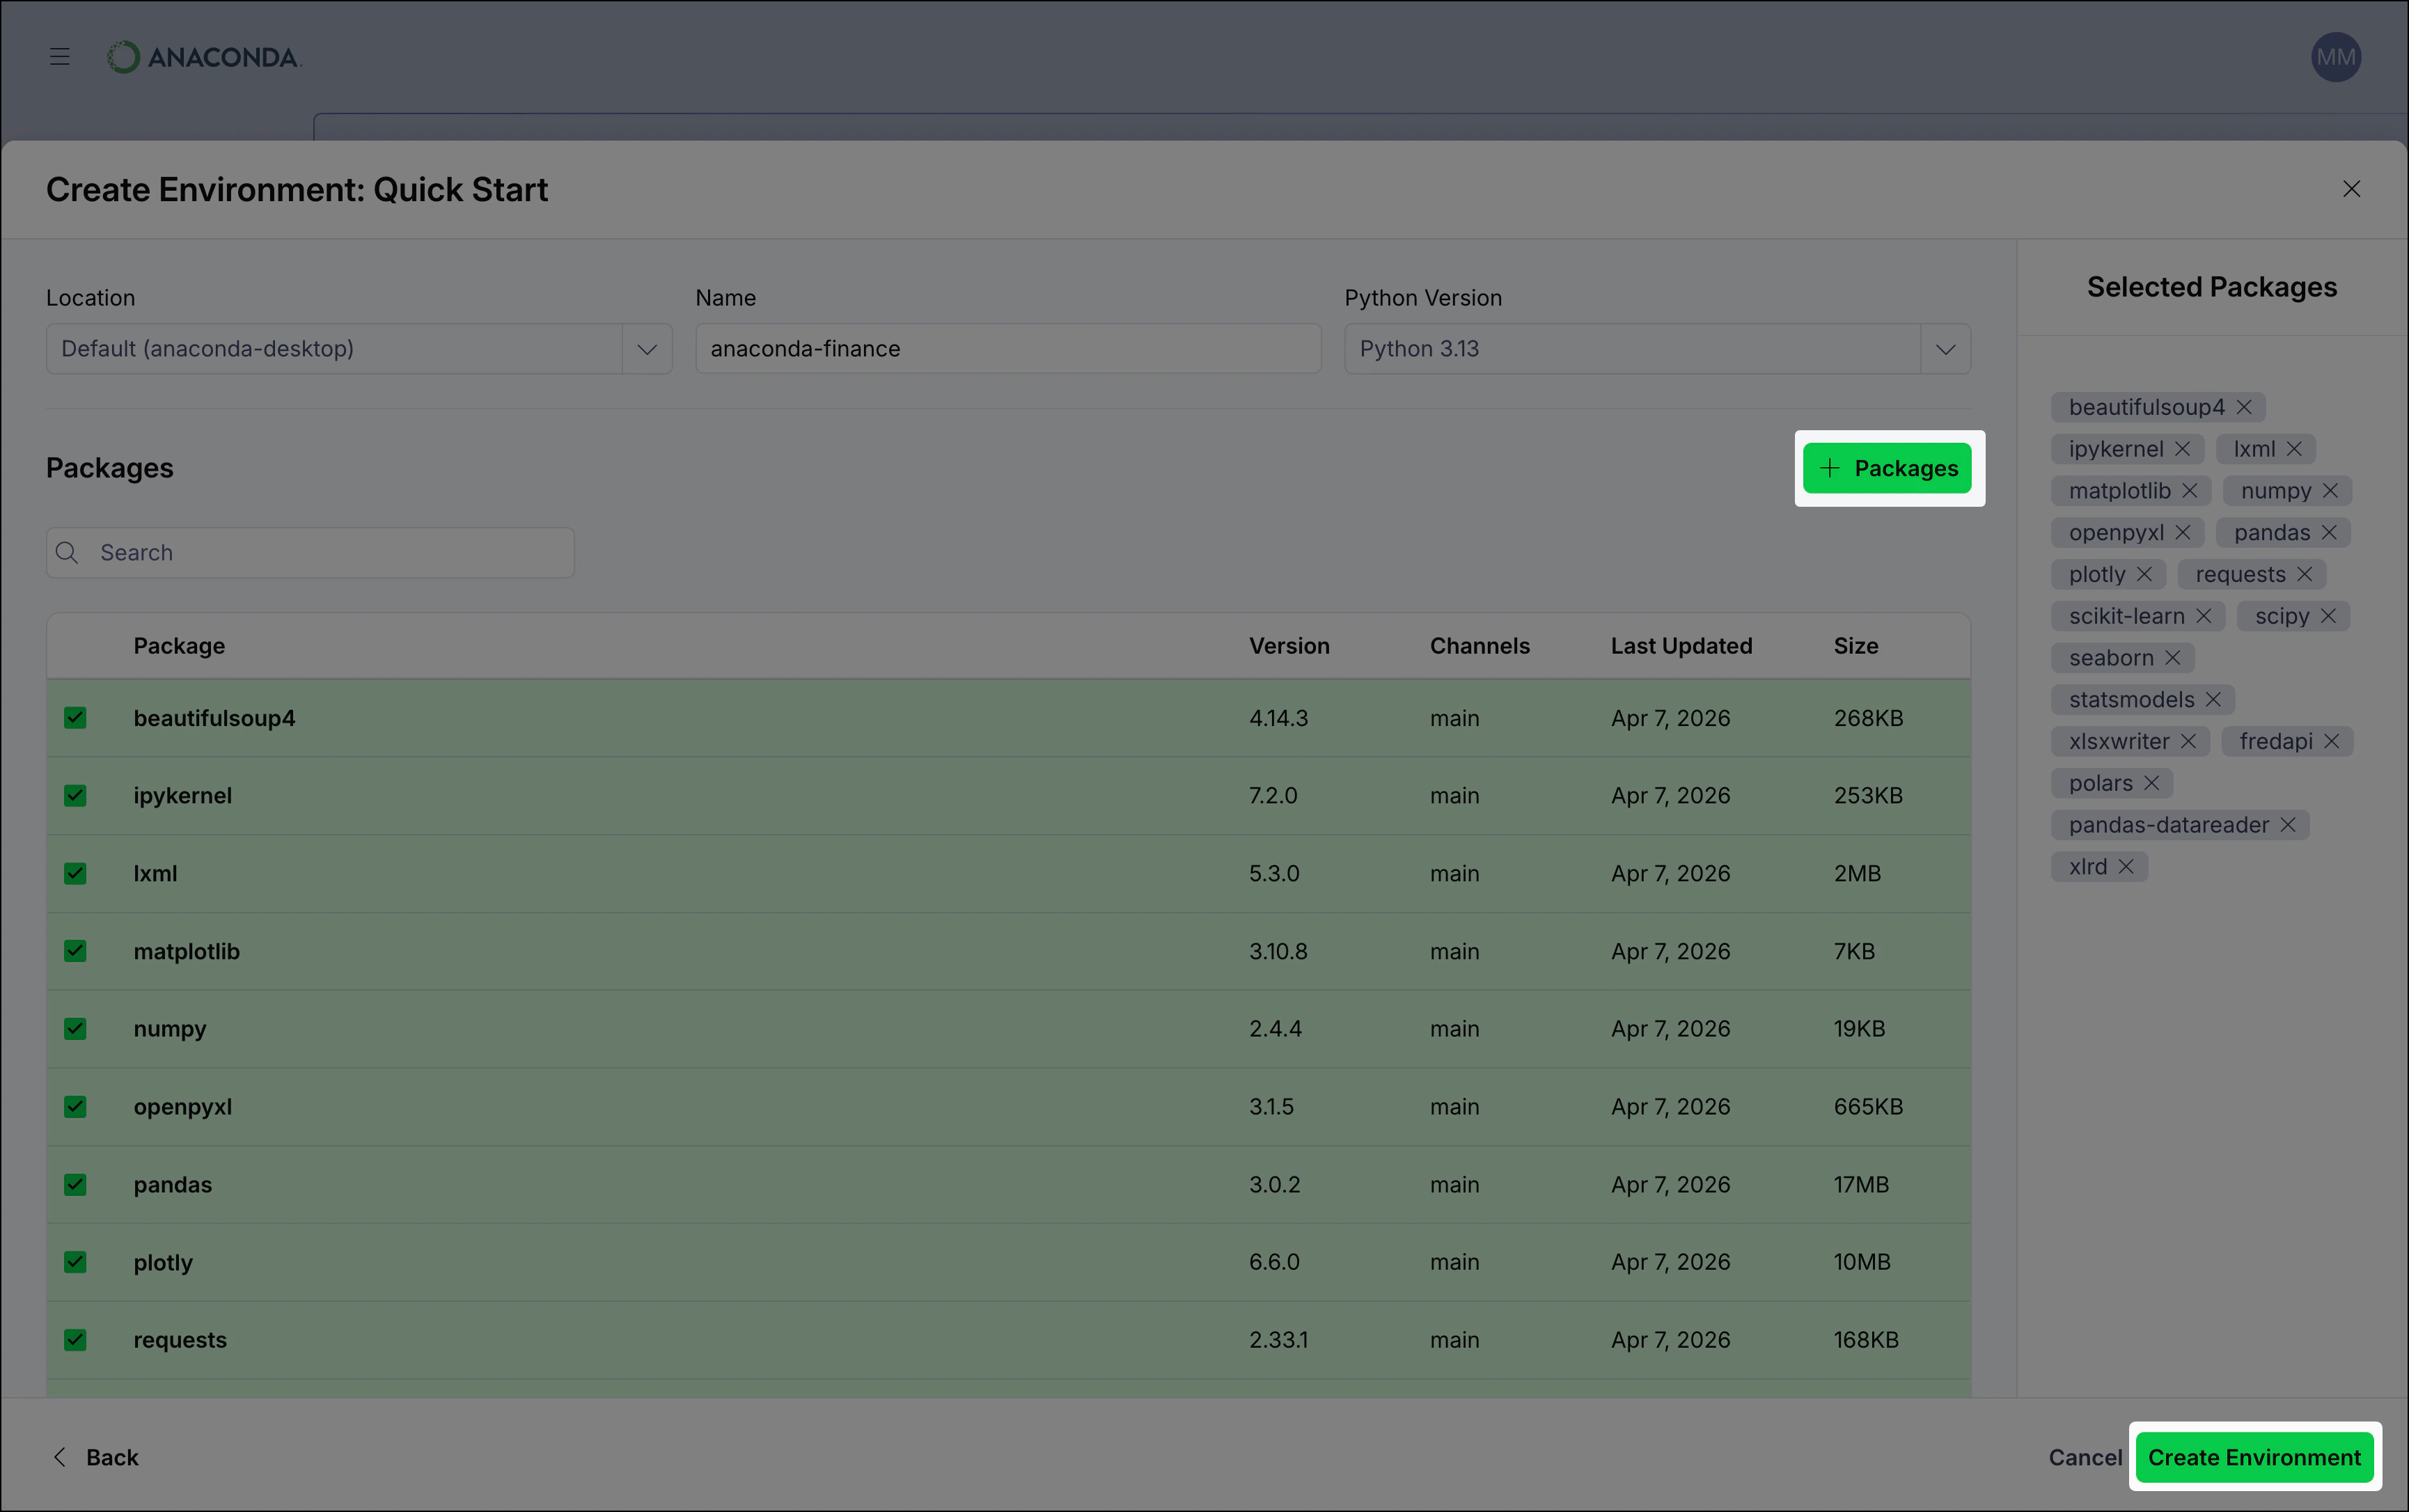
 To view details about the environment and make custom configurations, select anywhere on the environment's card to view its details page. From the details page, you can customize the environment's [configuration options](#environment-configuration-options). Use the **Packages** button to add additional packages to the environment.
After you've configured the environment, click **Create Environment** to create the quick start environment:
To view details about the environment and make custom configurations, select anywhere on the environment's card to view its details page. From the details page, you can customize the environment's [configuration options](#environment-configuration-options). Use the **Packages** button to add additional packages to the environment.
After you've configured the environment, click **Create Environment** to create the quick start environment:
 ## Creating an environment
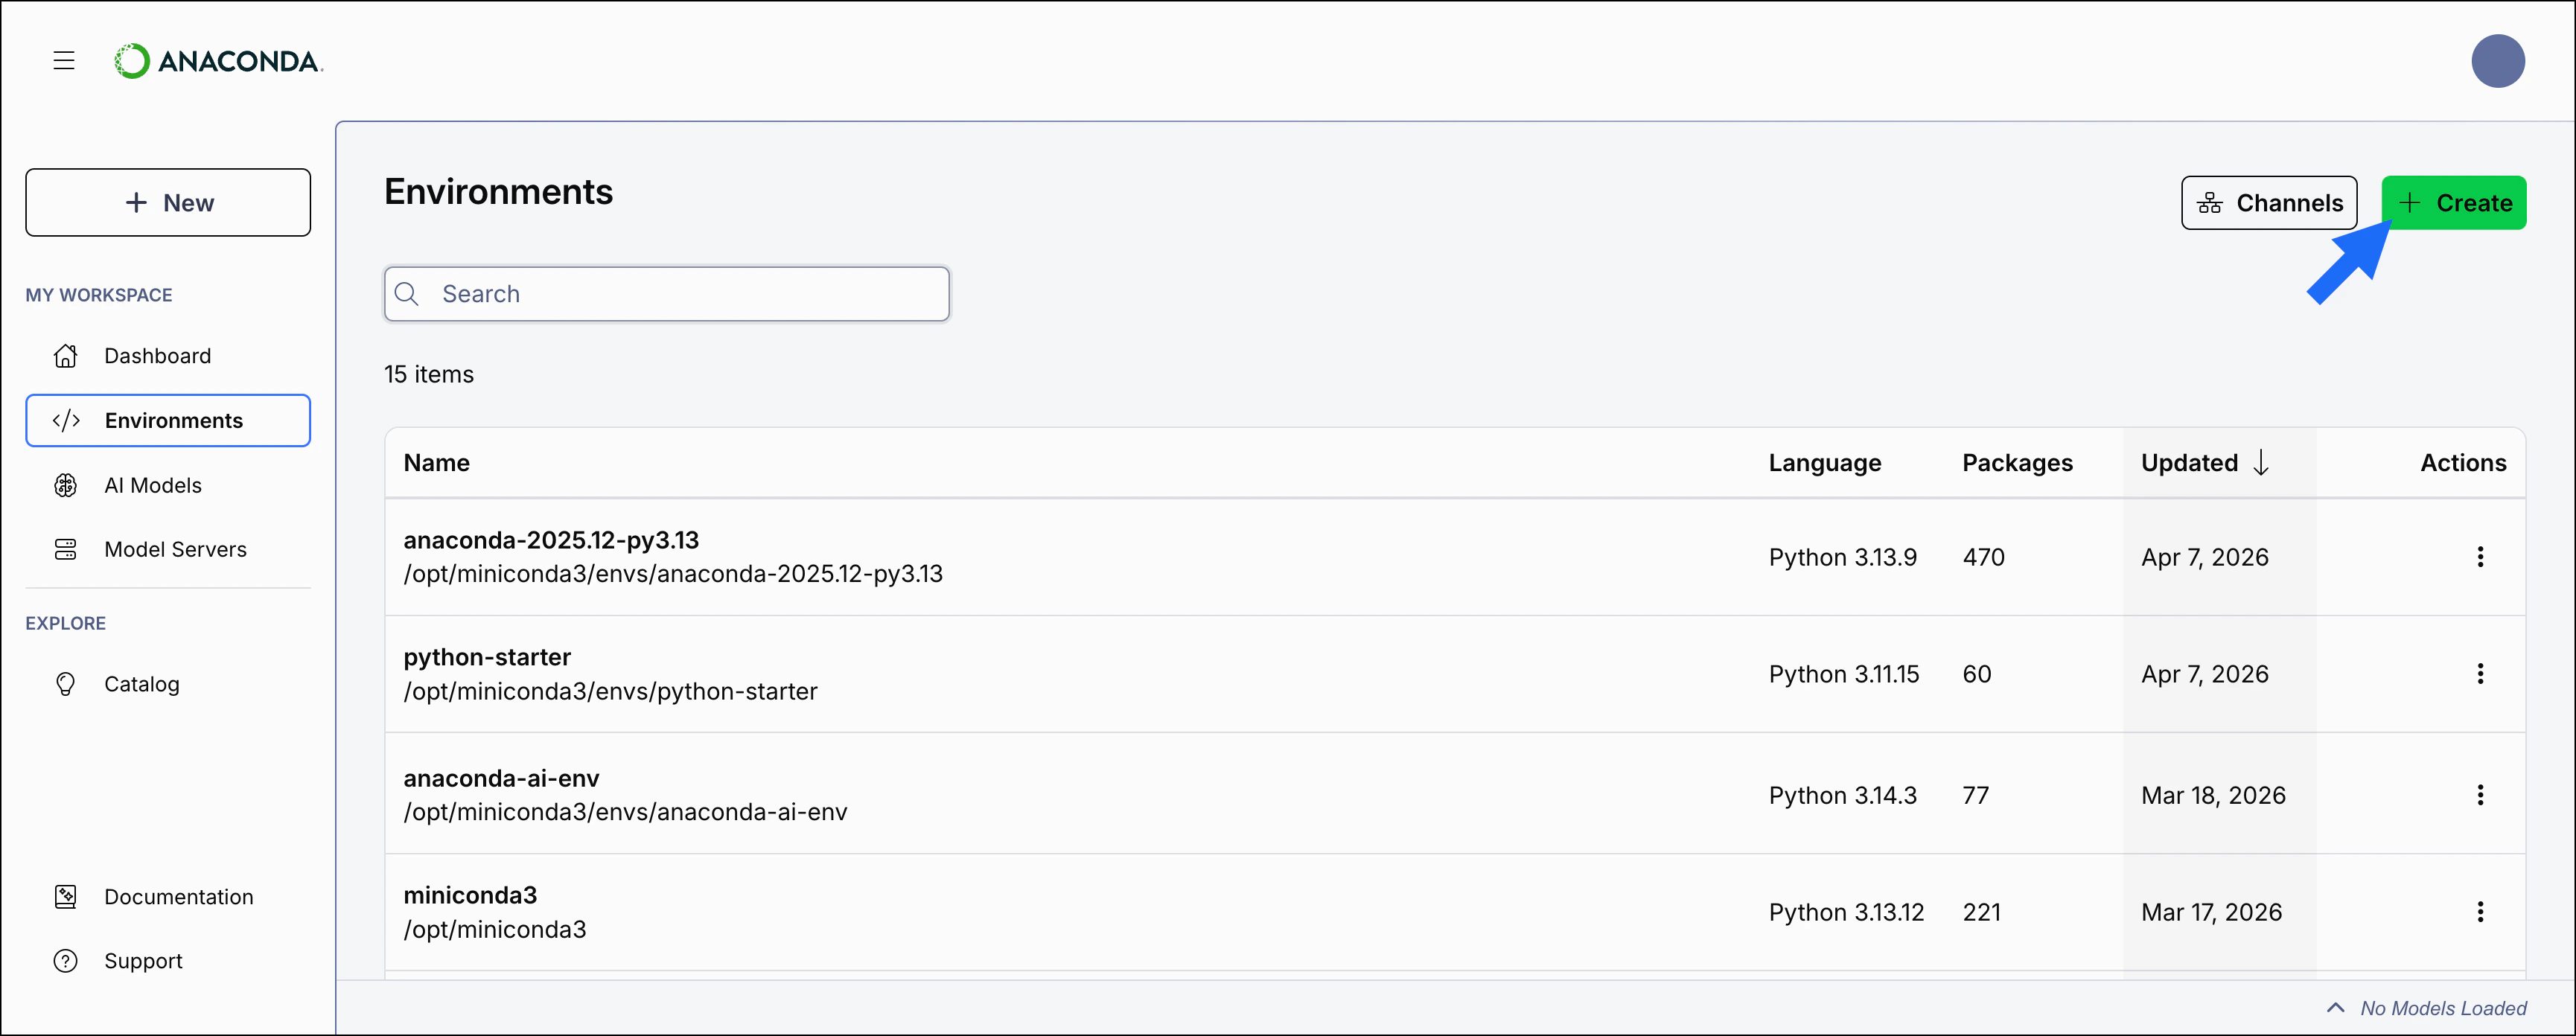
To create a new environment, click the **Create** button in the upper-right corner:
## Creating an environment
To create a new environment, click the **Create** button in the upper-right corner:
 In the **Create Environment** dialog, you can import an `environment.yml` file to create the environment, create a new environment manually, or select a [quick start environment](#using-a-quick-start-environment).
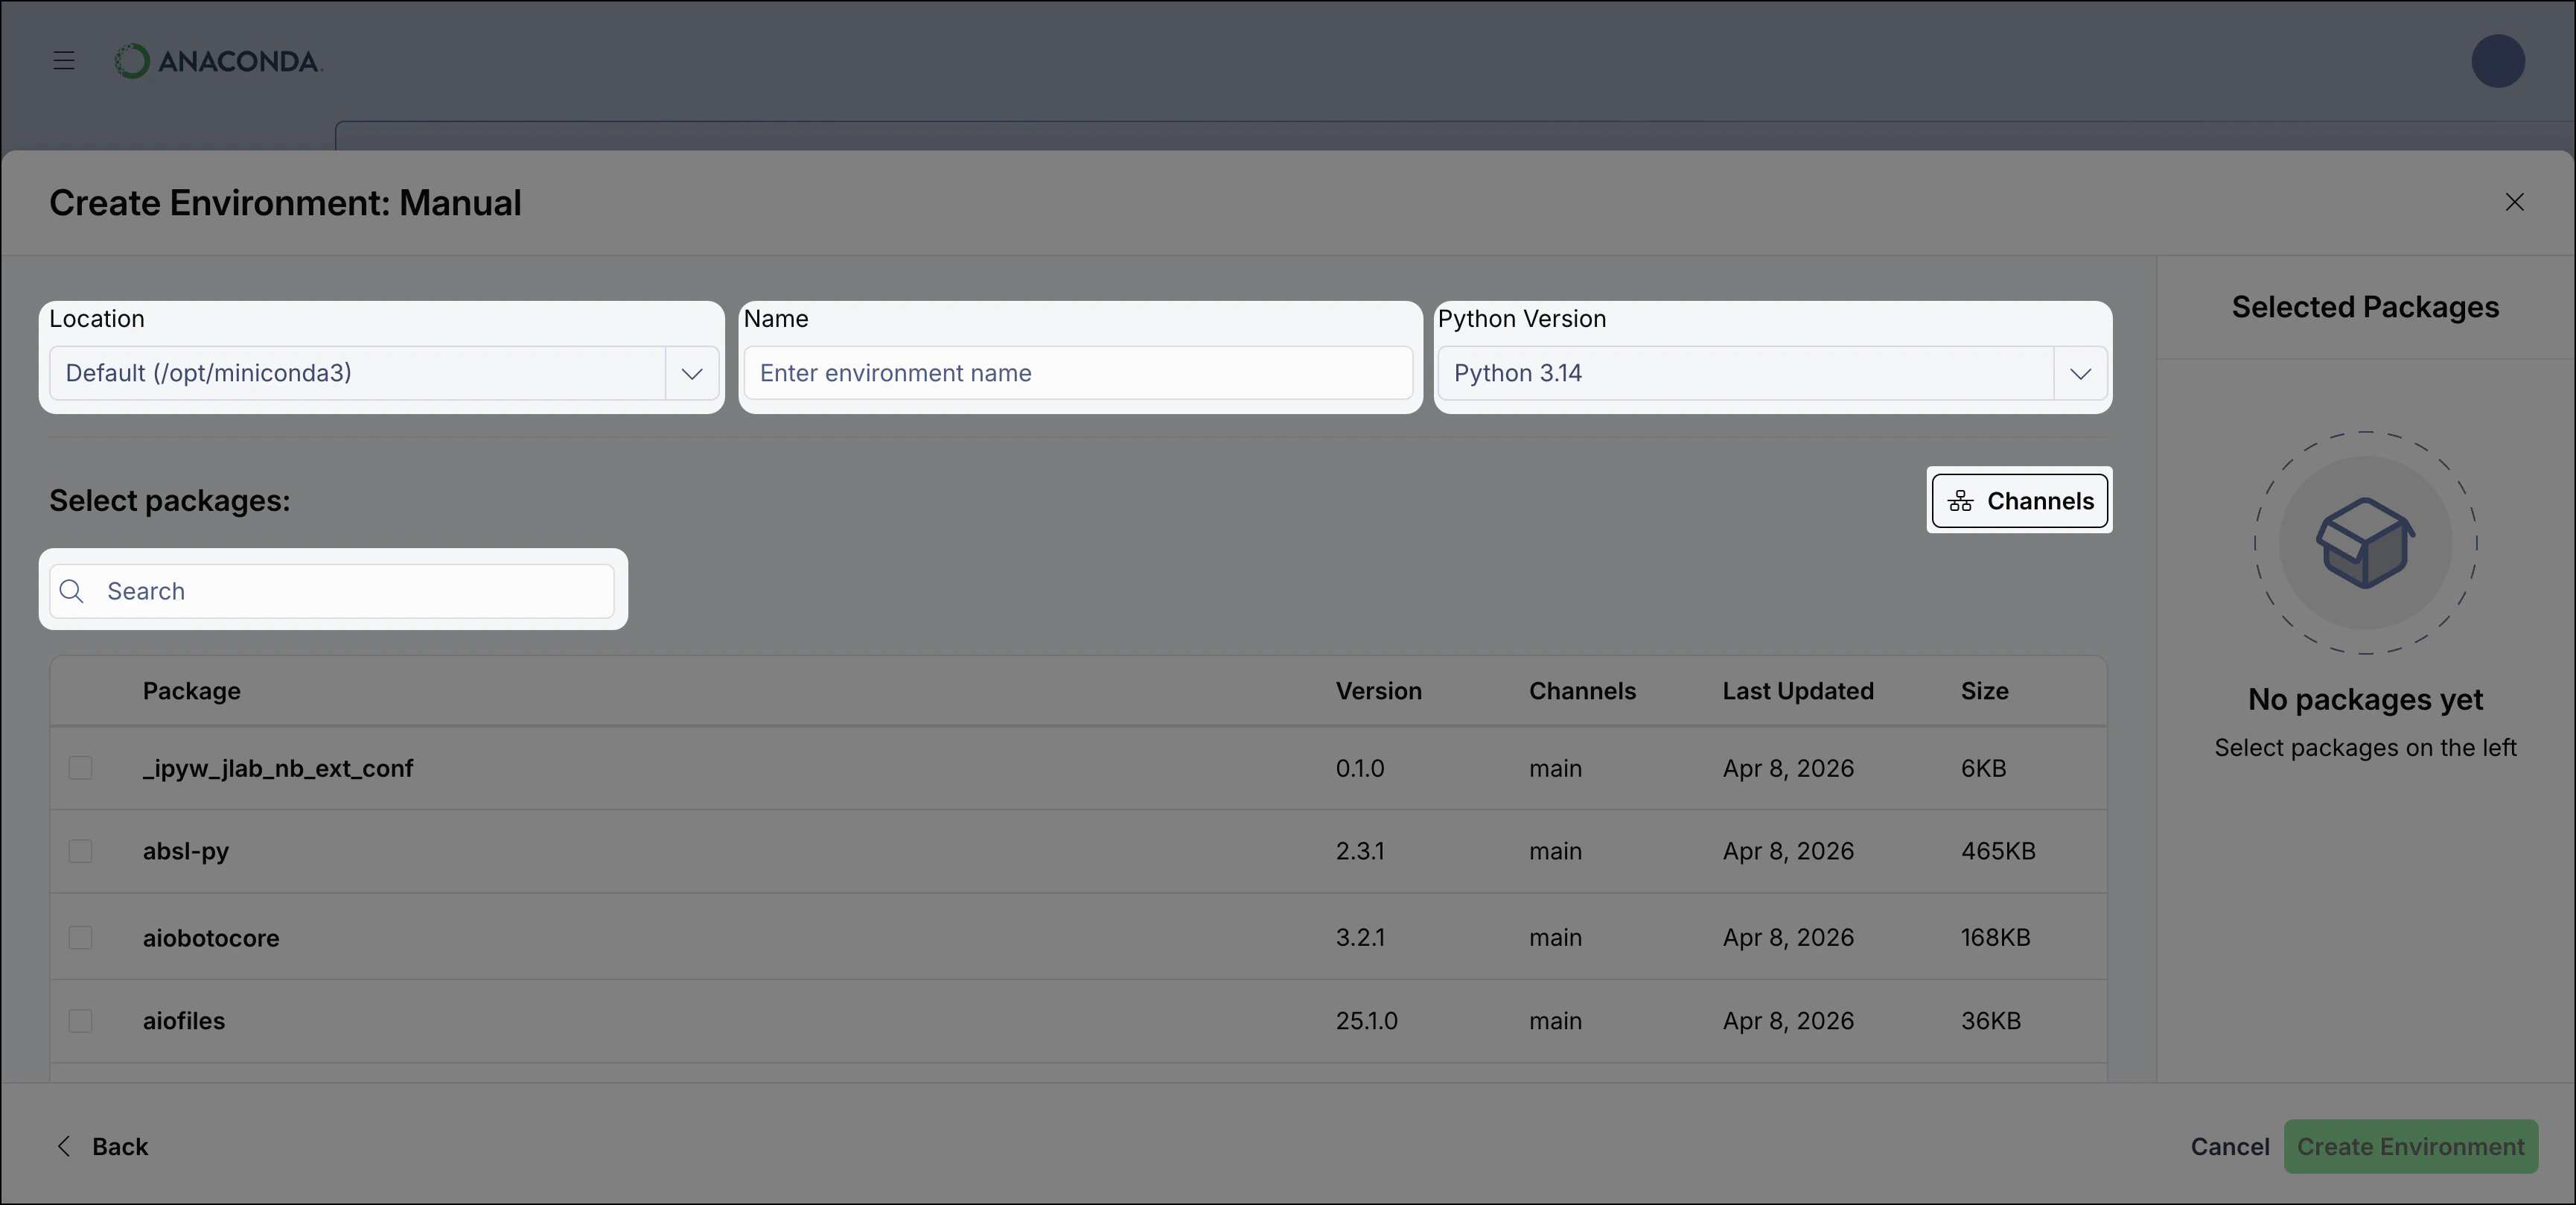
1. In the **Create Environment** dialog, click **Create Manually**.
2. Set [configuration options](#environment-configuration-options) for the environment.
3. Click **Create Environment** to create the environment.
There are two situations in which you might want to import an environment:
* Someone has [exported their environment](/docs/getting-started/working-with-conda/environments#sharing-an-environment) to a `environment.yml` file and shared it with you, and you want to reproduce their environment on your machine.
* You have [exported an environment](#exporting-an-environment), and you want to restore it to the exported state.
To create an environment from an imported `environment.yml` file:
1. In the **Create Environment** dialog, click **Import**.
2. Set [configuration options](#environment-configuration-options) for the environment.
Environment names must be unique.
3. Browse your local files and select the `.yaml` or `.yml` file you want to import.
4. Click **Create Environment** to create the environment.
### Environment configuration options
When you create a new environment, you can configure it with the following options:
In the **Create Environment** dialog, you can import an `environment.yml` file to create the environment, create a new environment manually, or select a [quick start environment](#using-a-quick-start-environment).
1. In the **Create Environment** dialog, click **Create Manually**.
2. Set [configuration options](#environment-configuration-options) for the environment.
3. Click **Create Environment** to create the environment.
There are two situations in which you might want to import an environment:
* Someone has [exported their environment](/docs/getting-started/working-with-conda/environments#sharing-an-environment) to a `environment.yml` file and shared it with you, and you want to reproduce their environment on your machine.
* You have [exported an environment](#exporting-an-environment), and you want to restore it to the exported state.
To create an environment from an imported `environment.yml` file:
1. In the **Create Environment** dialog, click **Import**.
2. Set [configuration options](#environment-configuration-options) for the environment.
Environment names must be unique.
3. Browse your local files and select the `.yaml` or `.yml` file you want to import.
4. Click **Create Environment** to create the environment.
### Environment configuration options
When you create a new environment, you can configure it with the following options:
 Option
Description
Notes
**Location**
Choose where to create the environment. Select **Default** to use your default environment directory or **Custom** to specify a custom path.
Custom locations identify environments by path rather than name.
**Name**
Set a descriptive name for your environment to help identify its purpose.
Not used for custom location environments.
**Python version**
Select which version of Python to install in the environment.
**Packages**
Select packages to install with the **Search** box.
Additional packages can be installed after creation. See [Packages](/docs/anaconda-desktop/packages).
**Channels**
Configure which channels are accessible for the environment with the **Channels** button.
Channels determine where packages are downloaded from. See [Channels](/docs/anaconda-desktop/channels).
## Managing environments
You don't need to activate an environment to manage it in Anaconda Desktop.
### Opening an environment in an application
From an environment's details page, click **Open with...** to launch an application.
In the **Open with...** dialog, select an application:
* **notebook**: opens Jupyter Notebook
* **jupyterlab**: opens JupyterLab
Select **Set as default** to use the selected application as the default for future **Open with...** launches, then click **Open**.
### Cloning an environment
Attempting to clone the `base` environment can generate an incomplete environment, which can cause errors while using Desktop or conda. For these reasons, Anaconda Desktop does not allow you to clone your base environment.
To clone an environment:
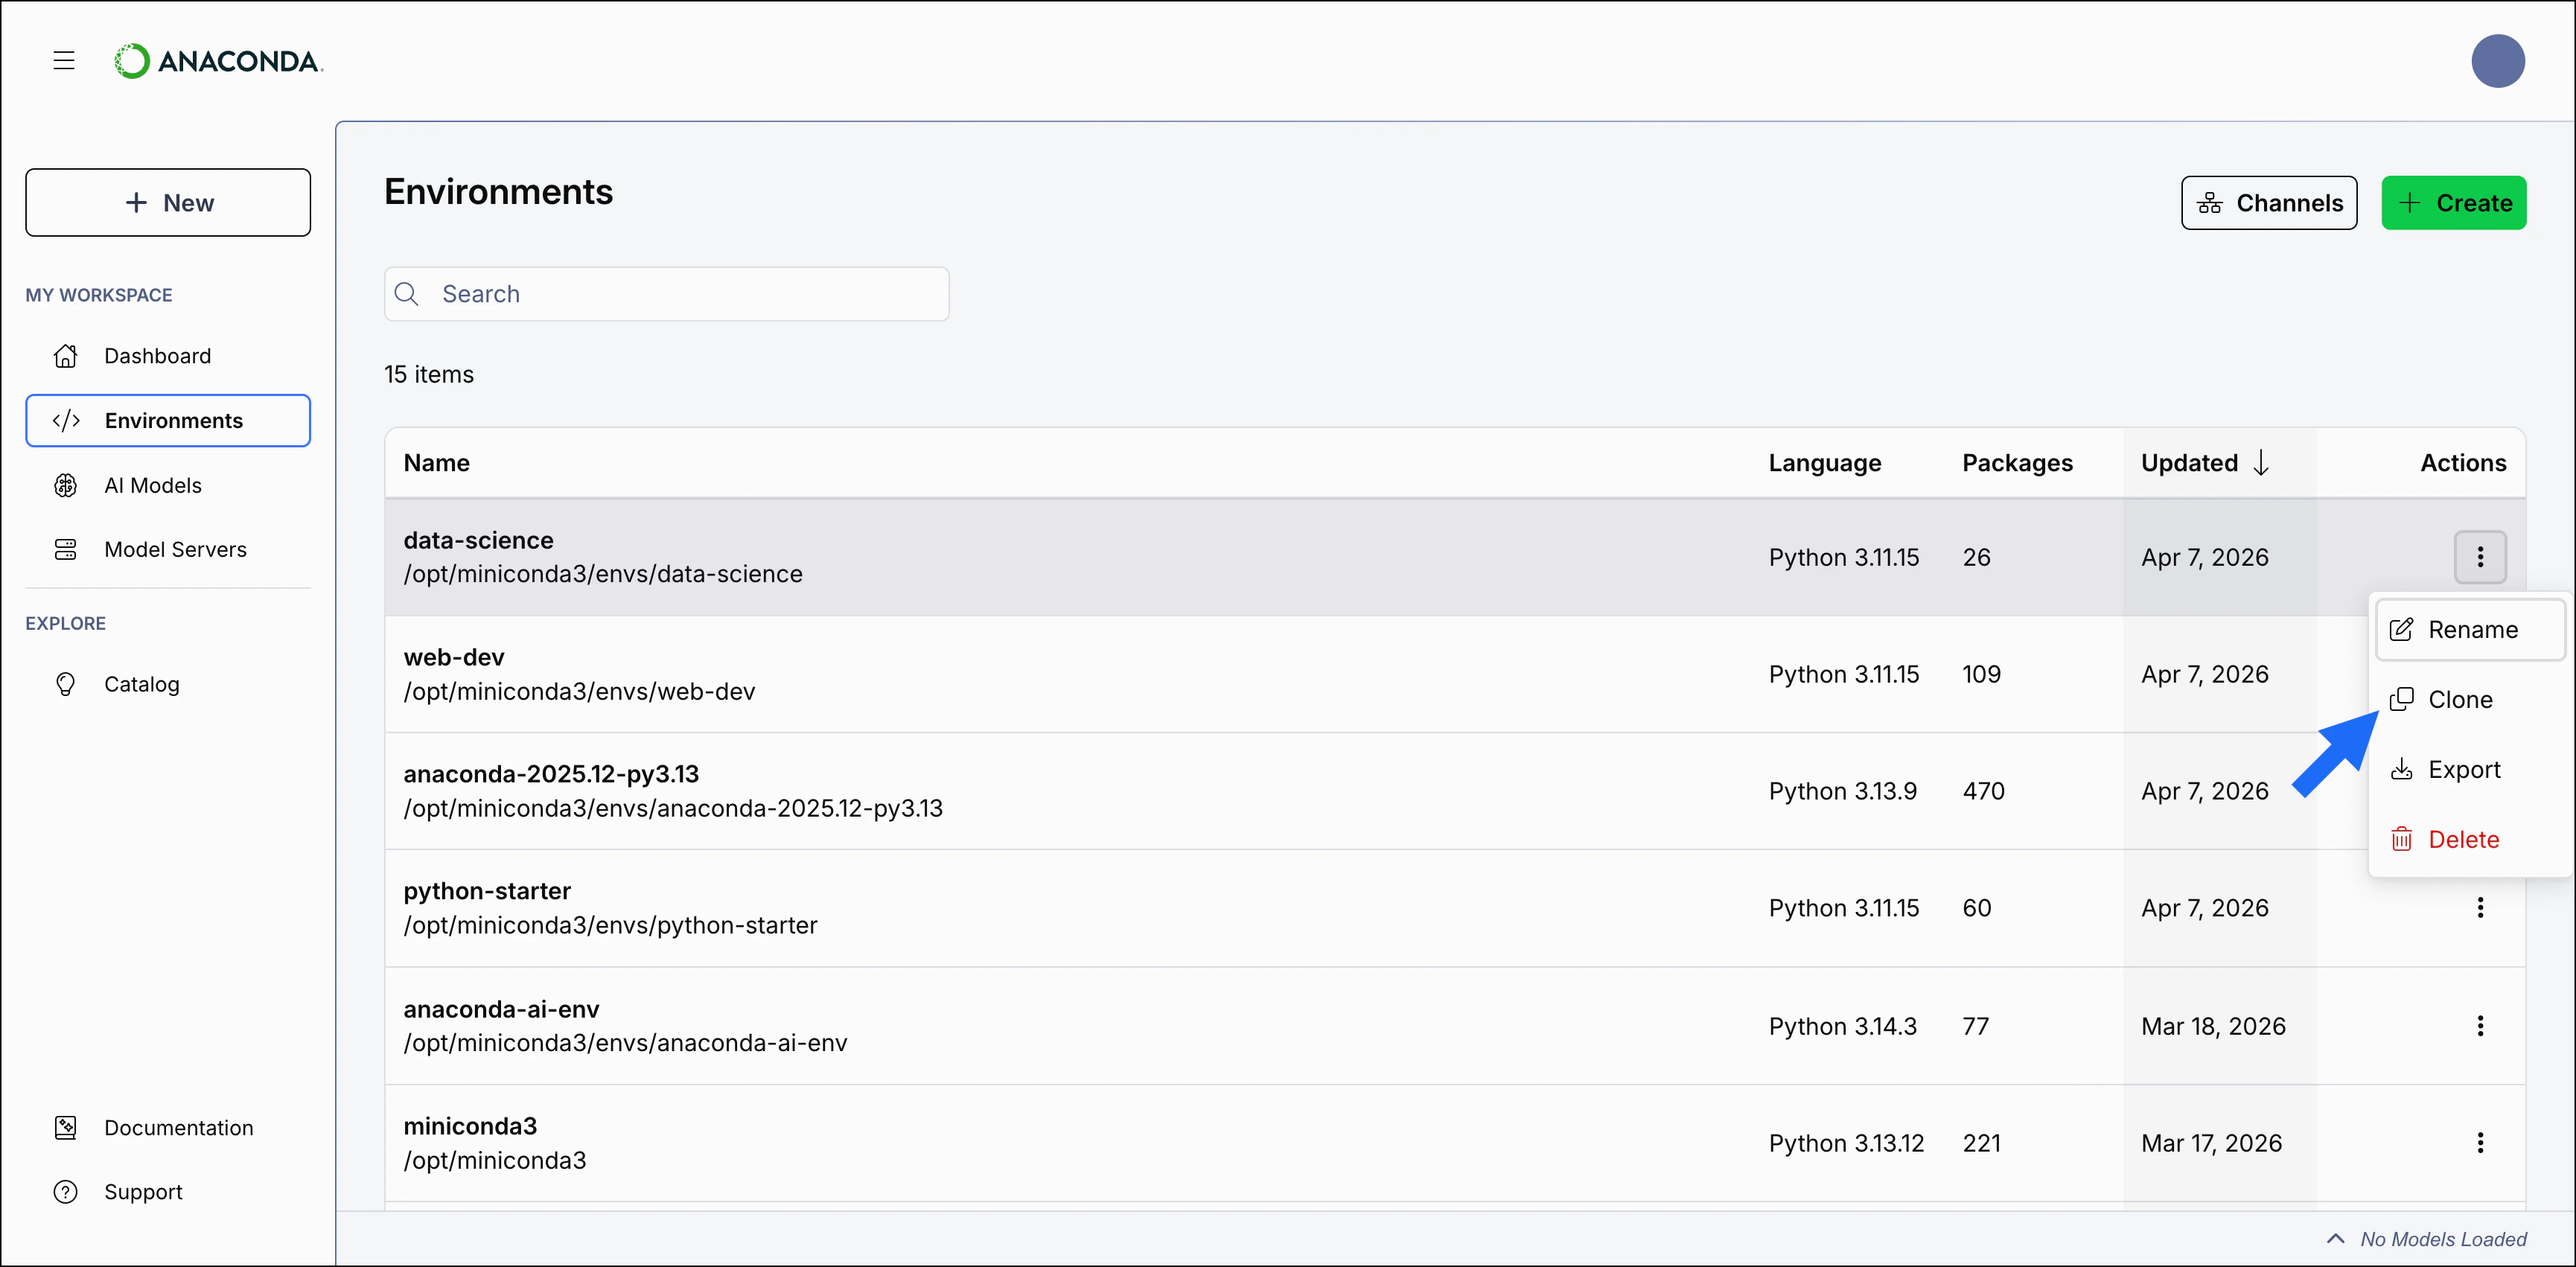
1. Click the **Actions** button in the environment's row and select **Clone**.
Option
Description
Notes
**Location**
Choose where to create the environment. Select **Default** to use your default environment directory or **Custom** to specify a custom path.
Custom locations identify environments by path rather than name.
**Name**
Set a descriptive name for your environment to help identify its purpose.
Not used for custom location environments.
**Python version**
Select which version of Python to install in the environment.
**Packages**
Select packages to install with the **Search** box.
Additional packages can be installed after creation. See [Packages](/docs/anaconda-desktop/packages).
**Channels**
Configure which channels are accessible for the environment with the **Channels** button.
Channels determine where packages are downloaded from. See [Channels](/docs/anaconda-desktop/channels).
## Managing environments
You don't need to activate an environment to manage it in Anaconda Desktop.
### Opening an environment in an application
From an environment's details page, click **Open with...** to launch an application.
In the **Open with...** dialog, select an application:
* **notebook**: opens Jupyter Notebook
* **jupyterlab**: opens JupyterLab
Select **Set as default** to use the selected application as the default for future **Open with...** launches, then click **Open**.
### Cloning an environment
Attempting to clone the `base` environment can generate an incomplete environment, which can cause errors while using Desktop or conda. For these reasons, Anaconda Desktop does not allow you to clone your base environment.
To clone an environment:
1. Click the **Actions** button in the environment's row and select **Clone**.
 2. Set the **Location** and **Name** for the new environment. See [configuration options](#environment-configuration-options) for more information.
Environment names must be unique.
3. Click **Clone** to create the new environment.
### Exporting an environment
When you export an environment, you create a `.yml` file that contains the environment's configuration. This file can be used as a back up for the environment, to recreate the environment on another machine, or to share the environment with other users.
To export an environment:
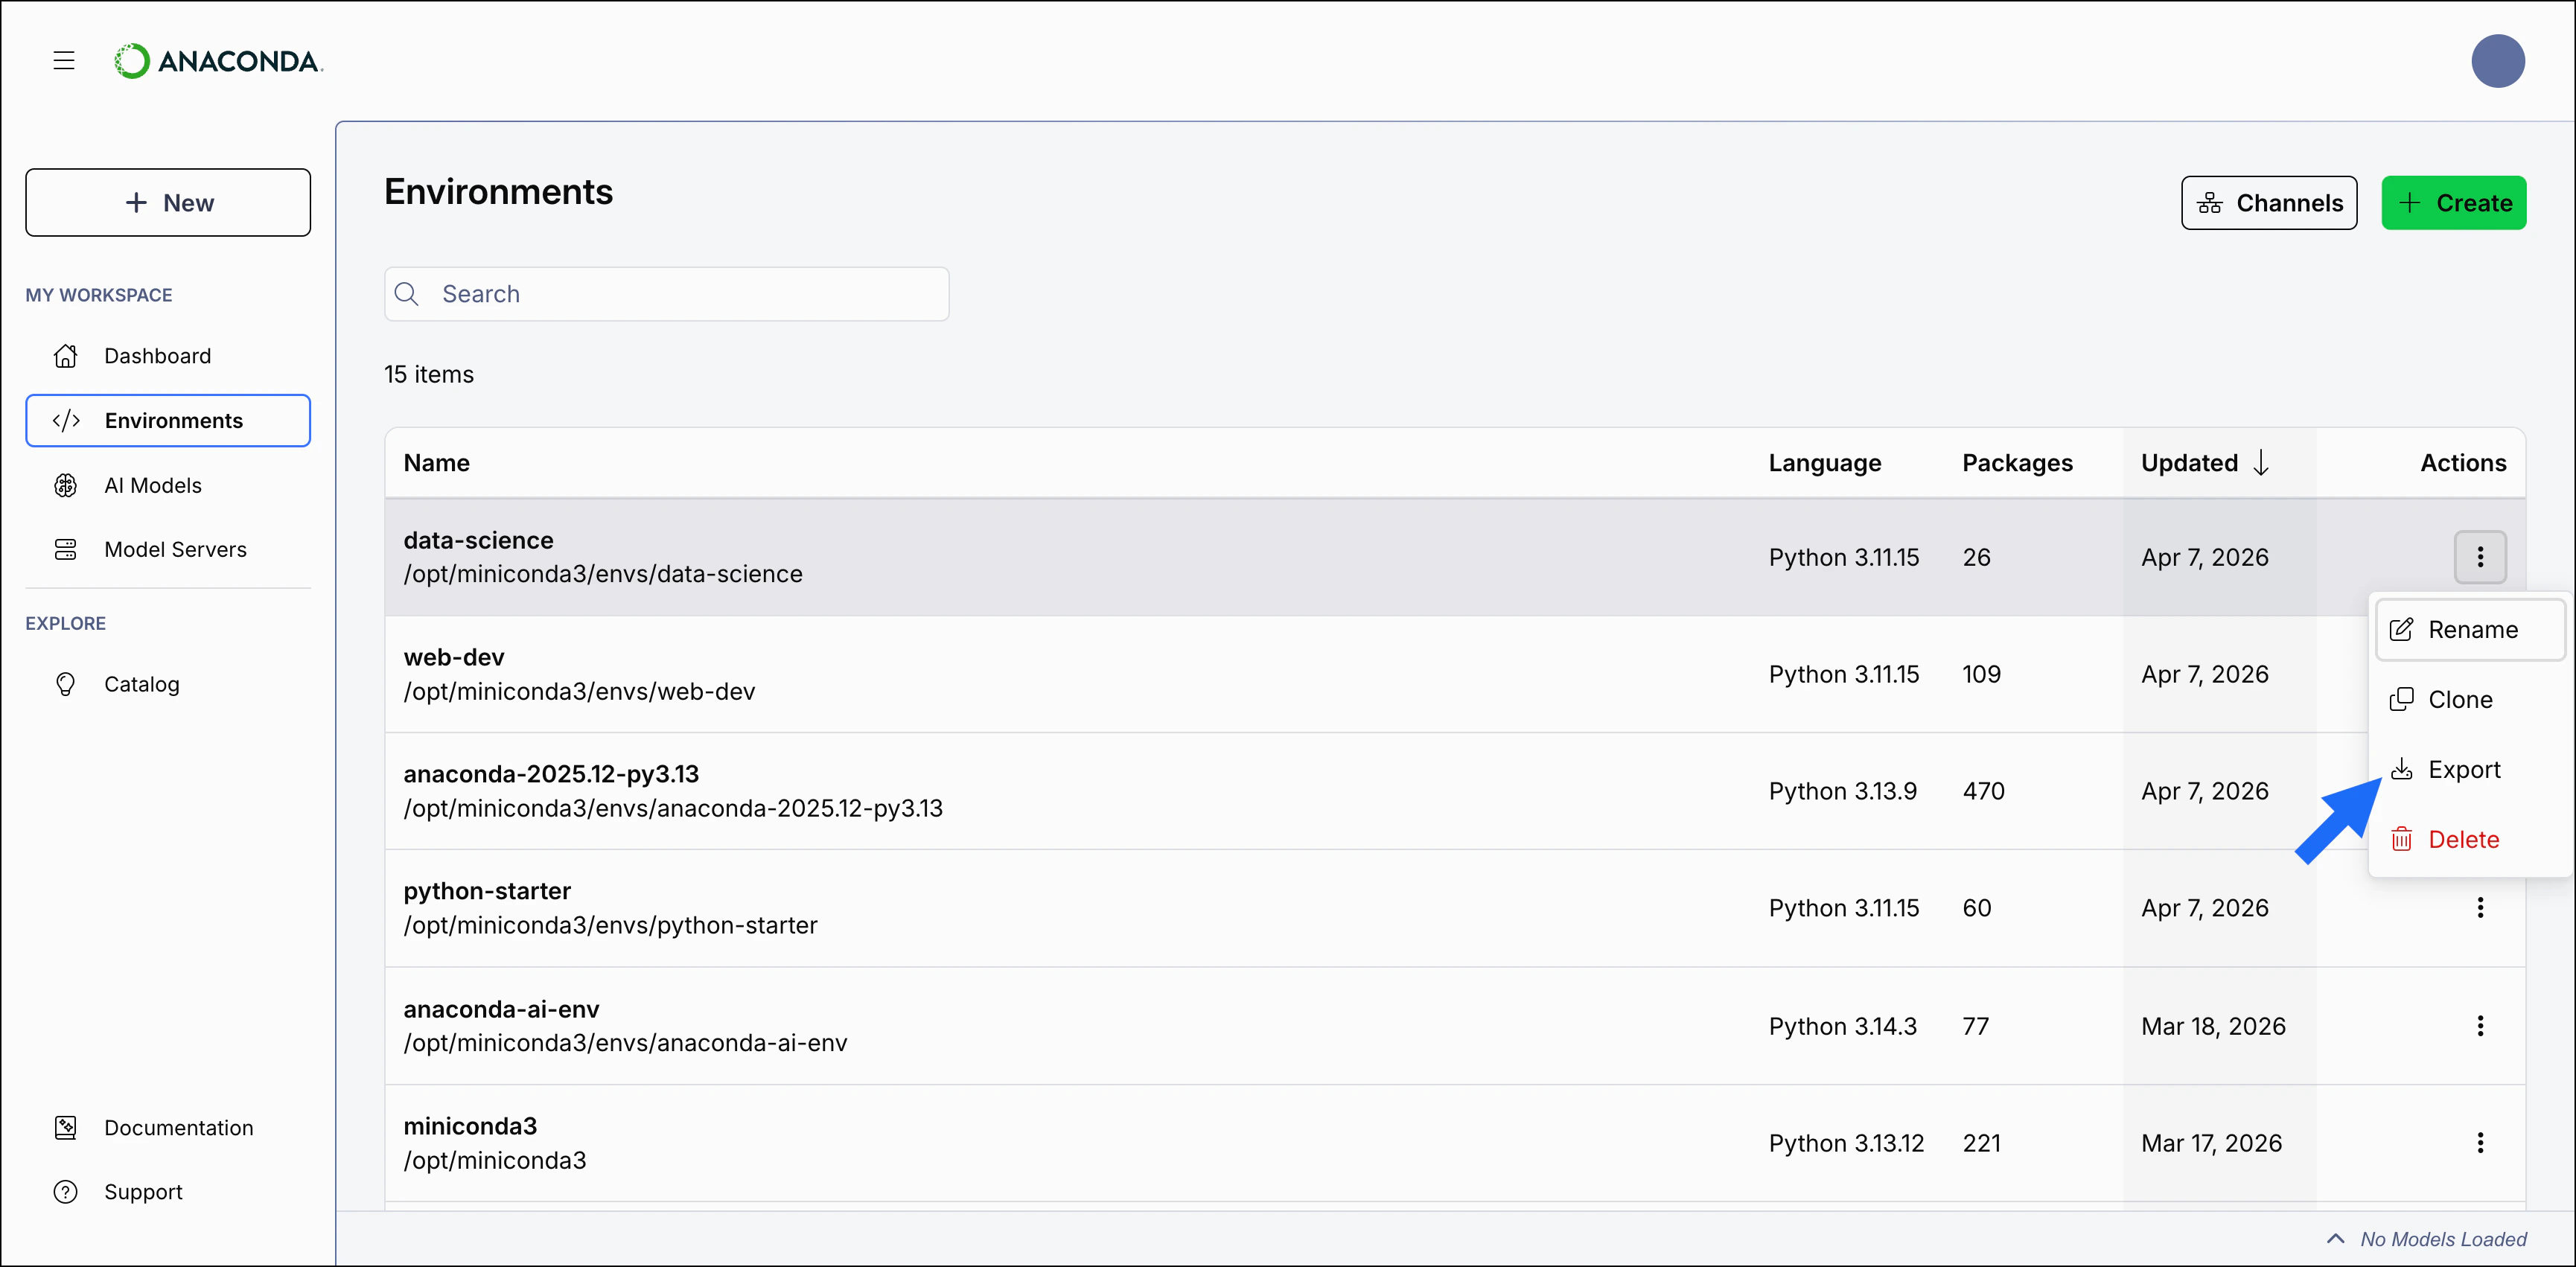
1. Click **Actions** beside the environment, then select **Export**.
2. Set the **Location** and **Name** for the new environment. See [configuration options](#environment-configuration-options) for more information.
Environment names must be unique.
3. Click **Clone** to create the new environment.
### Exporting an environment
When you export an environment, you create a `.yml` file that contains the environment's configuration. This file can be used as a back up for the environment, to recreate the environment on another machine, or to share the environment with other users.
To export an environment:
1. Click **Actions** beside the environment, then select **Export**.
 2. Using your system's Save dialog, enter a file name for your exported environment and choose a download location.
3. **Save** the file.
The exported environment file is saved to the selected location.
### Frozen environments
A frozen environment is an environment that has been marked as protected from modification. Frozen environments are identified by a lock icon in the environment list, and update and rename operations are disabled for them.
2. Using your system's Save dialog, enter a file name for your exported environment and choose a download location.
3. **Save** the file.
The exported environment file is saved to the selected location.
### Frozen environments
A frozen environment is an environment that has been marked as protected from modification. Frozen environments are identified by a lock icon in the environment list, and update and rename operations are disabled for them.
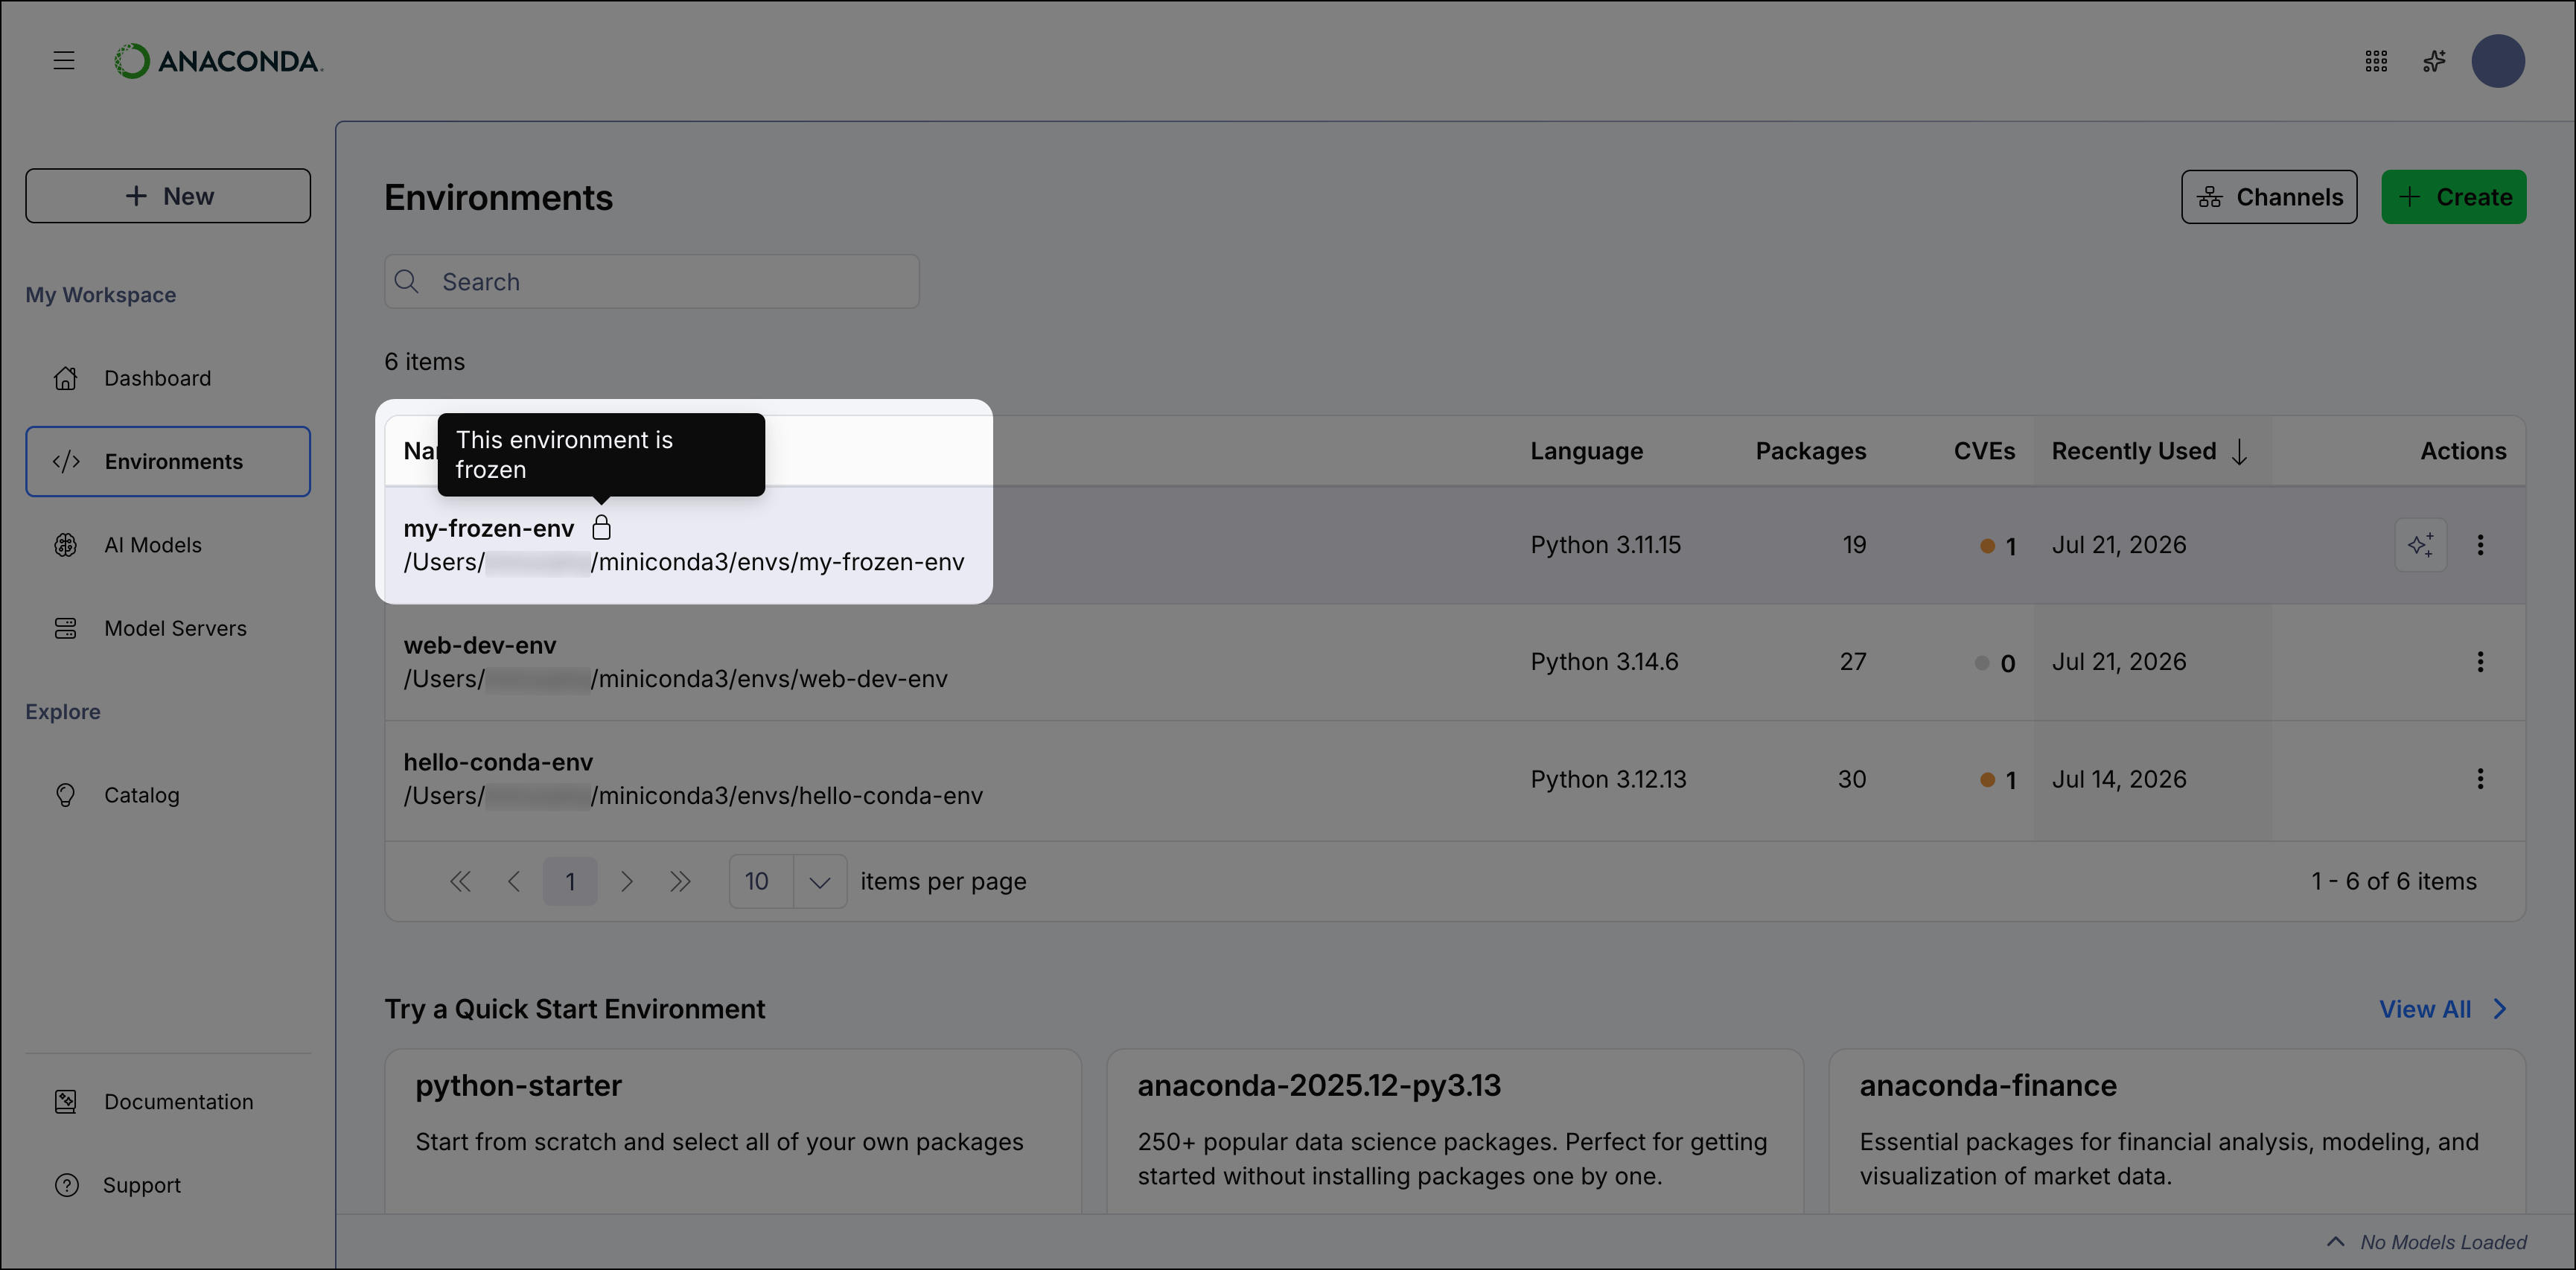 If you need a modifiable version of a frozen environment, [clone it](#cloning-an-environment) to create an unfrozen copy.
To modify a frozen environment directly, open [Anaconda Prompt](/docs/reference/glossary#anaconda-prompt) (Terminal on macOS/Linux) and use the `--override-frozen-env` flag:
```sh theme={null}
conda install --override-frozen-env -n
```
Replace `` with the name of the frozen environment.
If you need a modifiable version of a frozen environment, [clone it](#cloning-an-environment) to create an unfrozen copy.
To modify a frozen environment directly, open [Anaconda Prompt](/docs/reference/glossary#anaconda-prompt) (Terminal on macOS/Linux) and use the `--override-frozen-env` flag:
```sh theme={null}
conda install --override-frozen-env -n
```
Replace `` with the name of the frozen environment.
Replace `` with the package(s) to install.
Overriding a frozen environment bypasses protections that may be in place for a reason. Proceed with caution.
For more information on frozen environments, see the official [conda documentation](https://docs.conda.io/projects/conda/en/stable/user-guide/tasks/manage-environments.html#freezing-or-locking-an-environment).
### Deleting an environment
To delete an environment:
1. Click **Actions** beside the environment, then select **Delete**.
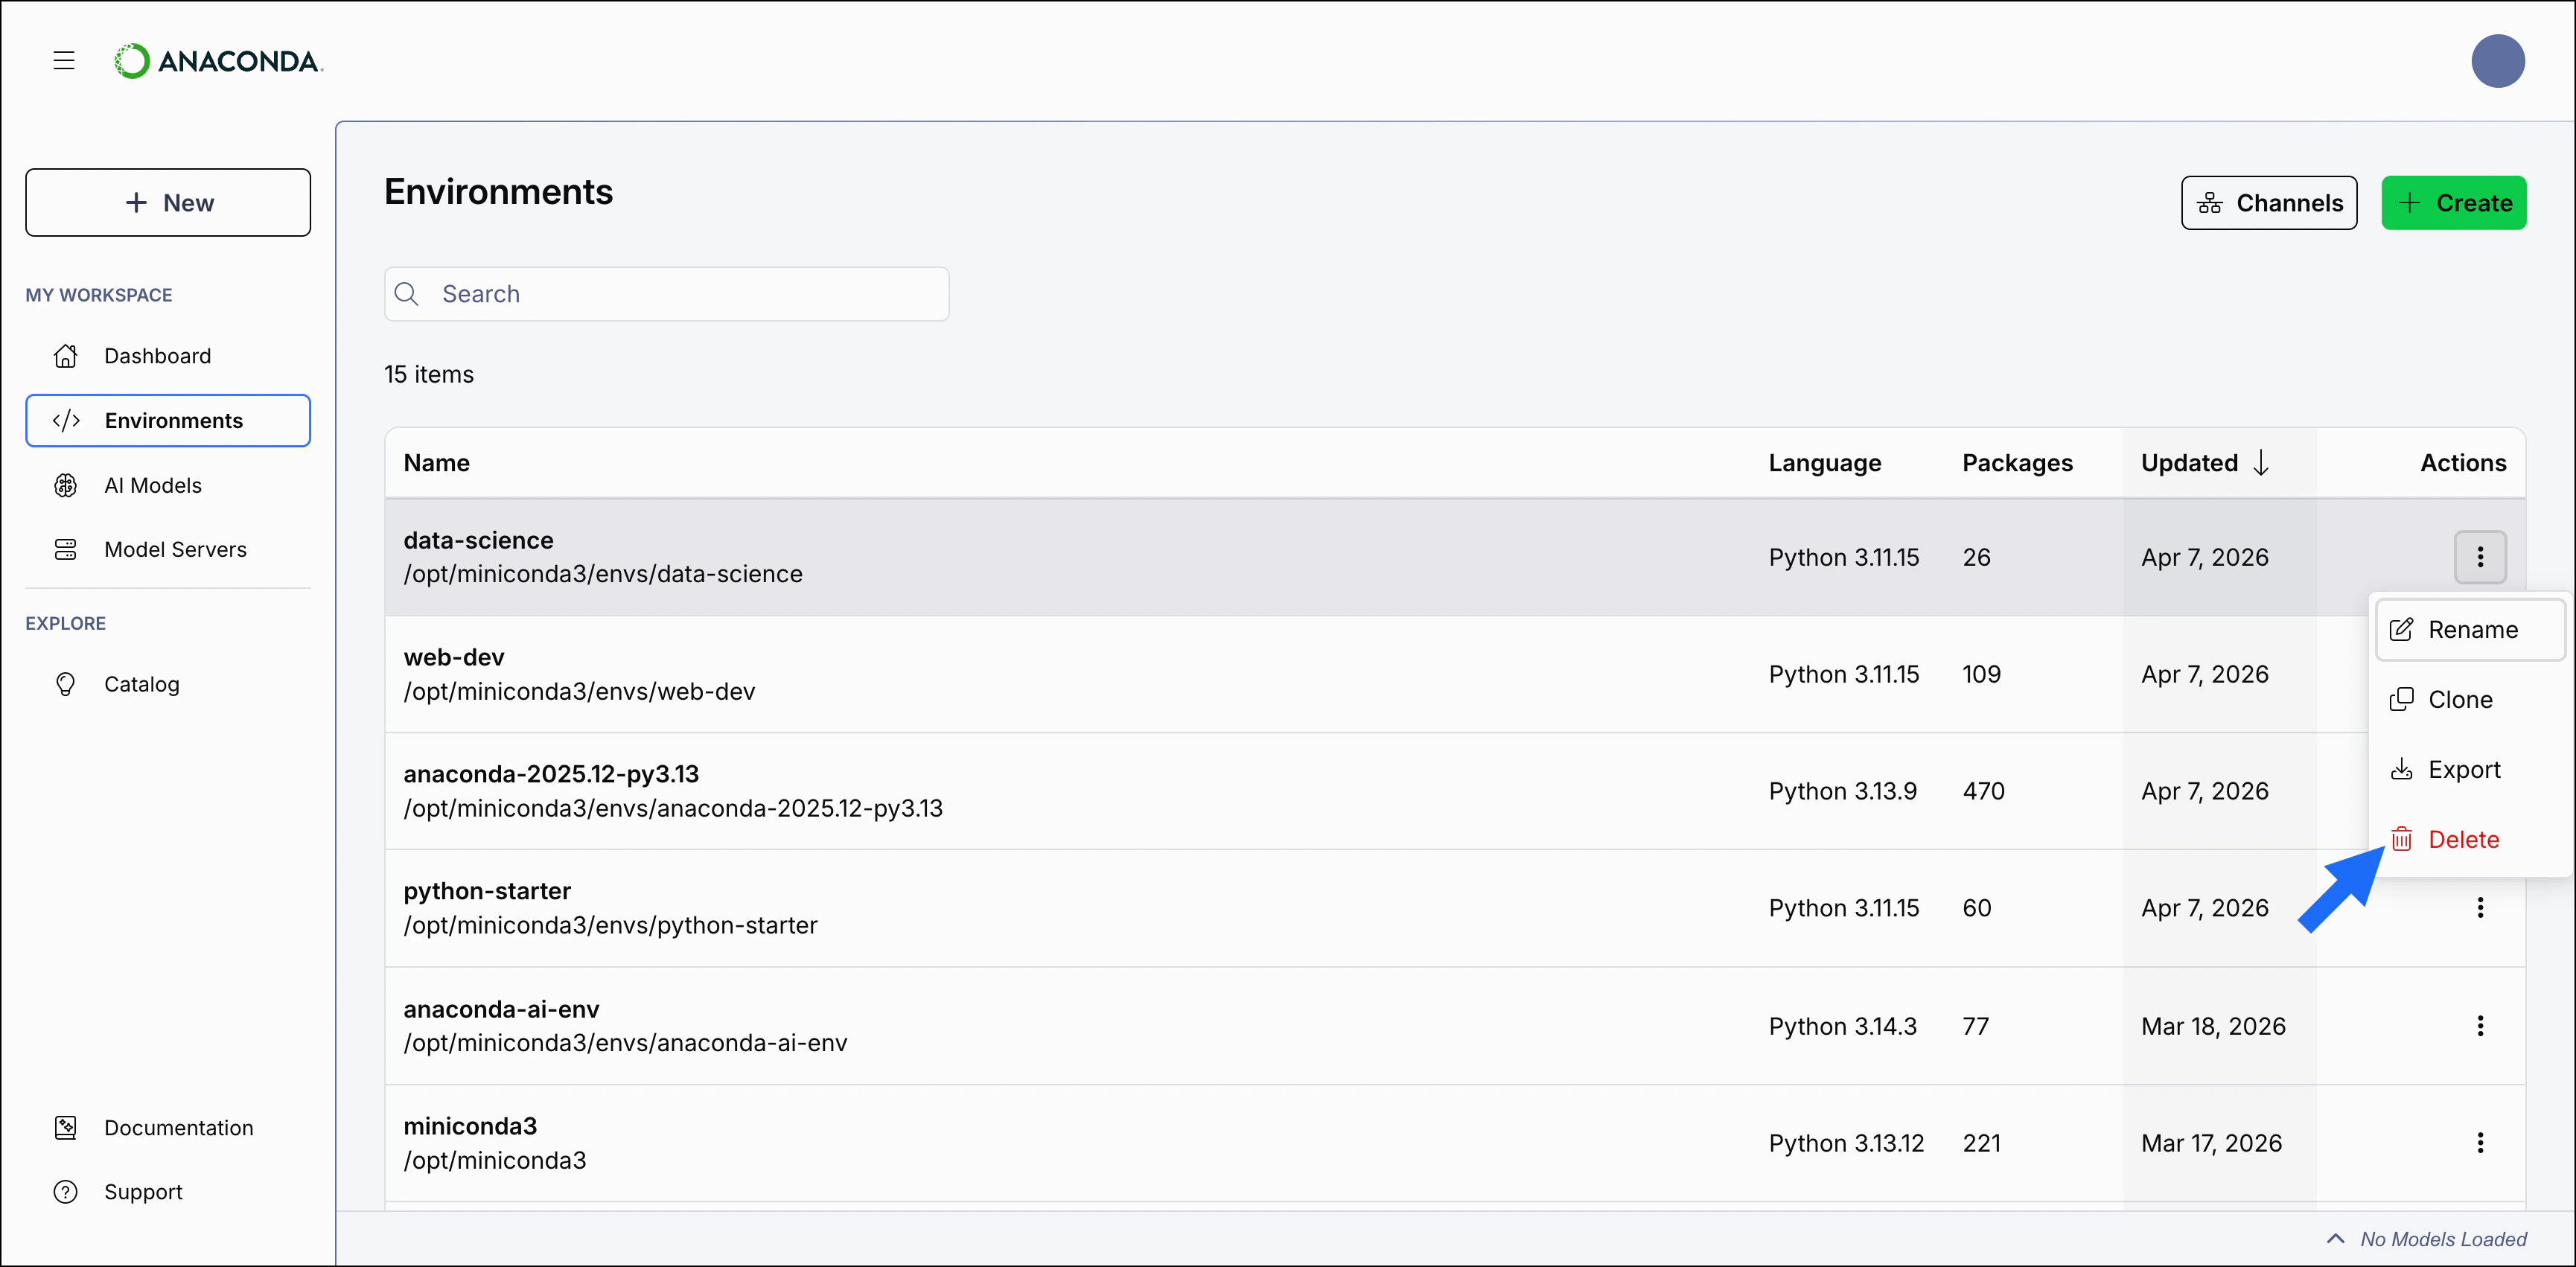 2. Click **Delete** again to confirm you want to delete the environment.
The environment is deleted and removed from your environments list.
2. Click **Delete** again to confirm you want to delete the environment.
The environment is deleted and removed from your environments list.